How to run a Level Loop using a Differential Level
The purpose of this video is to introduce the viewers to setting up a survey differential level and the processes of leveling to order to find the elevations of points. The survey level does not require batteries and functions by taking the differences in elevations between points. This video has two parts, the set-up process and leveling between points.
Join me on Social Media:
🖥️ Website: https://www.tamimi.biz
👥 Private Facebook Group: https://www.facebook.com/groups/iamasurveyor
📸 Instagram: https://www.instagram.com/ramitamimi
👔 LinkedIn: https://www.linkedin.com/ramitamimi
✉️ Email: rami@tamimi.biz
Part 1 – Setting up a Survey Level
Our level will be set up on an arbitrary point between the points we want to set up. One of these points is known as the Benchmark. This benchmark is established by either you or an older surveyor. The benchmark has a known record elevation, whether it is public record or your own records. The level is set up on a survey tripod and is leveled by adjusting the knobs on the bottom of the level. These knobs will move a bubble on the level around. We need this bubble to be leveled in the center to ensure our level is flat with the surface of the earth.
Part 2 – Using our Difference Level and Philadelphia Rod
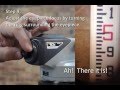
Once your level is leveled out, we can begin collecting data. Our initial reading will be on the benchmark. This will be considered our backsight reading. Using a Philadelphia Rod, we will measure where our cross hairs lay to find the difference between the ground elevation and the instrument height. The red numbers on the rod indicate feet, the large black numbers are the tenths of a foot, and the dashes in between indicate the hundredths of a foot. After taking the backsight reading on the benchmark, you will then add this to the elevation to get the instrument height. Then move to the next point and measure a foresight. This foresight is subtracted from the instrument height to give us a new elevation. In the video, we took a turn point by the gate to move closer to our sight. After finding the elevation, we moved the level towards the site. We reset the level and took a back sight on our turn point by the gate. With the new backsight reading, we then add it to the elevation of the turn point to find the new instrument height. After that, we took three side shots or rod shots on points green, orange, and blue. All of these are also considered foresights and should be subtracted for our second instrument height. Once we measure all the points, we will foresight the turn points again, move the level to an arbitrary location between the turn point and our original benchmark, relevel, backsight the turn point and foresight the benchmark. If all was done correctly, our elevation on the benchmark should match that of the record elevation.
About Professor Rami Tamimi:
Rami Tamimi is an American doctorate student at The Ohio State University working towards his Doctor of Philosophy in Geodetic Engineering. With over 8 years of experience in the Land Development Industry, his experience revolves around traditional field surveying, civil design work using AutoCAD Civil 3D, and geospatial technology including LiDAR, SONOR, and Photogrammetric data accusation and processing with the use of Unmanned Aircraft Systems or Drones. He is also a University Professor and creates instructional video content on YouTube.
Intro: (0:00)
How Differential Leveling Works: (0:21)
Leveling between Points: (7:18)
Outro: (12:03)
#Surveying #Leveling #Differential
Видео How to run a Level Loop using a Differential Level канала Rami Tamimi
Join me on Social Media:
🖥️ Website: https://www.tamimi.biz
👥 Private Facebook Group: https://www.facebook.com/groups/iamasurveyor
📸 Instagram: https://www.instagram.com/ramitamimi
👔 LinkedIn: https://www.linkedin.com/ramitamimi
✉️ Email: rami@tamimi.biz
Part 1 – Setting up a Survey Level
Our level will be set up on an arbitrary point between the points we want to set up. One of these points is known as the Benchmark. This benchmark is established by either you or an older surveyor. The benchmark has a known record elevation, whether it is public record or your own records. The level is set up on a survey tripod and is leveled by adjusting the knobs on the bottom of the level. These knobs will move a bubble on the level around. We need this bubble to be leveled in the center to ensure our level is flat with the surface of the earth.
Part 2 – Using our Difference Level and Philadelphia Rod
Once your level is leveled out, we can begin collecting data. Our initial reading will be on the benchmark. This will be considered our backsight reading. Using a Philadelphia Rod, we will measure where our cross hairs lay to find the difference between the ground elevation and the instrument height. The red numbers on the rod indicate feet, the large black numbers are the tenths of a foot, and the dashes in between indicate the hundredths of a foot. After taking the backsight reading on the benchmark, you will then add this to the elevation to get the instrument height. Then move to the next point and measure a foresight. This foresight is subtracted from the instrument height to give us a new elevation. In the video, we took a turn point by the gate to move closer to our sight. After finding the elevation, we moved the level towards the site. We reset the level and took a back sight on our turn point by the gate. With the new backsight reading, we then add it to the elevation of the turn point to find the new instrument height. After that, we took three side shots or rod shots on points green, orange, and blue. All of these are also considered foresights and should be subtracted for our second instrument height. Once we measure all the points, we will foresight the turn points again, move the level to an arbitrary location between the turn point and our original benchmark, relevel, backsight the turn point and foresight the benchmark. If all was done correctly, our elevation on the benchmark should match that of the record elevation.
About Professor Rami Tamimi:
Rami Tamimi is an American doctorate student at The Ohio State University working towards his Doctor of Philosophy in Geodetic Engineering. With over 8 years of experience in the Land Development Industry, his experience revolves around traditional field surveying, civil design work using AutoCAD Civil 3D, and geospatial technology including LiDAR, SONOR, and Photogrammetric data accusation and processing with the use of Unmanned Aircraft Systems or Drones. He is also a University Professor and creates instructional video content on YouTube.
Intro: (0:00)
How Differential Leveling Works: (0:21)
Leveling between Points: (7:18)
Outro: (12:03)
#Surveying #Leveling #Differential
Видео How to run a Level Loop using a Differential Level канала Rami Tamimi
Показать
Комментарии отсутствуют
Информация о видео
Другие видео канала
 Survey Leveling Calculations and Adjustment
 Setting Up the Automatic Level
 How does land surveying work?
 HOW TO SET ELEVATION BASED OFF OF A HUB || How to take elevation using a grade rod and a laser
 iPhone 13 Pro LiDAR vs. Survey Total Station Accuracy
 How to use a Laser level for Foundation and Block
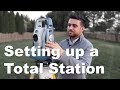 Setting up a Survey Total Station
 Reflectorless Total Station - Measuring Building Heights
 Survey Level Loop Notes Review
 Surveying Stake Out for Beginners
 Surveying 2 - Taking a level reading - OTEN Building & Construction
 Leveling Adjustment
 Drone Photogrammetry Image Processing - Carlson Photo Capture
 Profile Leveling Surveying
 Lines, Polylines, 3D Polylines, & Feature Lines | AutoCAD Civil 3D
 Level Loop Adj
 Field Notes for Surveying Leveling
 Resection Method in Surveying
 Reading the Level Rod