S1E10 Sprinter Van Conversion | Sheeting
Ep.10 BLOG POST + PRICE BREAKDOWN - http://www.jazmorton.com/van-conversion/ep-10-sheeting/
Season 1 Van Build : http://bit.ly/VanBuildS1
Season 2 Van Life : http://bit.ly/VanLifeS2
Van Build Blog : http://bit.ly/VanBuildBlog
All My Van Build Materials : http://bit.ly/VanMaterials
All My Van Build Tools : http://bit.ly/VanBuildTools
All My 2019 Camera Gear : http://bit.ly/JazCameraGear
2019 Camera Gear Quick List:
Main Vlog Camera : https://amzn.to/2Kxm9Wa
Secondary Camera : https://amzn.to/2JCUAYO
Main Vlog Lense : https://amzn.to/2N09xJ2
Cinematic Lense : https://amzn.to/2N00rwc
Versatile Lense : https://amzn.to/2N3kLN4
Camera Bag : https://amzn.to/2KtG7ky
My Drone : https://amzn.to/2N3viI0
Drone ND Filters : https://amzn.to/2xDcTre
Gopro Hero 7 Black : https://amzn.to/2JBKRC1
Gopro 7 Waterproof Housing : https://amzn.to/2XvG2DU
My Gimbal : https://amzn.to/2KsNOaM
Lacie 4TB HDD : http://amzn.to/2gmAZBj
Rode Video Micro Mic : https://amzn.to/2JAiQuk
T-Shirt Microphone : http://amzn.to/2zaEWN9
128GB SD Card : https://amzn.to/2L9CznV
Joby Gorillapod : https://amzn.to/2LIhKPT
Meike Battery Grip : https://amzn.to/2JwmuW9
Camera Cleaning Kit : https://amzn.to/2Lazq7m
FOLLOW ME:
Instagram : http://bit.ly/AddMeInsta
Facebook : http://bit.ly/AddMeFB1
Snapchat : http://bit.ly/AddMeSC
Website : https://www.jazmorton.com
Donate : https://www.jazmorton.com/donate/
▬▬▬▬▬▬▬▬▬▬▬▬▬▬▬▬▬▬▬
In this episode I show you exactly how the walls, ceiling and doors were sheeted. This episode was quite intricate in terms of making cuts very precise and measuring to the millimetre.
For the walls I used 4mm bracing ply, and riveted it to the metal van body with the help of my mate Hayden. I then applied 4 or 5 coats of Vivid white which was a semi gloss water based paint.
The ceiling was completely sheeted with pine VJ panels, which clip into each other. The front wall, shelving and door panels were also sheeted with the same panelling as the ceiling.
I applied 4 coats of danish oil combined with sanding in between each coat to get the really nice smooth finish on the timber. The sanding/staining process went like this:
1. Sand with 240 grit sandpaper
Apply 1st coat of danish oil.
2. Sand with 400 grit sandpaper.
Apply 2nd coat of danish oil.
3. Sand with 600 grit sandpaper.
Apply 3rd coat of danish oil.
4. Sand with 800 grit sandpaper.
Apply 4th coat of danish oil.
I highly recommend buying a proper mask to safely breathe whilst apply the danish oil. My mask only cost around $40 and it did a great job!
http://www.jazmorton.com/van-conversion/
▬▬▬▬▬▬▬▬▬▬▬▬▬▬▬▬▬▬▬
HAYDEN’S SOCIALS
https://www.instagram.com/haydenseyes/
https://www.youtube.com/channel/UCcfFvTqYnKTH615MjycX8yA
▬▬▬▬▬▬▬▬▬▬▬▬▬▬▬▬▬▬▬
MUSIC
Song 1 - A I K O by Venice
Song 2 - Sweet Dreams by Pr0Beats
Song 3 - You Lose by Pr0Beats
Song 4 - Calling by Pr0Beats
Song 5 - Palmera by Pr0Beats
Venice
Soundcloud - https://soundcloud.com/veniceav
Right Beat Radio
Soundcloud - https://soundcloud.com/pr0beats
#vanbuild #vanlife #travelwithjaz
Видео S1E10 Sprinter Van Conversion | Sheeting канала Jaz Morton
Показать
Комментарии отсутствуют
Информация о видео
Другие видео канала
 S1E11 Sprinter Van Conversion | Cabinetry
 Van Build TIMELAPSE | DIY VW Crafter Conversion | Vanlife
 Camperización furgoneta vivienda Peugeot Boxer, Furgoplon
 S1E12 Sprinter Van Conversion | Plumbing Pt. 2 + Gas
 How to build a Camper Van / Studio - DIY conversion (Step by step)
 S1E14 Sprinter Van Conversion | Bed + Floor
 S1E1 Sprinter Van Conversion | Stripping the Van
 S1E5 Sprinter Van Conversion | Shower + Toilet
 OUR VAN CONVERSION (FULL TIME LAPSE) | DIY Sprinter Van Conversion | #VanLife UK
 Van Tour | COUPLE design UNIQUE vanbuild, BEAUTIFUL wood work and SLIDING BED
 VAN TOUR | A Photographer & Travel Consultant Live Full-Time On The Road
 S1E7 Sprinter Van Conversion | Plumbing Pt. 1
 They Built a Crazy Amazing Adventure Sprinter Van - Van Tour
 MEGA CAMPER VAN TOUR #VANLIFE
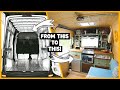 HOW TO EASILY CONVERT A VAN INTO AN OFF-GRID TINY HOME | START TO FINISH!
 04 Mercedes Sprinter 4x4 Van conversion Camper. Final result.
 Super Smart Camper Van Design with Lots of Great Ideas! Full Tour
 HOW TO BUILD A BATHROOM IN A VAN | Ep 3 Sprinter Van Conversion
 S1E8 Sprinter Van Conversion | Solar Install 580W