Co2 Laser Upgrade - Laser & Red Dot Beam Combiner for CNC Co2 Laser Machine
Installing A Laser Beam Combiner on an 80W Co2 Laser - Cloudray E Series 1st Mirror Mount(Including Beam Combiner) - https://amzn.to/2JaF1r0
The LED Red Dot side mounted on the laser head/nozzle is a not a true indication of the location of the laser beam from the lens and requires regular adjusting due to its poor mounting position. If the material height is out of focus then with the current setup the red dot will not be pointing accurately at the laser focus position. So to fix this problem today I will installing Laser Combiner from Coludray Laser. http://bit.ly/MW-Cloudray
A LIST OF UPGRADE PARTS I USED CAN BE FOUND HERE: https://mwlaser.com.au/upgrades-for-red-black-chinese-laser/
So what is a Laser Beam Combiner?
(00:26) The laser beam combiner used a Zinc Selenide (ZnSe) lens positioned at a 45 degree angle directly in front of the laser beam. The Co2 laser has is non-visible and its wavelength will pass through this ZnSe lens, however optical light is reflected off it. So the unit has a red laser beam shining onto the 45 degree surface of the ZnSe lens so that it combines the two beams together onto mirror one, then both the visible red dot laser and invisible Co2 laser beams bounce through all the mirrors and onto the working surface you can see where the red laser is situated and where the CO2 laser will be fired.
(01:05) You will find the link to the unit below
For Cloudray on eBay visit - http://bit.ly/Cloudray-mw
What’s in the kit?
(01:15) The parts I have are SET B of the Cloudray E Series 1st Mirror Mount Beam Combiner, it includes the following items.
1x Mirror and mount with base and beam combiner
1x Cloudray Laser Si 25mm Mirror
1x Cloudray Laser Beam Combiner ZnSe 25mm Lens
1x Red Dot Pointer
(01:40) Setup of the Combiner Unit - Installing the Lens and Mirror
(04:02) Installation
I started by removing the power and making sure the machine was safe to start working on. Conveniently I was also in the process of changing out a faulty power supply unit so I was certain there wasn’t going to be any nasty surprises while working at the laser tube side of the machine.
I loosened the lasertube and moved it out of the way by about 40-50mm so it was out of the way to safely work near it without damage.
(07:00) Positioning the Mirror Mount Base
(08:21) Explanation of the mirror base positioning - Diagram
(09:08) Mounting the mirror mount in its new position
(10:23) Installing the red dot pointer, removing the Old red dot pointer and running 5V power to New red dot pointer.
(11:20) Perform a mirror alignment and align the red dot pointer at the same position as the laser pulse at mirror #1. Demonstration of moving the laser head with the newly mounted laser beam combiner unit.
(12:06) Thanks for visiting Matt’s Workshop. Don’t forget to subscribe and put on the notification bell to be notified of new videos as I release them.
You will find my social media links below as well as a link to Cloudray Laser’s Website.
www.cloudraylaser.com
Until next time, take care
Cheers Matthew
Visit Matt's Workshop at http://www.mwlaser.com.au/
Instagram https://www.instagram.com/mattsworkshop/
Facebook https://www.facebook.com/mattsworkshopau
== If you'd like to support my channel financially so I can continue to produce content you can do via PayPal here --- https://www.paypal.me/mattsworkshop --- Thank You ====
Any questions please feel free to email me matt@mwlaser.com.au or leave a comment below.
NOTE: This is not a paid production or advertisement. The featured product was provided by Cloudray to allow me to provide viewers with an installation / how-to video.
Видео Co2 Laser Upgrade - Laser & Red Dot Beam Combiner for CNC Co2 Laser Machine канала MW Laser
Показать
Комментарии отсутствуют
Информация о видео
Другие видео канала
 RDWorks Learning Lab 99 Beam Combiners Investigated
 Co2 Laser Focus, Power & Speed Settings - Laser Ramp Test for CNC Co2 Laser Machines
 Boss Laser Mirrors Alignment Instructions
 Adding a Camera to your Laser
 40W Laser Cutter Upgrade: Making a Red Dot "Cut Indicator" - Ec-Projects
 Co2 Laser, AIR COMPRESSOR Upgrade, Setup & Testing, With Ultimate Air Assist
 DIY Homemade Laser Cutter
 K40 co2 Laser : Alles was ihr wissen müsst! Wie macht er sich nach einem Jahr?
 05 Build Your Own Laser - Tube & Mirror Mounts + Stepper Motors
 Custom Family Ornaments | Made $1400 With Pre-Order only using my Glowforge laser engraver
 Ep6: Laser Beam Alignment. The DIY CO2 Laser Cutter / Engraver Build Series
 Installing Z Axis Focus Sensor on Co2 Laser - CNC Co2 Laser Machine
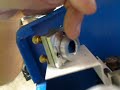 The Short K40 Laser Alignment Video is Here!
 Add A Red Dot Pointer To A K40 Laser Cutter
 60 Watt CO2 Laser stopped firing. How to troubleshoot.
 My Heavily Modified K40 C02 Laser | $400 Ebay C02 Laser Upgrades
 $2000 Chinese Laser Cutter Engraver Co2 60 watt 60w was it worth it?
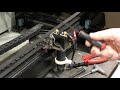 RDWorks Learning Lab 179 Fitting the Cloudray C series Adjustable Head Bracket
 6090- 100 watt laser finding the right cut in plywood
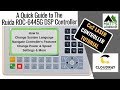 Tutorial - Ruida RDC-6445G DSP Controller from Cloudray Laser. - CNC Co2 Laser Machine