Combine two internet (WAN) connections with pfSense.
This quick tutorial would demonstrate how you can combine two Internet connections into one under 2 mins.
Since this is a quick guide, I expect you to know the essential workings of pfSense, please.
Here's the tutorial in written form.:
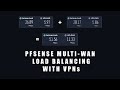
0. Setup both of your WAN (Internet) connections on your pfSense. (For this demonstration, I used two Internet connections, one I've named 'WAN,' which is a 50 Mbps symmetrical connection, and the second I've named 'WAN1' which was also symmetrical connection, 20 Mbps up and down.)
1. After successfully connecting both Internet connections to your pfSense. Go to System 🡆 Routing 🡆 Gateway Groups 🡆 and click 'Add' in the green box.
2. In 'Group Name' field write a name of your liking (in the video, I've used the phrase, 'MultiWAN')
3. Now in Gateway Priority, change the Tier from 'Never' to 'Tier 1' for both of your Internet connections (for reference, you can watch the video at around 0:49)
4. Now click 'Save' & 'Apply Changes.'
5. From here, go to Firewall 🡆 Rules 🡆 LAN 🡆 in 'IPv4' column, click on the pencil icon 🡆 and then click 'Display Advanced' (for reference, you can watch the video from 1:07)
Now lots of options would pop up, but you would need only to change one 'Gateway' option here, from 'Default' to 'MultiWAN' (or whatever group name you had given to your connections in the second step.)
If you use auto or hybrid NAT rule generation. You're done here, you can do a speedtest to test if the two connections indeed have been merged.
**
You're only required to follow these steps if you're using 'Manual Outbound NAT rule generation.' under Firewall 🡆 NAT 🡆 Outbound.
Basically, when you add a new WAN connection on your pfSense, you also have to create a network address translation (NAT) rule, so the Internet can flow from your local network to the public Internet and vice-versa.
Now this NAT rule generation happens on its own when you use 'Automatic' or 'Hybrid Outbound NAT rule generation.' But suppose you're using a manual NAT rule generation. In that case, all you've to do is copy your existing WAN rule and change its interface to WAN1 (or whatever name you've given to your second internet connection) click 'Save' & 'Apply Changes' that's it!!!😊
Say your first Internet connection is named 'WAN' and your local network is in the range of 192.168.1.0/24.
When you would go to Firewall 🡆 NAT 🡆 Outbound, you would see that under 'Mappings' section. One of the rules would be mentioned as 'WAN – 192.168.1.0/24 – * – * – * – WAN address – * – ['A path crossing' symbol] – Auto created rule - LAN to WAN'
You would have to copy this rule by pressing the icon between pencil and bin icons (reference at 1:39), and in the new page that would open, change the 'Interface' from 'WAN' to the name of your second internet connection (like I had named my second internet connection, 'WAN1,' so I changed this interface setting from 'WAN' to 'WAN1.')
After doing this click save and apply changes, and you would be all set.
***
P.S.: I hope I have provided you with clear instructions. One thing, this kind of setup works best with the kind of applications that can take advantage of aggregate Internet connections such as 'Steam' or your download managers (they can be p2p or http(s) based.) Perhaps any app that uses multiple connections to a fetch a file over the Internet would gain benefit (perhaps!)
However, don't expect that load balancing (sharing) between the two connections would magically double your Internet speeds on all web-based applications. Heck even on YouTube (which I guess only uses a single connection to fetch videos?) your streaming experience more or less would remain the same.
Видео Combine two internet (WAN) connections with pfSense. канала Palwinder Singh
Since this is a quick guide, I expect you to know the essential workings of pfSense, please.
Here's the tutorial in written form.:
0. Setup both of your WAN (Internet) connections on your pfSense. (For this demonstration, I used two Internet connections, one I've named 'WAN,' which is a 50 Mbps symmetrical connection, and the second I've named 'WAN1' which was also symmetrical connection, 20 Mbps up and down.)
1. After successfully connecting both Internet connections to your pfSense. Go to System 🡆 Routing 🡆 Gateway Groups 🡆 and click 'Add' in the green box.
2. In 'Group Name' field write a name of your liking (in the video, I've used the phrase, 'MultiWAN')
3. Now in Gateway Priority, change the Tier from 'Never' to 'Tier 1' for both of your Internet connections (for reference, you can watch the video at around 0:49)
4. Now click 'Save' & 'Apply Changes.'
5. From here, go to Firewall 🡆 Rules 🡆 LAN 🡆 in 'IPv4' column, click on the pencil icon 🡆 and then click 'Display Advanced' (for reference, you can watch the video from 1:07)
Now lots of options would pop up, but you would need only to change one 'Gateway' option here, from 'Default' to 'MultiWAN' (or whatever group name you had given to your connections in the second step.)
If you use auto or hybrid NAT rule generation. You're done here, you can do a speedtest to test if the two connections indeed have been merged.
**
You're only required to follow these steps if you're using 'Manual Outbound NAT rule generation.' under Firewall 🡆 NAT 🡆 Outbound.
Basically, when you add a new WAN connection on your pfSense, you also have to create a network address translation (NAT) rule, so the Internet can flow from your local network to the public Internet and vice-versa.
Now this NAT rule generation happens on its own when you use 'Automatic' or 'Hybrid Outbound NAT rule generation.' But suppose you're using a manual NAT rule generation. In that case, all you've to do is copy your existing WAN rule and change its interface to WAN1 (or whatever name you've given to your second internet connection) click 'Save' & 'Apply Changes' that's it!!!😊
Say your first Internet connection is named 'WAN' and your local network is in the range of 192.168.1.0/24.
When you would go to Firewall 🡆 NAT 🡆 Outbound, you would see that under 'Mappings' section. One of the rules would be mentioned as 'WAN – 192.168.1.0/24 – * – * – * – WAN address – * – ['A path crossing' symbol] – Auto created rule - LAN to WAN'
You would have to copy this rule by pressing the icon between pencil and bin icons (reference at 1:39), and in the new page that would open, change the 'Interface' from 'WAN' to the name of your second internet connection (like I had named my second internet connection, 'WAN1,' so I changed this interface setting from 'WAN' to 'WAN1.')
After doing this click save and apply changes, and you would be all set.
***
P.S.: I hope I have provided you with clear instructions. One thing, this kind of setup works best with the kind of applications that can take advantage of aggregate Internet connections such as 'Steam' or your download managers (they can be p2p or http(s) based.) Perhaps any app that uses multiple connections to a fetch a file over the Internet would gain benefit (perhaps!)
However, don't expect that load balancing (sharing) between the two connections would magically double your Internet speeds on all web-based applications. Heck even on YouTube (which I guess only uses a single connection to fetch videos?) your streaming experience more or less would remain the same.
Видео Combine two internet (WAN) connections with pfSense. канала Palwinder Singh
Показать
Комментарии отсутствуют
Информация о видео
Другие видео канала
 Pfsense "Double" Your Internet Speed | Load Balancing Multi-WAN With VPNs
 Dual WAN Setup w/ pfSense - Trying to turn TWO TERRIBLE ISPs into ONE DECENT one.
 Double Your Internet Speed (Really) With pfSense Load Balancing
 pfSense Site to Site VPN
 your home router SUCKS!! (use pfSense instead)
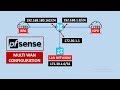 MULTI WAN PFSENSE CONFIGURATION
 SDWAN Failover and Bandwidth Aggregation Explained
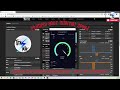 Multiply your internet speed with two isp connections with pfSense WAN Group Load Balancing
 pfSense Dual Wan Failover setup guide for redundant WAN connections.
 How-to Change Starlink DNS Server For Extra Speed & Privacy
 Configuring pfsense Firewall Rules For Home
 Tutorial: pfsense and pfBlockerNG Version 3
 SSL Encryption on Your Home Server the SIMPLE WAY - Cloudflare, pfSense, HAProxy, ACME https setup
 Firewall Feature Comparison 2020: pfsense, Untangle, USG, Dream Machine, UDM Pro, & EdgeRouter chart
 pfSense Tutorial Multi WAN & Policy Based Routing
 Double Internet Speed with OpenVPN and channel bonding to a Linux VPS
 25 - Source NAT + Uso Multiples IPs WAN - Curso PfSense
 Setup Guide / Tutorial for pfBlockerNG 2.2.5 on pfsense with DNSBL & GeoIP Blocking
 Virtual Tour of Our Network and How We Keep Things Secure Using the pFSense Firewall
 Combine Multiple Connections On Pc To Increase Internet Bandwidth, Speed!