Replacing a Kitchen Sink | Ask This Old House
Ask This Old House plumbing and heating expert Richard Trethewey helps a homeowner update a kitchen sink.
SUBSCRIBE to This Old House: http://bit.ly/SubscribeThisOldHouse
Time: 1 hour
Cost: $150
Skill Level:
Moderate
Tools List for Replacing a Kitchen Sink:
Adjustable open end wrench
Adjustable pliers
Screwdriver
Putty knife
Oscillating saw
Caulking gun
Shopping List:
Sink
Faucet
Sink Strainer
Silicone Caulking
Plumber’s Putty
New Shutoffs (if needed)
New Drain Piping (if needed)
Steps:
1. Turn the water to the faucet off at the shutoffs under the sink.
2. Open the faucet to ensure the shutoffs hold. If they don’t, turn off the water at the water main.
3. Use an adjustable open end wrench to remove the supply hoses from the shut off valves.
4. Use adjustable pliers to disconnect the drain piping from the bottom of the sink.
5. Use a screwdriver to loosen the clips that secure the sink to the countertop.
6. Use a putty knife to gently release the connection between the sink and the countertop.
7. Dryfit the new sink in place and modify the opening as needed with an oscillating saw.
8. With the sink out of the opening, perform any repairs needed to the shutoff valves, or replace them.
9. Install the new faucet to the sink based on the faucet manufacturer’s recommendations. Install the water supply hoses while the sink is out too.
10. Turn the sink upside down and spread a bead of silicone caulking around the edge of the sink.
11. Set the sink into the countertop opening.
12. Attach new clips between the sink and countertop.
13. Modify drain piping as needed for the new sink.
14. Spread a bead of plumber’s putty around the sink strainer, set in place, and secure from underneath with a nut. Remove the excess putty that squeezes out.
15. Attach the flexible supply hoses to the shutoff valves and tighten with a wrench.
16. Compete the new drain piping to the sink strainer.
17. Turn the water back on and check for leaks.
Resources:
Richard installed the All-in-One Top Mount Stainless Steel Kitchen sink kit, which is manufactured by Glacier Bay and available at The Home Depot (https://www.homedepot.com/).
All of the supplies for this project, including plumber's putty, shut off valves, flux, solder, supply hoses, and PVC drain piping are available at home centers and plumbing supply stores.
About Ask This Old House TV:
Homeowners have a virtual truckload of questions for us on smaller projects, and we're ready to answer. Ask This Old House solves the steady stream of home improvement problems faced by our viewers—and we make house calls! Ask This Old House features some familiar faces from This Old House, including Kevin O'Connor, general contractor Tom Silva, plumbing and heating expert Richard Trethewey, and landscape contractor Roger Cook.
Follow This Old House and Ask This Old House:
Facebook: http://bit.ly/ThisOldHouseFB
Twitter: http://bit.ly/ThisOldHouseTwitter
http://bit.ly/AskTOHTwitter
Pinterest: http://bit.ly/ThisOldHousePinterest
Instagram: http://bit.ly/ThisOldHouseIG
http://bit.ly/AskTOHIG
Tumblr: http://bit.ly/ThisOldHouseTumblr
For more on This Old House and Ask This Old House, visit us at: http://bit.ly/ThisOldHouseWebsite
Replacing a Kitchen Sink | Ask This Old House
https://www.youtube.com/user/thisoldhouse/
Видео Replacing a Kitchen Sink | Ask This Old House канала This Old House
Показать
Комментарии отсутствуют
Информация о видео
Другие видео канала
 How to Replace a Kitchen Sink and Faucet | Ask This Old House
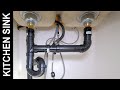 How to Connect a Kitchen Sink Drain
 How To Avoid Mistakes When Picking A Sink For Your Kitchen
 How to Repair a Cast-Iron Toilet Flange | Ask This Old House
 How to Install a Natural Gas Barbecue Grill | Ask This Old House
 How to Add a Shower to a Claw-Foot Tub | Ask This Old House
 How to Upgrade a Bathroom Vanity | Ask This Old House
 How to Install a Kitchen Sink
 How to Install a Drop-in Kitchen Sink
 How To Install a New Kitchen Sink , Faucet and Drain
 How to Secure an Undermount Kitchen Sink | Ask This Old House
 Solving a Spitting Faucet Mystery | Ask This Old House
 How to Snake/Unclog Kitchen Sink Drain, Stop Sewer Smell
 How to Install a New Toilet | Ask This Old House
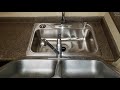 How to Replace Kitchen Sink. Step by Step!
 How to Install a Gas Clothes Dryer | Ask This Old House
 How to Install an Anti-Scald Shower Valve | Ask This Old House
 How to Replace a Vinyl Floor with Ceramic Tile | Ask This Old House
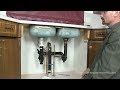 How To Remove a Kitchen Sink
 How to Install a Basement Bathroom | Ask This Old House