Arduino Tutorial: Arduino NRF24L01 Wireless Tutorial with Arduino Uno
Do you want to add wireless capability to your Arduino Projects? Using the NRF24L01+ module is a very easy and reliable way to do so. This tranceiver module works at the 2.4GHz band and it is extremely easy to use with any Arduino board, like the Arduino Uno, the Arduino Mega or the Arduino Nano. The cost of module is less than 3$ which makes this module irresistible!
--------------------
WHERE TO BUY
--------------------
1. NRF24L01: http://educ8s.tv/part/NRF24L01
2. Cheap Arduino Uno: http://educ8s.tv/part/ArduinoUno
3. Powerbank: http://educ8s.tv/part/Powerbank
4. Wires: http://educ8s.tv/part/Wires
Full disclosure: All of the links above are affiliate links. I get a small percentage of each sale they generate. Thank you for your support!
In this video we are going to build a simple project just to demonstrate how easy it is to add wireless capability to our Arduino Projects. I have two Arduinos here. This one is sending some data every second, and the other one is receiving the data and displaying it at the serial monitor. As you can see this one way communication is working fine and the range is very good, I can easily get more than 10 meters! The theoretical range that we can achieve is about 100 meters.
The NRF24L01 module is a low cost bi-directional transceiver module. The cost of it is less than 3$! You can find a link for it in the description of the video. It operates at the 2.4GHz band and it can achieve at a data rate of 2Mbits! Impressive isn't it? It uses the SPI interface in order to communicate with Arduino, so it is very easy to use with it. We have to connect 7 of the 8 pins of the module in order to make it work with Arduino.
Unfortunately we can't plug the module in the breadboard so we are going to use male to female wires in order to connect the module to Arduino. Pin number 1 of the module is GND. You have to connect it to Arduino Ground. The next pin is Vcc. You have to connect it to the 3.3V output of the Arduino Uno. Be careful! Do not connect it to 5V or you will destroy your module! The third pin is named CE and you can connect it to any digital pin you like. In this example I am going to connect it to digital pin 7. Pin 4 is CS and you can connect to any digital pin as well. I am going to connect to digital pin 8. The next pin is SCK which goes to digital pin 13 of the Arduino Uno. The next pin is MOSI which goes to digital pin 11 and the last pin in MISO which goes to digital pin 12. That's it!
--------------------
LIBRARY
--------------------
https://github.com/TMRh20/RF24
--------------------
CODE OF THE PROJECT
--------------------
http://educ8s.tv/nrf24l01/
--------------------
Quiz of Knowledge Android Game
--------------------
You can download my latest Android Game which is called Quiz of Knowledge here:
📥 http://bit.ly/QuizOfKnowledge
--------------------
MORE PROJECTS
--------------------
Arduino Datalogger: https://www.youtube.com/watch?v=oei3Y6tOhVI
Arduino Weather Station Project: https://www.youtube.com/watch?v=9jN-3DtS1RI
Arduino Nokia 5110 LCD Display: https://www.youtube.com/watch?v=aDwrMeu4k9Y
Arduino OLED display tutorial: https://www.youtube.com/watch?v=A9EwJ7M7OsI
DIY Arduino: https://www.youtube.com/watch?v=npc3uzEVvc0
--------------------
ABOUT EDUC8S.TV
--------------------
Educ8s.tv is a Youtube channel and website which is dedicated in developing high quality videos about DIY hardware and software projects. In this channel we develop projects with Arduino, Raspberry Pi, we build robots and simple electronic circuits. Check out our website as well for more information: http://www.educ8s.tv
--------------------
SUBSCRIBE ON YOUTUBE
--------------------
Never miss a video: https://www.youtube.com/subscription_center?add_user=educ8s
Видео Arduino Tutorial: Arduino NRF24L01 Wireless Tutorial with Arduino Uno канала educ8s.tv
--------------------
WHERE TO BUY
--------------------
1. NRF24L01: http://educ8s.tv/part/NRF24L01
2. Cheap Arduino Uno: http://educ8s.tv/part/ArduinoUno
3. Powerbank: http://educ8s.tv/part/Powerbank
4. Wires: http://educ8s.tv/part/Wires
Full disclosure: All of the links above are affiliate links. I get a small percentage of each sale they generate. Thank you for your support!
In this video we are going to build a simple project just to demonstrate how easy it is to add wireless capability to our Arduino Projects. I have two Arduinos here. This one is sending some data every second, and the other one is receiving the data and displaying it at the serial monitor. As you can see this one way communication is working fine and the range is very good, I can easily get more than 10 meters! The theoretical range that we can achieve is about 100 meters.
The NRF24L01 module is a low cost bi-directional transceiver module. The cost of it is less than 3$! You can find a link for it in the description of the video. It operates at the 2.4GHz band and it can achieve at a data rate of 2Mbits! Impressive isn't it? It uses the SPI interface in order to communicate with Arduino, so it is very easy to use with it. We have to connect 7 of the 8 pins of the module in order to make it work with Arduino.
Unfortunately we can't plug the module in the breadboard so we are going to use male to female wires in order to connect the module to Arduino. Pin number 1 of the module is GND. You have to connect it to Arduino Ground. The next pin is Vcc. You have to connect it to the 3.3V output of the Arduino Uno. Be careful! Do not connect it to 5V or you will destroy your module! The third pin is named CE and you can connect it to any digital pin you like. In this example I am going to connect it to digital pin 7. Pin 4 is CS and you can connect to any digital pin as well. I am going to connect to digital pin 8. The next pin is SCK which goes to digital pin 13 of the Arduino Uno. The next pin is MOSI which goes to digital pin 11 and the last pin in MISO which goes to digital pin 12. That's it!
--------------------
LIBRARY
--------------------
https://github.com/TMRh20/RF24
--------------------
CODE OF THE PROJECT
--------------------
http://educ8s.tv/nrf24l01/
--------------------
Quiz of Knowledge Android Game
--------------------
You can download my latest Android Game which is called Quiz of Knowledge here:
📥 http://bit.ly/QuizOfKnowledge
--------------------
MORE PROJECTS
--------------------
Arduino Datalogger: https://www.youtube.com/watch?v=oei3Y6tOhVI
Arduino Weather Station Project: https://www.youtube.com/watch?v=9jN-3DtS1RI
Arduino Nokia 5110 LCD Display: https://www.youtube.com/watch?v=aDwrMeu4k9Y
Arduino OLED display tutorial: https://www.youtube.com/watch?v=A9EwJ7M7OsI
DIY Arduino: https://www.youtube.com/watch?v=npc3uzEVvc0
--------------------
ABOUT EDUC8S.TV
--------------------
Educ8s.tv is a Youtube channel and website which is dedicated in developing high quality videos about DIY hardware and software projects. In this channel we develop projects with Arduino, Raspberry Pi, we build robots and simple electronic circuits. Check out our website as well for more information: http://www.educ8s.tv
--------------------
SUBSCRIBE ON YOUTUBE
--------------------
Never miss a video: https://www.youtube.com/subscription_center?add_user=educ8s
Видео Arduino Tutorial: Arduino NRF24L01 Wireless Tutorial with Arduino Uno канала educ8s.tv
Показать
Комментарии отсутствуют
Информация о видео
Другие видео канала
 #73 nRF24L01 Send (and receive) data with your Arduino!
 LoRa Module VS nRF24 VS Generic RF Module || Range & Power Test
 Arduino Wireless Communication – NRF24L01 Tutorial
 NRF24L01+ Setup With Arduino Nanos
 #37 Advanced Tutorial for NRF24L01 and Arduino #1
 DIY Radio Controller - Arduino & NRF24 + amplified antenna
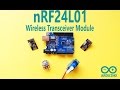 Arduino Communication with NRF24L01 Wireless Transceiver Module
 Which radio module? NRF24, LoRa, CC1101, HC12, 433MHz, HC05
 Arduino ST7789 Display Tutorial
 How To Build an Arduino Wireless Network with Multiple NRF24L01 Modules
 Arduino + NRF24 simple tutorial and range test
 How to create a simple Touchscreen GUI || Arduino LCD & Touchscreen Tutorial
 The nRF24L01 - Wireless Joystick for Arduino Robot Car with nRF24L01+
 BitBastelei #229 - ICStation.com RF24 Funkmodule
 NRF24L01+ Wireless Transceiver Module: Getting Started (NRF24L01)
 Pixy 2 Machine Vision Camera Review with Arduino
 Arduino LCD Tutorial ST7920
 ESP32 Internet Radio Update
 I2C Part 1 - Using 2 Arduinos