Honda CRF450 Engine Teardown | 2005 Honda CRF450 Engine Rebuild Project | Partzilla.com
Check out the Wiseco Garage Buddy kit for the Honda CRF450R here: http://partzil.la/Honda-CRF450-Garage-Buddy-Kit
If you’re going to rebuild the engine on a Honda CRF450R, you have to get it apart first, and that’s what we’re doing here. In this video, we’ll show you how to remove the engine on your CRF450R, then disassemble the top end on the CRF45R, and then perform a bottom end teardown on our CRF450R.
The process begins with engine removal. We’ll drain the fluids first and then tackle the bolts one at a time. We’ll drop out the exhaust, the radiators, and the carburetor before pulling the engine out of the frame. Now there’s a trick to this part: you need to turn the motor a certain way to get it out of the frame.
See this CRF450 frame diagram to identify many of the bolts that bisect the motorcycle: https://www.partzilla.com/catalog/honda/motorcycle/2005/crf450r-a/frame-05?utm_source=youtube&utm_medium=video&utm_campaign=description_btf
See how the radiators are connected here: https://www.partzilla.com/catalog/honda/motorcycle/2005/crf450r-a/radiator-05?utm_source=youtube&utm_medium=video&utm_campaign=description_btf
See how the swingarm is mounted here: https://www.partzilla.com/catalog/honda/motorcycle/2005/crf450r-a/swingarm?utm_source=youtube&utm_medium=video&utm_campaign=description_btf
With the engine removed, we’ll start getting it torn down. We’ll start by getting off the valve cover and finding top dead center. Then we'll go after the cylinder head and the piston, and you’ll need to be patient here because you need to loosen the bolts incrementally to relieve the torque on the bolts evenly. With this part done, we’ll get our first good look and the valves, piston, and cylinder walls.
See the Honda CRF450 cylinder head diagram here: https://www.partzilla.com/catalog/honda/motorcycle/2005/crf450r-a/cylinder-head?utm_source=youtube&utm_medium=video&utm_campaign=description_btf
See the camshaft and valve assembly: https://www.partzilla.com/catalog/honda/motorcycle/2005/crf450r-a/camshaft-valve?utm_source=youtube&utm_medium=video&utm_campaign=description_btf
The CRF450 piston diagram is here: https://www.partzilla.com/catalog/honda/motorcycle/2005/crf450r-a/crankshaft-piston?utm_source=youtube&utm_medium=video&utm_campaign=description_btf
Next, we’re digging deep into the engine to tear down the bottom end of the motor. This will involve spitting the crankcase halves.
We’ll start with the clutch and move from one side of the engine to the other, tackling the water pump, the stator, and the flywheel, which will require a special tool to remove. Then we’ll go after the shifting mechanism. At that point, we’ll split the cases. John has some trouble getting the case halves apart, but he’ll guide you though his thinking as he works through getting the motor cracked open.
Then we’ll grab a handful of transmission and pop out the crankshaft to finish off this phase of the project.
See the Honda CRF450 clutch diagram here: https://www.partzilla.com/catalog/honda/motorcycle/2005/crf450r-a/clutch?utm_source=youtube&utm_medium=video&utm_campaign=description_btf
See the crankcase here: https://www.partzilla.com/catalog/honda/motorcycle/2005/crf450r-a/crankcase?utm_source=youtube&utm_medium=video&utm_campaign=description_btf
The CRF450 transmission diagram is here: https://www.partzilla.com/catalog/honda/motorcycle/2005/crf450r-a/transmission?utm_source=youtube&utm_medium=video&utm_campaign=description_btf
VIDEO HIGHLIGHTS:
Introduction - 0:00
Draining the fluids - 1:10
Removing the seat - 3:30
Removing the fuel tank - 3:40
Removing the fender - 4:40
Removing exhaust - 6:00
Removing radiators - 7:10
Disconnecting the carburetor - 10:10
Disconnecting the clutch - 11:20
Removing the ignition coil - 13:00
Unbolting the engine - 13:15
Disconnecting the swingarm - 15:00
Removing the motor - 17:30
Removing the valve cover - 19:30
Finding top dead center - 20:00
Removing the cam chain tensioner - 21:35
Removing the cam assembly holder - 22:45
Unbolting the head - 23:45
Removing the head - 24:30
Unbolting the cylinder - 25:20
Removing the piston - 26:30
Removing the clutch - 2:45
Removing the clutch basket - 36:50
Removing the crankcase cover - 37:45
Removing the stator - 39:45
Removing the flywheel - 42:15
Removing the crankshaft gear - 44:15
Splitting crankcase halves - 37:35
Removing the transmission - 53:15
Removing the crankshaft - 54:15
Shop for OEM Honda motorcycle parts here: https://www.partzilla.com/catalog/honda/motorcycle?utm_source=youtube&utm_medium=video&utm_campaign=description_btf
Talk to us:
Twitter: https://twitter.com/partzilla
Facebook: https://www.facebook.com/Partzilla
Instagram: https://www.instagram.com/partzilla/
In the video we’re working with a 2005 Honda CRF450R, but you may have similar steps for your Honda dirt bike. If you’re not sure whether these steps apply to your machine, leave a comment and we’ll get back to you.
Видео Honda CRF450 Engine Teardown | 2005 Honda CRF450 Engine Rebuild Project | Partzilla.com канала Partzilla
Показать
Комментарии отсутствуют
Информация о видео
Другие видео канала
 Honda CRF450 Bottom End Rebuild | 2005 Honda CRF450-R Engine Rebuild Part 4 | Partzilla.com
 Honda Grom Upgrades | Honda Grom Top End Build | Honda Grom Aftermarket Upgrades | Partzilla.com
 How to Clean Honda CRF Carbs | Honda CRF 450R | Partzilla.com
 How To Rebuild the Top End on a 2019+ Kawasaki KX450 | Part 1: Engine Disassembly
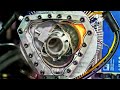 See Thru Liquid Piston Rotary Engine - In Slow Motion
 Yamaha YFZ450R Top End Rebuild | Partzilla.com
 How To Adjust the Valves on a 2002-2008 Honda CRF450R
 Honda Goldwing Fork Seal Replacement | Partzilla.com
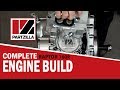 Yamaha Raptor 700R Engine Build | Partzilla.com
 Turn Gasoline Into Fuel Injected Diesel Engine
 Honda CRF 250 / 450 Crankcase, crank shaft, balancer, transmission service - Parts in Description
 Rekluse Z-start Pro Auto clutch CRF450 Install and Review
 Honda CRF450 Bottom End Teardown | 2005 Honda CRF450-R Engine Rebuild Part 3 | Partzilla.com
 Yamaha YFZ450R Top End Rebuild Part 2: Rebuild | Partzilla.com
 Inside Chase Sexton's Factory Honda CRF450 - Motocross Action Magazine
 Honda Grom Top End Build | Honda Grom Big Bore Kit Installation | Partzilla.com
 Honda Rancher 350 Front Brake Cylinder Rebuild | Partzilla.com
 O.G. 2 STROKE LEGEND CARL LEGUIA'S 2002 SERVICE HONDA CR500AF RIPPA!
 Yamaha R6 Engine Rebuild Part 3: Head Install & Final Steps | Partzilla.com
 Honda CRF450R Top End Rebuild | Part 1