Inexpensive Backyard Patio | Easier Patio Install | Less Time & Energy | Backyard DIY | Paver Pads
This DIY paver patio cost us less than $900 (2016) to install in our backyard. We used foam paver pads to eliminate the need for gravel, which eliminated a lot of the work. We worked on this project one summer and included our two teens in the process, making it a fun project for the whole family.
If you are looking to enjoy your backyard this summer, but don't have the funds for a big professional patio install, this is a great option. We used this patio for three seasons before we moved. It held up very well ( and we have cold snowy winters). We filled in the spaces between the blocks with sand each season.
This is also helpful if you are looking to stay on a budget or determined to pay cash for home repairs and DIYS and don't want to go into debt for it.
➡ Paver Pads at Lowes ~ https://www.lowes.com/pl/Paver-base-panels-Stones-pavers-Pavers-retaining-walls-Lawn-garden/4294612587
*Links are not affiliated*
➡ Here is some edging similar to what we used. I am having a hard time finding the exact same edging. We did this project in 2016. ~ https://www.homedepot.com/p/ProFlex-6-ft-Paver-Edging-in-Black-1260-HD/203706944
Our blocks were 16" by 16" each, 8 blocks long by 7 blocks wide or 128"(10.67 Ft.) by 112" (9.33 Ft.) The border is 16 inches all around extended from the patio portion. The 10 by 12 gazebo fits just over the patio portion.
Patio cost breakdown, not including gazebo and table set; (2016)
Paver pads: $254 Lowes or Home Depot
Paver blocks: $290 Menards
Edging: $110
Edging stakes: $56
Fabric/plastic: $25
Fabric pins: $27
Marking paint: $8
Sand leveling: $33
Sand locking: $14
Stones: $42
Total cost: $859
Install:
1) 16" x 16" blocks, 8 blocks long by 7 blocks wide equals 56 blocks total. The stone border was developed at the end of the project.
2) Mark out dimensions on grass with paint. The stakes represented the corners of the blocks. The outer painted border was 6" wider than the blocks and this represented where we would start removing the grass. In retrospect, I should have gone out 12" or more for the painted border.
3) Remove the grass and dirt as needed. This was the most difficult part of this project. It was a judgement call as to how deep we should go with the dirt removal. I wanted the blocks to be above the surrounding grass a little bit. You will have to adjust by temporarily placing a pad and block to get a feel for the finished height of the blocks compared to the level of the surrounding grass.
4) Level dirt with a long straight 2 x 4 and a level.
5) Tamp dirt down with a tamper. The weather was very dry when we did this project so the dirt was very hard. We had to wet the ground a bit and break some areas up with a shovel.
6) Layout weed prevention fabric and secure into the ground with plastic pins.
7) Spread and level sand to 0.5" depth. I used 0.5" diameter dowels taped together as guides to slide the 2 x 4 over. This process was tedious but we ended up with a nice level surface of leveling sand.
8) We started carefully placing the dense foam "paver pads" onto the sand first. These can take the place of having to use 2" of gravel as a secure base for your paver blocks. Then we started placing the blocks. I had to measure off of our house to be sure I was making a line of blocks that was straight and parallel to the house.
9) Stake down paver block edging border with stakes. Edging should have the triangle portion facing away from the patio. This helps to keep the blocks in place and keep them from shifting.
10) At this point we also brushed paver locking sand into the blocks and misted with water. I had a problem with the sand falling out of the edges of the blocks because there was nothing there to keep it inside. I eventually bought some grey colored clay and filled in the edges which helped to keep the locking sand in place.
11) Initially, we were going to have a grass border. This turned out to be a bad idea. Every time it rained the water would splash down on the dirt where we were trying to grow grass and it would send dirt flying all over the blocks and patio furniture. We came up with the idea of a stone border. Thankfully, this solved the dirt splashing problem.
12) The close up of the corner of our stone border shows that I used the same paver edging staked down over weed control fabric to contain the stones. This time the triangle edging is facing in, pointing towards the patio. Then just fill in with stones.
*Note*
We had ground that was pretty flat to start with. We did need to do some leveling, but it wasn't that hard because the land was flat. It was, however, clay soil which is difficult to dig out. This project will still take longer than a weekend. I rarely believe in "weekend projects". It will be work, but a lot less than using gravel.
*This project worked well for us. We are not professionals and cannot guarantee it will work for everyone as it has for us.*
#bargainbluebird #budgetpatiodiy #paverpatio
Видео Inexpensive Backyard Patio | Easier Patio Install | Less Time & Energy | Backyard DIY | Paver Pads канала Bargain Bluebird
Показать
Комментарии отсутствуют
Информация о видео
Другие видео канала
 DIY Herringbone Pattern Paver Patio Renovation | Home Improvement
 How to Build a Deck in a Day
 DIY French Drain & Landscaping | River Rock | Yard Drainage Solution
 DIY Patio Roof | HANDYBROS |
 Installing Pavers - Quick Fix for High Foot Traffic Area of Lawn
 One Man Paver Patio Construction, Using Paver Base Panel, Build a Patio By Yourself - Time Lapse
 Patio Install on Gator Base
 How To Form, Pour, And Stamp A Concrete Patio Slab
 How to Install Concrete Flag/Block Paving Flexibly | Commercial Paving | Marshalls
 Paver Patio Backyard Makeover
 EPIC BACKYARD MAKEOVER - Full Build Time Lapse!
 Small Landscape Design Ideas (10 Secrets)
 DIY XERISCAPE BACKYARD PATIO: Backyard Makeover!!!
 easy diy No Dig Border *2020 UPDATE*
 EZ Base | Installing Pavers with Techniseal's Hardscape Base System
 How to Turn Your Backyard into the ULTIMATE Outdoor Entertaining Space | GARDEN | Great Home Ideas
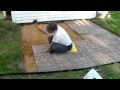 Building a paver patio and firepit
 How to Pour a Concrete Slab for Beginners DIY
 Installing Brick pavers -start to finish day2
 How to Build a Simple Stone Walkway | Large Stepping Stone Pathway