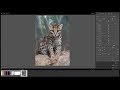
How to Use the Adjustment Brush in Lightroom Classic
In this Lightroom Adjustment Brush tutorial, learn how to make targeted adjustments to a specific area of your image without affecting the rest of the photo. The Adjustment Brush is a powerful Develop Module tool for modifying the exposure, contrast, shadows, highlights, saturation and more by moving the sliders and brushing the effect exactly where you want it. You can adjust the size of the brush, the feather, flow and density values, and "paint" the adjustments on a portion of your image. Like everything else in Lightroom, you can change, move or delete your adjustments whenever you want.
SUBSCRIBE to my Channel to get all my Lightroom tutorials:
https://www.youtube.com/user/valeriesphotochannel
==============================================
Get my free Digital Photography Basics ebook - Learn more about photography and how to use your camera's manual settings to improve your photos.
https://valeriegoettsch.com/digital-photography-basics/
==============================================
If you want to learn how to take better family portraits, check out my course: https://valeriegoettsch.com/portrait-course/
=============================================
Watch more of my Lightroom tutorials on my website:
https://valeriegoettsch.com/lightroom-tutorials/
==============================================
Follow me:
Facebook: https://www.facebook.com/digitalphotos101
Pinterest: http://www.pinterest.com/digitalphoto101/
Thanks for watching!
Видео How to Use the Adjustment Brush in Lightroom Classic канала ValeriesPhotoChannel
Показать
Комментарии отсутствуют
Информация о видео
Другие видео канала
 Mastering Lightroom Classic CC - 10: Adjustment Brush
 3 Ways to Use The BRUSH TOOL in Adobe Lightroom - Editing Tutorial 2021
 All About Masks in Lightroom
 EXPOSE FOR THE HIGHLIGHTS | Tutorial Tuesday
 How to Use Complementary Colors in Photoshop
 Editing YOUR Photos in Photoshop! | S1E1
 Color Grading vs Split Toning: What's the difference?! (Adobe Lightroom Classic)
 Things You Don't Know About Tone Curves In Lightroom | Master Your Craft
 How to use the Healing Brush in Lightroom CC
 Curso Adobe Lightroom 2021 | Pincel de ajuste | Tutorial Lightroom en Español | Making Designs
 How To Use The Adjustment Brush In Lightroom | LR Classic Tutorial
 My TWO-STEP PROCESS For Better Cut Outs! - Photoshop Select and Mask Crash Course
 Lightroom Tutorial BASICS | Photo Editing Masterclass
 3 Lightroom Graduated Filter Tips You'll Use Everyday
 The Graduated Filter and Adjustment Brush in Lightroom
 How to PROPERLY Sharpen & Reduce Noise in LIGHTROOM
 Best Lightroom Tip for Portraits // Range Mask for Local Adjustments
 How to use the DETAIL PANEL in LIGHTROOM
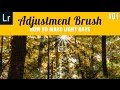 Adjustment Brush 01 in Lightroom, How to Make Light Rays
 How to use the Brush Tool in Lightroom CC