- Популярные видео
- Авто
- Видео-блоги
- ДТП, аварии
- Для маленьких
- Еда, напитки
- Животные
- Закон и право
- Знаменитости
- Игры
- Искусство
- Комедии
- Красота, мода
- Кулинария, рецепты
- Люди
- Мото
- Музыка
- Мультфильмы
- Наука, технологии
- Новости
- Образование
- Политика
- Праздники
- Приколы
- Природа
- Происшествия
- Путешествия
- Развлечения
- Ржач
- Семья
- Сериалы
- Спорт
- Стиль жизни
- ТВ передачи
- Танцы
- Технологии
- Товары
- Ужасы
- Фильмы
- Шоу-бизнес
- Юмор
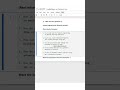
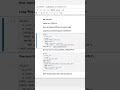
Build an AI Chatbot from Scratch (Python + OpenAI + Flask)#AI #Python #OpenAI
This short walks through building a simple AI chatbot app using Python, OpenAI, and Flask — a project viewers can build in under 10 minutes.
This kind of end-to-end project attracts more engagement, shares, and subscribers because viewers can copy, run, and see instant results.
⭐ 1. Set Up Python & OpenAI
Install Python and required packages:
pip install openai flask python-dotenv
Create a .env file to securely store your API key:
OPENAI_API_KEY=your_openai_api_key
Load environment variables in your app:
from dotenv import load_dotenv
import os
load_dotenv()
OPENAI_API_KEY = os.getenv("OPENAI_API_KEY")
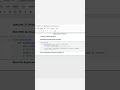
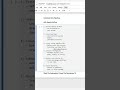
⭐ 2. Build a Simple Flask App
Create app.py:
from flask import Flask, request, jsonify
import openai
import os
app = Flask(__name__)
openai.api_key = os.getenv("OPENAI_API_KEY")
This sets up the server to run your chatbot.
⭐ 3. Call OpenAI API for Chat Responses
Add a route to handle chat messages:
@app.route("/chat", methods=["POST"])
def chat():
user_message = request.json.get("message")
response = openai.ChatCompletion.create(
model="gpt-4o-mini",
messages=[{"role":"user", "content": user_message}],
max_tokens=150
)
answer = response.choices[0].message["content"]
return jsonify({"reply": answer})
This sends user text to OpenAI and gets a reply.
⭐ 4. Deploy Locally & Test
Start your Flask app:
python app.py
Your server runs at http://127.0.0.1:5000.
Test using curl or Postman:
curl -X POST http://127.0.0.1:5000/chat -H "Content-Type: application/json" -d "{\"message\":\"Hello AI!\"}"
You should see an AI response instantly.
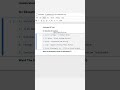
⭐ 5. Add a Frontend UI
Create a simple index.html:
v !DOCTYPE html v
v html v
v head v
v title v AI Chatbot v /title v
v /head v
v body v
v h2 v AI Chat v /h2 v
v textarea id="msg" v v /textarea v v br v
v button onclick="sendMsg()" v Send v/button v
v p id="reply" v v/p v
v script v
async function sendMsg() {
let msg = document.getElementById("msg").value;
let res = await fetch("/chat", {
method:"POST",
headers: {"Content-Type":"application/json"},
body: JSON.stringify({message: msg})
});
let data = await res.json();
document.getElementById("reply").innerText = data.reply;
}
v /script v
v /body v
v /html v
Now you have a working browser-based AI chatbot.
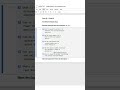
❓ 5 INTERVIEW QUESTIONS & ANSWERS
Q1: How do you secure API keys in Python apps?
➡ Use .env files and environment variables; don’t hardcode keys.
Q2: Why use Flask here?
➡ Flask provides a lightweight Python web server to accept requests and return responses.
Q3: How does the frontend talk to the backend?
➡ Through JavaScript fetch() calls to the /chat endpoint.
Q4: Why specify max_tokens in OpenAI API?
➡ It limits the response length and controls cost.
Q5: What model is suitable for chatbot responses?
➡ GPT-4o-mini (balanced speed and quality), or GPT-4.1 for deeper responses.
⚙ Tools Used:
✔ Python
✔ Flask (Web Server)
✔ OpenAI API
✔ dotenv (.env config)
✔ Postman / curl (testing)
✔ Any code editor
Видео Build an AI Chatbot from Scratch (Python + OpenAI + Flask)#AI #Python #OpenAI канала CodeVisium
This kind of end-to-end project attracts more engagement, shares, and subscribers because viewers can copy, run, and see instant results.
⭐ 1. Set Up Python & OpenAI
Install Python and required packages:
pip install openai flask python-dotenv
Create a .env file to securely store your API key:
OPENAI_API_KEY=your_openai_api_key
Load environment variables in your app:
from dotenv import load_dotenv
import os
load_dotenv()
OPENAI_API_KEY = os.getenv("OPENAI_API_KEY")
⭐ 2. Build a Simple Flask App
Create app.py:
from flask import Flask, request, jsonify
import openai
import os
app = Flask(__name__)
openai.api_key = os.getenv("OPENAI_API_KEY")
This sets up the server to run your chatbot.
⭐ 3. Call OpenAI API for Chat Responses
Add a route to handle chat messages:
@app.route("/chat", methods=["POST"])
def chat():
user_message = request.json.get("message")
response = openai.ChatCompletion.create(
model="gpt-4o-mini",
messages=[{"role":"user", "content": user_message}],
max_tokens=150
)
answer = response.choices[0].message["content"]
return jsonify({"reply": answer})
This sends user text to OpenAI and gets a reply.
⭐ 4. Deploy Locally & Test
Start your Flask app:
python app.py
Your server runs at http://127.0.0.1:5000.
Test using curl or Postman:
curl -X POST http://127.0.0.1:5000/chat -H "Content-Type: application/json" -d "{\"message\":\"Hello AI!\"}"
You should see an AI response instantly.
⭐ 5. Add a Frontend UI
Create a simple index.html:
v !DOCTYPE html v
v html v
v head v
v title v AI Chatbot v /title v
v /head v
v body v
v h2 v AI Chat v /h2 v
v textarea id="msg" v v /textarea v v br v
v button onclick="sendMsg()" v Send v/button v
v p id="reply" v v/p v
v script v
async function sendMsg() {
let msg = document.getElementById("msg").value;
let res = await fetch("/chat", {
method:"POST",
headers: {"Content-Type":"application/json"},
body: JSON.stringify({message: msg})
});
let data = await res.json();
document.getElementById("reply").innerText = data.reply;
}
v /script v
v /body v
v /html v
Now you have a working browser-based AI chatbot.
❓ 5 INTERVIEW QUESTIONS & ANSWERS
Q1: How do you secure API keys in Python apps?
➡ Use .env files and environment variables; don’t hardcode keys.
Q2: Why use Flask here?
➡ Flask provides a lightweight Python web server to accept requests and return responses.
Q3: How does the frontend talk to the backend?
➡ Through JavaScript fetch() calls to the /chat endpoint.
Q4: Why specify max_tokens in OpenAI API?
➡ It limits the response length and controls cost.
Q5: What model is suitable for chatbot responses?
➡ GPT-4o-mini (balanced speed and quality), or GPT-4.1 for deeper responses.
⚙ Tools Used:
✔ Python
✔ Flask (Web Server)
✔ OpenAI API
✔ dotenv (.env config)
✔ Postman / curl (testing)
✔ Any code editor
Видео Build an AI Chatbot from Scratch (Python + OpenAI + Flask)#AI #Python #OpenAI канала CodeVisium
ai chatbot python openai chatbot tutorial python ai project build ai chatbot flask ai app chatgpt api python openai api tutorial ai projects for beginners python flask tutorial machine learning projects artificial intelligence project ai web app python python automation ai coding ai chatbot ai programming tutorial data science projects python projects 2025 ai developer roadmap learn ai with python ai app development
Комментарии отсутствуют
Информация о видео
12 февраля 2026 г. 13:34:41
00:00:10
Другие видео канала