- Популярные видео
- Авто
- Видео-блоги
- ДТП, аварии
- Для маленьких
- Еда, напитки
- Животные
- Закон и право
- Знаменитости
- Игры
- Искусство
- Комедии
- Красота, мода
- Кулинария, рецепты
- Люди
- Мото
- Музыка
- Мультфильмы
- Наука, технологии
- Новости
- Образование
- Политика
- Праздники
- Приколы
- Природа
- Происшествия
- Путешествия
- Развлечения
- Ржач
- Семья
- Сериалы
- Спорт
- Стиль жизни
- ТВ передачи
- Танцы
- Технологии
- Товары
- Ужасы
- Фильмы
- Шоу-бизнес
- Юмор
Tutorial - Piping System Zero to Hero in Revit and converting revit to Isometric drawing
Request your demo today: https://www.pipeex.org/demo
info@pipeex.org
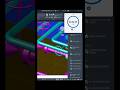
Learn how to build a piping system from start to finish! This tutorial covers copying families (bolt sets, flanges, valves, etc.), setting up routing preferences, defining pipe types, routing pipes, and adding components like butterfly valves, drains, and pressure gauges. We address Revit limitations, use a plugin to fix connections, and set properties for isometric extraction. Finally, we export a PCF file and use AutoCAD Plant 3D to create an isometric drawing. Perfect for piping design enthusiasts!
0:00 Introduction
0:11 Components used in the piping system
1:03 Copy families into the new project
1:23 Create and rename a new pipe type
1:49 Review pipe type properties
2:11 Open routing preferences
2:47 Clean up segments and sizes
3:21 Review pipe size properties
4:17 Add fittings to routing preferences
5:07 Start routing the pipe
5:35 Fix pipe graphics display
6:02 Continue drawing with elbows and angled runs
6:48 Add flange connections
7:28 Add gaskets and bolt sets
9:09 Add butterfly valves
9:34 Copy flange sets to both sides
10:34 Check pipe connectivity
11:06 Reconnect disconnected components with the plugin
11:58 Adjust bolt visibility and bolt length
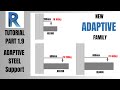
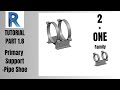
14:39 Add pipe shoe supports
16:11 Add flow direction annotation
17:27 Add wall penetration and create wall opening
19:19 Add note annotations
20:40 Add drain connection with reducer
22:26 Create a drain branch from pipe
24:18 Add globe valve, gaskets, and flanges to the drain
26:52 Create an instrument connection for a pressure gauge
29:39 Review the full assembled piping set
30:45 Add valve tags
32:13 Set pipe specification and process properties
34:37 Important note about correct system type
35:33 Work around Revit system type limitations
37:13 Open Pipex settings and map attributes
38:40 Export the PCF file
39:19 Open AutoCAD Plant 3D
39:35 Convert PCF to isometric drawing
40:29 Review the generated isometric sheets
41:36 Review bill of materials and process data
41:47 Outro
#Engineering #PipingEngineering #MechanicalDesign #ProcessEngineering #AutodeskPlant3D#RevitTutorial#SoftwareTutorial#IndustrialEngineering#technicalskills #DIYEngineering #TutorialVideo#InnovativeEngineering #ProductivityTips
#ProfessionalDevelopment #TechSavvy #EngineeringLife #CADDesign #DigitalEngineering #SkillBuilding #LearningResources
Видео Tutorial - Piping System Zero to Hero in Revit and converting revit to Isometric drawing канала PipeEX
info@pipeex.org
Learn how to build a piping system from start to finish! This tutorial covers copying families (bolt sets, flanges, valves, etc.), setting up routing preferences, defining pipe types, routing pipes, and adding components like butterfly valves, drains, and pressure gauges. We address Revit limitations, use a plugin to fix connections, and set properties for isometric extraction. Finally, we export a PCF file and use AutoCAD Plant 3D to create an isometric drawing. Perfect for piping design enthusiasts!
0:00 Introduction
0:11 Components used in the piping system
1:03 Copy families into the new project
1:23 Create and rename a new pipe type
1:49 Review pipe type properties
2:11 Open routing preferences
2:47 Clean up segments and sizes
3:21 Review pipe size properties
4:17 Add fittings to routing preferences
5:07 Start routing the pipe
5:35 Fix pipe graphics display
6:02 Continue drawing with elbows and angled runs
6:48 Add flange connections
7:28 Add gaskets and bolt sets
9:09 Add butterfly valves
9:34 Copy flange sets to both sides
10:34 Check pipe connectivity
11:06 Reconnect disconnected components with the plugin
11:58 Adjust bolt visibility and bolt length
14:39 Add pipe shoe supports
16:11 Add flow direction annotation
17:27 Add wall penetration and create wall opening
19:19 Add note annotations
20:40 Add drain connection with reducer
22:26 Create a drain branch from pipe
24:18 Add globe valve, gaskets, and flanges to the drain
26:52 Create an instrument connection for a pressure gauge
29:39 Review the full assembled piping set
30:45 Add valve tags
32:13 Set pipe specification and process properties
34:37 Important note about correct system type
35:33 Work around Revit system type limitations
37:13 Open Pipex settings and map attributes
38:40 Export the PCF file
39:19 Open AutoCAD Plant 3D
39:35 Convert PCF to isometric drawing
40:29 Review the generated isometric sheets
41:36 Review bill of materials and process data
41:47 Outro
#Engineering #PipingEngineering #MechanicalDesign #ProcessEngineering #AutodeskPlant3D#RevitTutorial#SoftwareTutorial#IndustrialEngineering#technicalskills #DIYEngineering #TutorialVideo#InnovativeEngineering #ProductivityTips
#ProfessionalDevelopment #TechSavvy #EngineeringLife #CADDesign #DigitalEngineering #SkillBuilding #LearningResources
Видео Tutorial - Piping System Zero to Hero in Revit and converting revit to Isometric drawing канала PipeEX
Комментарии отсутствуют
Информация о видео
20 августа 2025 г. 11:00:06
00:42:12
Другие видео канала