Building A FOLDING VAN TABLE With STORAGE, Part 1 | Ep 22 | Nissan NV200 Camper Van Build
In this video I share how I built this new fold down table side unit with built-in van storage and integrated battery pack for charging my devices. Please SUBSCRIBE to keep up-to-date with all of my future videos, thanks!
See part 2 of the table build here: https://youtu.be/jqr2s-dynZQ
Music: https://soundcloud.com/architct
Instagram: https://www.instagram.com/yogi.the.van
Heavy duty adjustable steel wire: https://amzn.to/37jAQ8g
Novoo portable battery power pack: https://amzn.to/37nNKlD
---
Check out the full written version of my van build, with photos, on my blog: https://nv200vanconversion.wordpress.com/2020/12/01/building-a-new-folding-van-table-with-storage-part-1/
---
0:00 - Introduction
0:30 - The Front
3:12 - The Sides
5:31 - The Table
9:00 - The Top Shelf
9:45 - The Upper Brace
10:20 - The Base
12:21 - The Lower Brace
12:46 - Final Prep
13:37 - Attaching The Table
16:15 - Installation
I recently made a video about how I made my old table - https://youtu.be/cJGZMmY0svM - it’s a really easy cheap setup, so do check that one out after this video.
I’ve split this video into 2 parts. In this first video I’ll be building the table unit, and in the next part I’ll be kitting it out with storage, so do keep an eye out for that..
I created a design of how I wanted it to look Sketchup and joined two boards with dowels to get my width. I then cut out my table from this front piece and attached it with a piano hinge. I cut out various notches from the top of the front piece to get it fitting against the van ceiling and wall, and to incorporate a shelf.
With the van wall being a very uneven surface, I created templates with two bits of cardboard and trimmed them down to get a good fit, then drew up these templates onto the wood and cut them out. I then cut out an opening for the face of my battery pack to sit in, using a router.
Clamping the side pieces in place, I used pocket holes to screws the sides into the front piece to created an arched structure.
The next piece to cut was the top shelf, once again with a couple of notches removed, so that it would fit nicely in the van. Once cut and sanded, I added pocket holes and screwed it into the unit, making the bottom of the shelf was flush with the top of the table opening.
This shelf would have the addition of a back piece and this is would allow an area for the table to be attached to the van wall. Due to the corners of the van, the back piece didn’t stretch all the way along, but as long as it met the screw threads in the van walls then this didn’t matter.
I created the base in the same way as the top shelf and with a bit of refinement got it to a good fit. I cut a recess for my piano hinge to sit in and this is so when the table is folded up it sits flush with the rest of the front. With the structure of the table finally coming together, I could attach the hinge into the front recess.
I needed to fix the lower area of the unit to the van wall, and so another brace was needed. This time, it required an angled edge to accommodate the corner of the van.
I undid the pocket holes, and got some wood glue in the joints and then, after screwing it all back together, got some 9mm diameter dowel plugs that I had pre-cut, to fill the pocket holes in places where they might be seen, like the top shelf, inside the side the unit and on the base.
I could now attach the table to the hinge. It was a good fit overall, though the corners were a little tight, so I sanded the edges. I then attached two magnets, and latch and four eye plates for my wires to hook through. Before deciding on this method of holding the table up I looked at nearly every possible way of supporting a table, including folding shelf brackets, fold-out arms and piston stays. Though it would have been nice not to have these attachments and wires, I’ve never found them to be ‘in the way’ and if I’m going to be cooking on this table, then I want the strongest possible support for it. After a final sand, I gave the whole unit 3 coats of polyurethane varnish to protect the wood, and sanded in between coats.
At long last I was ready to install the table in the van. For this I used all 5 of the M6 screw threads built into the wall of the van, and purchased some high tensile bolts that would secure it in place, along with penny washers to help distribute the load and protect the wood
And the table is SOLID!
I could now add the battery - it’s great to finally have power built into the van!
Please do SUBSCRIBE to my channel to keep up to date with the rest of my van build series and thanks for watching!
#Vanlife #NissanNV200 #LensOfJames
DISCLAIMER: In this video, I am in no way stating that this is the proper way to undertake the conversion of a van, however after research and experience using the van, I believe this to be the way that is best suited to my van and the way I intend to use it.
Видео Building A FOLDING VAN TABLE With STORAGE, Part 1 | Ep 22 | Nissan NV200 Camper Van Build канала Lens Of James
Показать
Комментарии отсутствуют
Информация о видео
Другие видео канала
 Part 2, Building A FOLDING VAN TABLE With STORAGE | Ep 24 | Nissan NV200 Camper Van Build
 10 INNOVATIVE TABLE SOLUTIONS FOR YOUR CAMPERVAN 🤯🚐
 DIY Camper Van Conversion Bed That Turns Into a Couch!
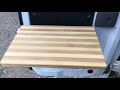 Attaching a Folding table to my Van back door - Vanlife
 Installing A Vinyl Van Floor | Ep 7 | Nissan NV200 Camper Van Build
 DIY Thermal Van Window Covers From Insulation And Carpet ♻️ | Ep 10 | Nissan NV200 Camper Van Build
 CARPETING The Van | 4-Way Stretch Carpet Lining | Ep 4 | Nissan NV200 Camper Van Build
 HOW TO BUILD WHEEL WELL BOXES - VW CRAFTER CONVERSION - TOUR BUS BUILD - EPISODE 9
 Van Fit Out: Building a Custom Drawer
 10 ESSENTIAL Extras For A Campervan Conversion | Ep 16 | Nissan NV200 Camper Van Build
 Nissan NV200 Camper Van Tour
 Unique DIY Pullout Bench/Bed With Storage, In 3 Sections | Ep 8 | Nissan NV200 Camper Van Build
 How to build overheads/upper cabinets for your van conversion | Vanlife Conversions
 How to build a cabinet box
 Carpeting Van Doors & Creating A Neat Edge With Rubber | Ep 5 | Nissan NV200 Camper Van Build
 INSULATING The Cab CEILING And Cleaning The Van HEADLINER | Ep 23 | Nissan NV200 Camper Van Build
 VAN BUILD Time Lapse From START TO FINISH | Tiny Camper Van Conversion
 ROOF BARS On The Van & Stopping Them LEAKING | Ep 19 | Nissan NV200 Camper Van Build
 Nissan NV200 Camper Conversion - Day 1 Tour