Unique DIY Pullout Bench/Bed With Storage, In 3 Sections | Ep 8 | Nissan NV200 Camper Van Build
In this video, I’ll be showing the cheap, easy-to-use custom 3-section sliding removable bench/bed that I’ve built for my Nissan NV200, as I convert it into a camper van.
Please SUBSCRIBE to my channel, thanks!
Song 1: 'Awakening' by Architct - https://soundcloud.com/architct/awakening
Song 2: 'Illuminate' by Architct - https://soundcloud.com/architct/illuminate
Song 3: 'Trefusis' by Architct - https://soundcloud.com/architct/trefusis
SoundCloud: https://soundcloud.com/architct
Spotify: https://open.spotify.com/artist/6pUUe9rQQgBpRRtC3mm99j
Apple Music: https://music.apple.com/us/artist/architct/1537389987
---
Check out the full written version of this video, with photos, on my blog: https://nv200vanconversion.wordpress.com/2020/04/03/creating-a-unique-3-section-pullout-bench-bed-with-storage/
---
The bed is made entirely out of lengths of 38x63mm timber, which cost about £2.50 each. They came in 2.4m lengths, so that makes it a very cheap bed to build, considering I only used about 8 pieces of wood for the bed.
I started the bed with the frame. It is held together with wood glue and screws and has proved to be very sturdy. I wanted to get a 6 foot long bed in, so that meant using all available space. Putting an angle in the bed frame near the back door, which mirrored the angle of the van, enabled me to achieve this.
Because this would be a 3-section pullout bed, I didn't want wide slats which might create big gaps when pulled out, so I opted to use thin ones. I cut the wood to give me 9 slats per piece.
I mentioned that this bed was a 3-section pullout bed, and that might raise the question of why I would need that. The answer is that I wanted to ensure that I could fit my 9'5" long surfboard through the centre of the van. A 2 section expandable bed would have blocked the gap between the front seats, so 3 sections it was!
Once pulled out, the bed spans the entire width of the van making it nearly a king size - so it's very roomy!
The handles underneath the bed are to help expanding the bed - they give a good point to pull from and look smart too. To install the metal eyes around the bed I drilled pilot holes before adding epoxy to give a really strong hold.
Next, I gave the bed a sand, starting with 80 grit sandpaper and going up to 180 grit for a smooth finish. Then I added feet to the bed, using scraps of leftover carpet and some contact adhesive.
I mentioned the metal eyes that are epoxied in at the front and back, and are used to fix the bed to the van using turnbuckles. By the rear doors, the bed is tensioned down to one of the load rings, whilst at the front, the turnbuckle is attached to a metal ring which is screwed directly into a thread on the passenger seat.
For storage, I’ve built a drawer that slides under the bed, behind the front passenger seat. It is very spacious and maximises the use of the area under that part of the bed fully. I created a peg which slots through a hole in a leg of the bed, and into the side of the drawer so it doesn't slide open when driving. I also put handles on the front and back of the drawer from pieces of rope and these help make it more portable. The drawer itself is made from some high quality 18mm baltic birch plywood that I had leftover, and is coated with a waterproof varnish to protect it from dirt.
No bed is complete without a decent mattress, or mattresses in this case. Here is the first mattress - made from 50cm wide and 200cm long foam. The corner is cut to match the contour of the van, and ensures the mattress can sit parallel with the van wall. The second mattress is also 50cm wide, but is cut a bit shorter. This is so, when using the bench, it doesn’t bend on the angle by the rear doors and can be used as a back rest. The final mattress is cut thinner, to fill the remaining gap on the bed, but also has a corner cut off to match the other edge of the van.
To secure these mattresses in place while driving around, I use 2 bungees pulled over the mattresses and connected to the bed via metal eyes. Because the middle mattress is cut shorter, as previously mentioned, it leaves a gap but this is solved by a very small 4th section of foam which fills this void.
The mattresses are all made of 4 inch thick sheets of extra firm foam, and you can’t feel the slats beneath them at all! They were easy to cut with a sharp knife, and I sewed together their covers by hand from 2 double duvet covers.
It’s super exciting to see the bed installed and secure, with the drawer and mattresses back in their places too, plus there’s still plenty of space for storage underneath the bed, even when it is pulled out.
Please SUBSCRIBE to my channel, thanks for watching!
#Vanlife #NissanNV200 #LensOfJames
DISCLAIMER: In this video, I am in no way stating that this is the proper way to undertake the conversion of a van, however after research and experience using the van, I believe this to be the way that is best suited to my van and the way I intend to use it.
Видео Unique DIY Pullout Bench/Bed With Storage, In 3 Sections | Ep 8 | Nissan NV200 Camper Van Build канала Lens Of James
Показать
Комментарии отсутствуют
Информация о видео
Другие видео канала
 Amazing Skills And Techniques Woodworking Easy Ingenious - How To Build A Sofa Combined Compact Bed
 SIMPLE DIY Pull Out Slat Bed - Stealth Camper Astro Van (Ep. 11)
 11 mistakes to avoid (van conversion)
 DIY Thermal Van Window Covers From Insulation And Carpet ♻️ | Ep 10 | Nissan NV200 Camper Van Build
 Nissan NV200 Camper Conversion Part 13 | Constructing A Pull Out Bed
 HOW TO BUILD A DAYBED IN A DAY!
 How To Build A Smart Chair Combination With Bed - Design Ideas Woodworking Project Smart Furniture
 Sliding bed base for minivan camper - converts to couch and requires no modifications
 48 Hour VW T4 Transporter Conversion. Slat Bed Tips
 This COLLAPSIBLE Bed System Is Perfect For MAXIMIZING SPACE In Your Van!!! #vanlife
 HOW TO build affordable BED/BENCH seats that look great in your VAN! // Ep 10
 MAXED OUT MICRO CAMPER VAN | FULL TOUR! - 2012 Ford Transit Connect
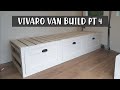 Building a sofa bed for your campervan | Vauxhall Vivaro SWB Van Conversion PT4
 How to Make a Sofa Bed
 5 AWESOME VAN BEDS 🛏 For Comfy Van Conversions | How to Build a Camper Bedroom 🚐
 DIY Camping Box
 Design Ideas Project Woodworking Furniture Space Saving - Build A Smart Bed Combination With A Sofa
 CARPETING The Van | 4-Way Stretch Carpet Lining | Ep 4 | Nissan NV200 Camper Van Build
 IKEA Beds for Van Life & Tiny Houses
 Small Off-Road Camper Van Conversion Using Aluminium