Fine Art Photography: From Scan to Print to Frame
Your contributions make these videos happen! https://www.nickcarverphoto.com/contribute
And check out my online course all about light metering for film photography: https://www.nickcarverphoto.com/metering
You better believe it. I'm printing that photo of Houston's Liquor from my most recent on-location video. And I'm doing it big: 2-foot by 6-foot.
Oh, what's that? You want to see how it's made? I thought you'd never ask. Seriously. I thought no one would ever ask to see this. But hey, I'm doing it anyway. So I made a video showing the entire process from scan to print to frame to hanging it on the wall.
I started with a drum scan...but that didn't work out too well. So I instead scanned the 6x17 negative (of Kodak Portra 160 film) on my Epson V750 scanner. Then I cleaned up the file and prepped it for printing before sending off to Pro Photo Connection in Irvine, CA to get a C-type wet-process print on Fujifilm Crystal Archive Pearl paper. They used a beast of a machine: a ZBE Chromira ProLab printer.
It came out so. damn. good. ...if I may say so myself.
Then the print was mounted on 3/4 gator board and laminated with a luster lamination before heading off to Salamon Art in Fountain Valley, CA for framing where they wrapped it in a beautiful warm-gray float-frame.
With the print finished and hanging on the wall, it was time for me to enjoy a cold celebratory beer while I pontificate about the virtues of printing and why you should do it too. Because if I can't pretentiously lecture to you about what you should be doing with your photography, why do this at all, you know?
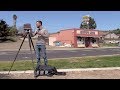
But really, I hope you enjoyed watching this whole process of capturing, scanning, printing, framing and hanging this 6x17 film image on the wall. By the way, I created this photo on Kodak Portra 160 film using a Shen-Hao TFC 617-A panoramic camera. You can view the original on-location video where I created this photo here: https://youtu.be/G_wiHZZND6I
Printing (and film processing) by Pro Photo Connection in Irvine: https://www.prophotoconnection.com
Framing by Salamon Art: https://www.salamonart.com
Thank you for watching, subscribing, and commenting!
Website: https://www.nickcarverphotography.com
Instagram: http://www.instagram.com/nickcarver
Видео Fine Art Photography: From Scan to Print to Frame канала Nick Carver
And check out my online course all about light metering for film photography: https://www.nickcarverphoto.com/metering
You better believe it. I'm printing that photo of Houston's Liquor from my most recent on-location video. And I'm doing it big: 2-foot by 6-foot.
Oh, what's that? You want to see how it's made? I thought you'd never ask. Seriously. I thought no one would ever ask to see this. But hey, I'm doing it anyway. So I made a video showing the entire process from scan to print to frame to hanging it on the wall.
I started with a drum scan...but that didn't work out too well. So I instead scanned the 6x17 negative (of Kodak Portra 160 film) on my Epson V750 scanner. Then I cleaned up the file and prepped it for printing before sending off to Pro Photo Connection in Irvine, CA to get a C-type wet-process print on Fujifilm Crystal Archive Pearl paper. They used a beast of a machine: a ZBE Chromira ProLab printer.
It came out so. damn. good. ...if I may say so myself.
Then the print was mounted on 3/4 gator board and laminated with a luster lamination before heading off to Salamon Art in Fountain Valley, CA for framing where they wrapped it in a beautiful warm-gray float-frame.
With the print finished and hanging on the wall, it was time for me to enjoy a cold celebratory beer while I pontificate about the virtues of printing and why you should do it too. Because if I can't pretentiously lecture to you about what you should be doing with your photography, why do this at all, you know?
But really, I hope you enjoyed watching this whole process of capturing, scanning, printing, framing and hanging this 6x17 film image on the wall. By the way, I created this photo on Kodak Portra 160 film using a Shen-Hao TFC 617-A panoramic camera. You can view the original on-location video where I created this photo here: https://youtu.be/G_wiHZZND6I
Printing (and film processing) by Pro Photo Connection in Irvine: https://www.prophotoconnection.com
Framing by Salamon Art: https://www.salamonart.com
Thank you for watching, subscribing, and commenting!
Website: https://www.nickcarverphotography.com
Instagram: http://www.instagram.com/nickcarver
Видео Fine Art Photography: From Scan to Print to Frame канала Nick Carver
Показать
Комментарии отсутствуют
Информация о видео
Другие видео канала
 Photography On Location: The Liquor Store
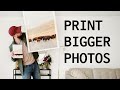 Make Your Images Bigger for Print
 Intro to Fine Art Digital Printing
 Skip The Lab: How To Mount And Frame Prints Yourself
 Comparing 5 Epson Film Scanning Techniques
 Solo Camp Gear Walkthrough (+ Photography On Location)
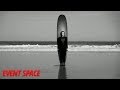 The Business of Fine Art Photography | Thomas Werner
 Image Review: Paris and London with the Fuji X-Pro2
 Selling Prints- HUGE MISTAKES I Wish I Didn't Make!
 Mounting Prints onto Gatorfoam Board
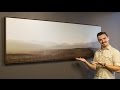 Making a Fine Art Photography Print: Anza-Borrego Desert
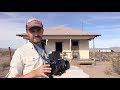 Photography On Location: Route 66
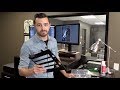 Film Scanning Tips for Epson Perfection Scanners
 Is it Worth Printing Your Own Photos?
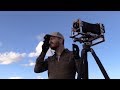 Photography On Location: Deterioration in the Desert
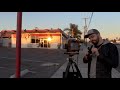 Photography On Location: The Breakfast Cafe
 Matting and Framing Tutorial
 The New Reveni Labs Spot Meter
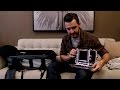 Whats in My Bag: 6x17 Panoramic Camera
 Start PRINTING your photos today | ESSENTIAL Tips and Tricks