Making the Great Lakes Stand Out with Epoxy Part 3 - Final Seal Coat
In this video, Mike demonstrates how to do the final flood coat of epoxy on one of his projects. Be sure to watch the first 2 parts to learn how to pour blue epoxy and complete seal coats. Be sure to stay tuned for the outtakes at the end of each video!
For more information check us out at:
www.northernridgedesigns.com
Instagram: https://www.instagram.com/northernridgedesigns/
Facebook: www.facebook.com/NorthernRidgeDesigns
Also mentioned in our video is US 12 Marine and Michigan Custom Canvas in Jerome, Michigan. They can be found at:
https://www.facebook.com/Battery-Man-US-12-Marine-381688518863764/
This description contains affiliate links. An affiliate link means I may earn commissions for items you purchase through links in this post (at no additional cost to you). As an Amazon Associate I earn from qualifying purchases.
Stone Coat Countertop Stone Coat Epoxy we used (heat and yellowing resistant) for the seal coats and top final flood coat can be found using this link: https://amzn.to/481NVAr
Metallic powder additive used with the super cast epoxy. https://amzn.to/3oec7sy
Mixing Cups
When using a specific ratio epoxy, measuring your amounts is extremely important. Here is the brand of mixing cup I trust and has never let me down https://amzn.to/3iGUHU0
Diablo Sanding Discs
I use Diablo 5" random orbital sanding discs (I use different grits, working my way up to 220 - there is no need to go beyond 220 grit when using epoxy) https://amzn.to/2MizlAv
Dewalt Orbital Sander
With the exception of a little hand sanding, I use this Dewalt Random Orbital Sander https://amzn.to/3iJVxzx
Metal Sanding Discs
These are the metal sanding disks I use on my 4 1/2 grinder with the grinder conversion attachment. I use 50 grit. https://amzn.to/3jTTB89
Angle Grinder Sanding Disc Attachment
To remove router lines, excess epoxy, and/or hardened epoxy drips, I use this conversion grinder attachment on my 4 1/2 grinder and attach low grit metal sanding disks. https://amzn.to/3pueJ5Y
Self-Igniting Torch ***
This is the self-igniting propane torch I prefer to pop air bubbles. https://amzn.to/34yBXzV
Chop Brush
Quality brush used to chop out the epoxy flood coat https://amzn.to/39cfNGM or if you are planning on doing a couple epoxy projects or working with bark on, I suggest this bulk pack of 12. https://amzn.to/3qMgegR
Burn in Wax Stick
Burn in wax sticks used to fill stubborn pinholes between seal coats of epoxy https://amzn.to/3a1GQny and https://amzn.to/3c6f7Vp
1/8 Inch Square Notch Trowel
You can keep reusing your trowel by simply letting the epoxy drain off the square notches. This 1/8 x 1/8 x 1/8 square notch trowel is the size you need for the flood coat https://amzn.to/2M0SiYv
Видео Making the Great Lakes Stand Out with Epoxy Part 3 - Final Seal Coat канала Northern Ridge Designs
Показать
Комментарии отсутствуют
Информация о видео
Другие видео канала
 River Table - We need your help!
 Maple Syrup and Christmas Trees
 Epoxy River Bar Base - Start to Finish
 The SECRET to a Bubble-Free Epoxy Finish
 How to Epoxy Over Uneven Surfaces Like Barnwood
 How to Make River Charcuterie Boards
 Oil Finished Epoxy River Table - Step by Step
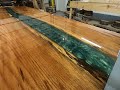 Making a River Table - Start to Finish
 Making the Great Lakes Stand Out with Epoxy Part 1 - Pouring Blue Epoxy
 Live Edge Finished With Epoxy
 Making the Great Lakes Stand Out with Epoxy Part 2 - How to Seal Coat
 Michigan Woods in Winter