Honda Shadow VT1100 Carburetor Rebuild - Part 2 of 2
This is the second in a two part series on the complete disassembly, cleaning and reassembly of my dual Keihin CV carbs for the Shadow VT-1100. It goes into much much much detail. Continuing on I work on the Brass, which is polished, to include needles, emulsion tubes and jets. They are further blown out with air, and look brand new.
With this, assembly is started on the first side with the float and needle. This is followed by emulsion tubes and jets. The idle needle also goes in to full seat with the spring washer and o ring. It is then drawn out the correct amount of turns.
After this the diaphragm for the main jet is introduced. This required some creativity with a paper towel to hold it in the ideal position so it would not pull allowing for the cover to be put on correctly. This probably had to do with some shrinking of the rubber.
Now, the same cleaning procedure is conducted on the other side, as the procedure was completed the rebuild kits had arrived, which changed up things a bit, which included the re-use of the side diaphragms. They were cleaned and that portion was reinstalled on both sides. This included the oval o ring from the kit. That complete assembly is reinstalled on the carb.
Since new float needles came with the kit I went back and removed the old ones and put in the new ones, It required some double effort but was worth it. While working with the bowls, the covers had the old gaskets removed, cleaned up, and new ones installed.
The plastic pieces for the top air filter also has o-rings that need to be replaced, after which they are installed, same thing for the bowl drains. All O rings are lightly lubricated before assembly.
Lastly the idle mixture screws are removed again just to receive new O rings and are then reinstalled to the correct turns. With this the carb cleaning and rebuild is done, and the unit is ready to go back onto the bike.
Видео Honda Shadow VT1100 Carburetor Rebuild - Part 2 of 2 канала Retro Tech & Electronics
Показать
Комментарии отсутствуют
Информация о видео
Другие видео канала
 Honda Shadow VT1100 Carb Install after General Maintenance
 Best carburetor cleaner ever!
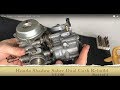 Honda Shadow VT1100 Carburetor Rebuild - Part 1 of 2
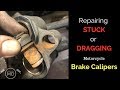 Repairing Stuck Brake Calipers: Honda VT1100
 WHY your motorcycle only runs on CHOKE
 Carburetor Float Height: Tips For Multiple Carbs
 EASIEST Carburetor Rebuild for Honda Shadow: Part 2 of 4
 honda shadow float adjustment 83-87
 Pilot Air/Fuel Screw Adjustment Explained - Multiple Carbs - Part 2
 Honda Shadow Dual Carb Performance SECRETS - REVEALED!
 Coleman Lantern Model 220 Rebuild, Restoration & Conservation Part 1
 DynoJet Carb Jet Kit Install Honda Shadow 1100 (UPGRADES PART: 2)
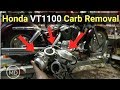 Honda VT1100 Carburetor Removal
 04 How to inspect and adjust float level on a carburetor. BONUS: RICH LEAN Fuel Settings explained!
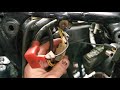 Common Honda Shadow 1100 problem
 How to install a Jet Kit Honda VT750 #how2wrench #jetkit #howtoinstallajetkit #dynojet vt750dc
 $300 1983 Honda Sabre (VF750S) Part 3: Carburetor Disassembly, Cleaning, and Reassembly
 Stock Air Box and Hose Removal for Honda Shadow VT600 and VT750
 Honda Shadow 1100 Disassembly with Carb Removal for General Maintenance and Repair