She hangs a Dollar Store fence from her ceiling…brilliant!
I've always wanted to make my own hanging chandelier for under my porch. So, I headed out to my local Dollar Store and picked up four plastic garden fences for $1.75. Next, I took an old tomato cage and cut off the top portion of it leaving just the bottom ring. Then, I took a piece of off-cut welded wire mesh that I had left over from another project, cut it to fit inside the ring, and bent the wires around the outside of the tomato cage ring.
For these corner areas where it doesn't quite fit, I just took a pair of wire cutters, cut off the excess, and then bent it around the wire so that it's attached to the tomato cage. I just broke off the pegs that stick in the ground for my fence pieces. Again, this is really lightweight plastic, so it's easy to bend and break off.
Then, I took my first piece and using some zip ties, I tied it around the tomato cage making sure that the zip ties were pulled nice and tight. I added zip ties every couple of inches to make sure that my fence was secure around the tomato cage. I added on another piece of the fence using the guide holes on the fence and clicking it into place, and again working with more zip ties. I had an opening where the two fence pieces didn't quite meet, so I broke off another piece of the fence, worked it in with zip ties and connected it as well.
Once it was all connected and zip tied on I came in with some Rust-oleum satin heirloom white paint and I spray-painted the whole piece. Once I let it fully dry, I came in with this black wax from Country Chic Paint and added just a bit of dimension so it wasn't so flat working it in to almost make it look like rusted raw iron. Then I took these battery-operated fairy lights and I worked them around the outside of the chandelier wrapping them around. This is a wired fairy light, so I could just wrap it, and it would stay in place. Then I also took a battery-operated puck light and I secured that with zip ties to the top of my wire fence mesh in the middle so that I have two options for lighting when I want to use this chandelier.
To add some beauty and a more decorative finish, I took these faux white branches and worked them around the top of the chandelier just zip-tying them on. Since this is going outside, this greenery is plastic so it is meant to go outside and it will withstand weather and temperature.
Once I had that done this is my finished chandelier here outside under my porch. It is a covered porch, so I'm not worried too much about the rain but I really love the beauty and elegance that this chandelier adds to my porch. It is low enough that I can reach from the ground to change the batteries or turn the puck light on and off, but if I was going to hang it in a higher space, I would probably get a puck light or battery lights that can be controlled with a remote. That just makes it easier but for me, this works for my space and I am so happy with how this project turned out.
Thank you so much for tuning in to Hometalk and we'll see you on another video.
Hometalk | Ideas you can do.
Get our daily DIY email for endless creative ideas: https://www.hometalk.com/l/lcoi
FACEBOOK → https://www.facebook.com/Hometalk
INSTAGRAM → https://www.instagram.com/hometalk
PINTEREST → https://www.pinterest.com/hometalk
TIKTOK → https://vm.tiktok.com/ne4T87
#Hometalk #DIY #dollartree #dollartreediy #dollartreefinds #dollarstore
Видео She hangs a Dollar Store fence from her ceiling…brilliant! канала Hometalk
Показать
Комментарии отсутствуют
Информация о видео
Другие видео канала
 Grab a container for this BRILLIANT TikTok kitchen hack!
 19 GENIUS Christmas ideas to save for 2023!
 Grab a command hook for this GENIUS Christmas idea!
 Brilliant tips and tricks to give your bathroom a BUDGET makeover!
 He brushes down his fence for this BRILLIANT idea!
 29 brilliant room makeover ideas (that only LOOK expensive!)
 The BRILLIANT flooring makeover DIYers are obsessed with.
 She lays a black garbage bag on the ground for this BRILLIANT porch idea!
 The GENIUS way he lights up his windows for Christmas!
 Why everyone LOVES what she did with this $2.49 bowl!
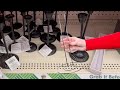 💍 28 DIY Wedding Decor Ideas For a Handmade Celebration 💍
 13 brilliant frame hacks
 Lay a fork on your wall for this GENIUS hack
 Dad builds a GIANT nutcracker for Christmas (You gotta see this!)
 22 budget ideas to get you SO excited for summer!
 Lay a tray on 6 pool noodles for this genius outdoor hack!
 Double your kitchen storage for $20! (BRILLIANT!)
 🐰 Hop into Spring With These 16 DIY Easter Bunny Ideas 🐰
 Everyone's OBSESSED with these genius Christmas hacks!
 People with messy countertops are flipping over this GENIUS idea!
 The brilliant reason everyone's buying Dollar Store mini crates this fall!