Wood Deck & Small Inground Pool - Concrete & Epoxy DIY HomeMade
Deck construction information :
- Post 4x4
- Joist 2x8
- Deck plank 2x6
- Deck dimension 20'x15' (including pool)
- Fence height 5'-6''
- Fence post T form with two 2x4
- Fence plank 1x6
Pool construction information :
- Pool dimension +- 7' x 7'
- Pool depth +- 4'
- It was not expected to have the rock at the bottom of the hole. But since the shape of the rock was like a stair, I enjoyed it.
- Insulation panel 2'' used mostly to shape the pool and to create a surface to allow concrete install. I did not put insulation panel at the bottom, neither on the rock.
- Pump electric cord reachs ground level by following the hole side under insulation panel.
- Pump 1'' water pipe reachs ground level by following the hole side under insulation panel.
- Underwater light partially fixed through insulation panel, then fixed with concrete.
- No steel reinforcement at all.
- Standard premixed concrete with ½'' gravel was used. Maybe 50 bags of 30kg 66lb was used.
- Concrete thickness 1½'' to 2''.
- Pre-colored epoxy resin coating.
- The pump area cover which is sometime noticeable throughout the video is a black plastic cover made to cover storm water catch basin. I covered it with epoxy resin. But because its made of plastic, it floats. So in order to keep it at the bottom of water, I used tie-wraps to fix a brick under the plastic cover.
Pool wall and stove construction information :
- Wood structure 2x4 and 2x6
- Insulation panel 2'' on top
- Insulation panel 1'' on vertical sides of the wall and in the stove.
- Again, insulation panels was used only to obtain a correct surface for then put the concrete.
- Wire mesh was then fixed over the insulation. Main goal of the wire mesh was to be able to fix the concrete on vertical area.
- Premixed concrete was used on the top and in the stove. About 1'' to 2'' thick.
- Premixed mortar was used on pool wall. I did ball shape with the mortar while applying it, then I added few rocks (as plain as possible) by fixing them into the mortar. Maybe 10 bags of 30kg 66lb was used. Mortar thickness is probably about 2'' to 2½'' at middle of balls and ¾'' to 1'' between the balls.
- Clear epoxy resin coating on top and on walls.
- I bought in a local metal shop a stainless steel top to put over the stove.
- The water pipe of the pump pass through a filter (big blue 10'') which is located behind the deck. Then the water pipe ends up (still 1'') at the top of the pool wall fixed through the concrete.
- The water pipe of the pump is splited somewhere behind the deck to allow one another ½'' pipe to pass inside the stove. (This was added a year later).
- Just before the filter, I added a valve on the main 1'' pipe to allow me to drain out all the water when needed. So when the valve is open and the pump works, all the water is pumped on the ground behind the deck.
Other information :
- It cost me about 4 500 USD of material (pool and deck) and a lot of ''fun'' hours of work.
- It tooks me maybe six weeks to build the most part of it, first two weeks I was working on it by evenings and w-e, then fulltime +- 8 to 12 hours/day during two summer break weeks. Then part time work after that to complete the epoxy coating.
- I did it mostly alone (except while my dad has really helped me to dig the hole !!). Working alone for me = No stress and fun :).
- I did a preliminary drawing to allow me to calculate the required wood material. But overall, I continually adapted the layout while doing the construction. This is why working alone was great because all the construction steps evolved in my head, no needs to explain it to someone else, etc.
- To clean it, I use common net and also portable electric underwater vacuum.
- Regarding heating the water with the fireplace, firstly with only the ss plate above the fire, it wasnt heating enough. So it is a year later that I added all the copper pipes into the fire place, and now it works really well. Not to use it as an hot tube (even if I could by rushing fire and covering the pool) but just to be able to raise the temperature of the pool by around 10 to 15 farenheit within a saturday AM if required. And if wanted, keeping the water at 90 farenheit for the evening.
Construction mistake:
- The underwater light has not resisted to winter frozen temperature. Instead of having fixed the light through concrete, I should have find a way to allow me to remove the light before winter…
- I should have made the Inside of the stove larger in order to have more space to build my fires.
- Most importantly, the concrete itself does not stop the heat of the fire, so when the fire is too big and too heat, the wood frame around the stove begins too burn a little. To solve this, a year later, I have added a coating with resist to high temperature by the Inside of the stove. But overall, I should have find a way during the construction to use a concrete with silica or something like that in order to really stop the heat within the concrete layer.
Видео Wood Deck & Small Inground Pool - Concrete & Epoxy DIY HomeMade канала Tykalooo
Показать
Комментарии отсутствуют
Информация о видео
Другие видео канала
 How to build a plunge pool for cheap!
 13 Backyard Privacy Ideas / Privacy Screens
 Heated Splash Pool / Dip Pool Construction (Semi In-Ground) – Step by Step
 Amazing Ideas That Will Upgrade Your Home
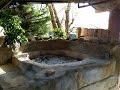 FRED FLINTSTONES CONCRETE hot tub spa jacuzzi (BUILD)
 Should you buy a shipping container pool?
 The Plunge Pool Company - Enjoy your pool in days, not months.
 Hexagonal Hot Tub Build Full Build in 5 Minutes!
 Building a concrete hot tub grotto
 4 | Bricklaying walls | Build a pool yourself | English version
 How We Made Our In Ground Stock Tank Pool and Hot Tub
 We built a DIY in-ground Hot Tub/Spa! (4 foot deep, 1000 gallons, fits 10)
 DIY Hot Tub
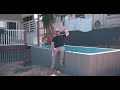 Paddington plunge pool, deck and living room extension
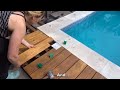 Wooden terrace around the swimming pool
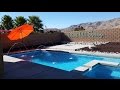 Everything You Ever Wanted To Know About Building A Pool
 Building Heated Swimming Pool For Homeless Man - Construction idea
 Luna Plunge Pool Install Belgrave Heights | Plunge Pools Direct
 Building a deck over an existing concrete slab