Drag and drop a picture into Word Document (Easily - WITHOUT picture distortion).
Learn how to drag and drop a picture into a word document table simply and easily with this video. Word tables can often distort when you insert an image but with this tutorial you can learn how to insert an image without disrupting your table.
Microsoft Office 365 - https://microsoft.msafflnk.net/x3yAA
The above link is an affiliate link. If you click on it and purchase a product you will not pay a penny more but I will gain a small commission to help keep the lights on!!!
I used to format each individual one to the correct size and position. When continuing to type these images would become distorted, disappear, or be cut in half across the page...extremely frustrating...
However....
This videos shows you how to drag and drop images into a word document without the images exploding across the page and nudging all your typing where you don't want it.
This method allows you to easily control the size of the images particularly when inserting a number of images into one document.
Purchase Microsoft Office for PC here - https://amzn.to/2L4FM7K
I may earn a small commission from my endorsements, recommendations, testimonials and/or link to any products or services from this website.
First, insert a table from the ‘table’ icon in the ‘INSERT’ tab. Your table can contain as many rows and columns as you want, but remember this will dictate how many images will be displayed on your page. At this stage you can adjust the margins if you need the images closer to the edge of your page. If your table doesn’t adjust to the margin change, just delete it and re-insert it (that’s why you should do it at this stage). It’s now time to adjust the size of your table cells to fit your images into. Select the table by clicking and dragging your cursor across the whole table or clicking the square at the top left corner of the table. In TABLE TOOL under the ‘Layout’ tab you will see the width and height boxes and it’s here you can enter your chosen sizes. You will need to play around with these measurements to suit your requirements. Once you have created the perfect table to insert images you can now remove the borders and only leave a faint dotted line that won’t appear when printed or saved as a PDF. To achieve this highlight the table as before and in the HOME tab click on ‘borders’ and a drop down menu will appear with border options, click on ‘no borders’. If your border completely disappear click on the same border tab again and go to the bottom and click on ‘show gridlines’. You should now see a faint border lines.
Now this is where the crucial part takes place. You have to tell Word NOT TO MOVE THE TABLE BORDERS AND SET THEM IN STONE….RIGID….WITHOUT MOVING. Highlight the table once again, go to TALE TOOLS – LAYOUT and click on ‘Autofit’ and simply click on ‘fixed column width’. This will fix the width of your columns, but WAIT, we’re not finished just yet, we have to fix the height in place. To do this we need to once again make sure the table is highlighted and right click anywhere on the table. A drop-down menu will now appear, scroll down to TABLE PROPERTIES, you will now see a dialogue box, click on the ‘columns’ tab and where is says ‘row height is’ and a dialogue box saying ‘at least’, click on the down arrow to the right and you should see the option to click ‘exactly’ (this is the little magic button). Click on this option and click OK. Your table is now pinned in place and the cells are not going to budge when you insert your images. It’s not time to insert those images. Simply drag and drop your images into the word document. Drop the images one at a time into each cell and they will automatically resize to fit the cell. If you find the image is too small you will have to crop the image to fit the dimensions of your cells. In order to CENTRE your images you simply highlight the table and check the ‘centre’ icon under the HOME table. Is it looking good?
I you need to split your table so you can insert some text or simply separate the rows, click on the row BELOW the split, go to TABLE TOOLS – LAYOUT and the click on ‘split table’. EASY!!
Before I discovered this method of dragging and dropping images into word I was spending endless hours trying to correct the images, the sizes and where they landed on the page. To say I was frustrated was an understatement. It was part of my business, so giving up so much time to formatting documents meant my income per hour was dwindling and the bigger the project the more time I spent. Once I figured out this method it was such a relief, in fact I think I may have jumped for joy!!! I then made template for my projects with formatted tables ready to go.
Updated version of this video https://youtu.be/etAW892xONw
Видео Drag and drop a picture into Word Document (Easily - WITHOUT picture distortion). канала Lisa Doe
Показать
Комментарии отсутствуют
Информация о видео
Другие видео канала
 Microsoft Word Tutorial - Beginners Level 1
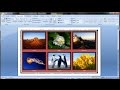 Microsoft word tutorial |How to Insert Images into Word Document Table
 How to insert an image in word with perfect dimensions | Microsoft Word Tutorials
 2x2 photo using MS Word DIY Tutorial -Tagalog
 How to Move or Align Anything in Word | Microsoft Word Tutorials
 How to insert a picture or clipart into a Word document.mp4
 MS Word - Insert Pictures
 How to Write on an Image in Word | Microsoft Word Tutorial
![[TUTORIAL] How to Insert MULTIPLE Pictures On ONE Page In Microsoft Word 2013, 2016, Office 365](https://i.ytimg.com/vi/4rbEp5bF80Y/default.jpg) [TUTORIAL] How to Insert MULTIPLE Pictures On ONE Page In Microsoft Word 2013, 2016, Office 365
[TUTORIAL] How to Insert MULTIPLE Pictures On ONE Page In Microsoft Word 2013, 2016, Office 365 cara mudah merapikan foto microsoft word
 How To Insert Image Into Another Image Using Microsoft Word
 How to insert images into a word document.
 How to Make a Passport size photo in Microsoft Word
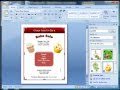 How to Make a Flyer using Microsoft Word
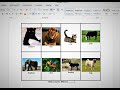 How to insert images into word document table Microsoft word
 How to Resize Image (1x1, 2x2, wallet size, 3R, 4R,5R,1wholesize) #Best for Extra Income @ home 2020
 Word Advanced Tutorial
 Revised: Printing multiple images on a single sheet Windows 10
 Word 2016: Pictures and Text Wrapping
 How to insert a picture into a shape | Microsoft Word tutorials