Remove and Reinstall a Valtek VL Actuator on a MK1 Control Valve
The purpose of this video is to demonstrate how to remove and reinstall a Valtek VL actuator on a MK1 control valve. This demonstration also applies to the Valtek MK2, MK6, MK8 & MK10 control valves.
Some VL actuators are bolted to the valve bonnet (show photo), and some are clamped using half clamps (photo). Most VL actuators sit on a step on the bonnet (photo), some sit on half rings (photo). There are actuators that fail closed, and actuators that fail open. Regardless of which style, the goal is the same which is to ensure the plug is hitting the seat.
Actuator Removal.
Remove the tubing, positioner, and all other accessories if installed on the actuator.
Loosen the stem clamp bolt. The stem clamp bolt and nut do not need to be removed, only loosened.
Remove the packing bolting (arrows)
Note: During this step, the actuator yoke will move away from the bonnet. Be sure to watch for pinch point hazards. Remove the bolting that attaches the yoke bolting to the bonnet. There are two different designs (show both clamp and 6 bolt designs). If the valve is currently fail closed, the actuator yoke should lift up off the bonnet ~1/8” (show detail of the 1/8 gap) when removing the half clamps or the last bolt depending on which yoke style is used.
If ‘fail closed’, spin the actuator off the plug stem. Most actuators will spin off without the plug stem turning but if the plug stem does spin, it will damage the seating surfaces of the plug and seat and so a regulated air supply must be applied to the bottom actuator port to position the valve at a mid-stroke position and the plug removed using the flats at the top of the plug stem. The regulated air supply may need to be increased as the plug stem is turned and begins to re-contact the seat.
If ‘fail open’, apply air to the top port to force the plug into the seat and then rotate the actuator off. If the plug stem turns, apply a regulated air supply to the top port and position plug at mid-stroke and remove using the plug stem flats.
Once the plug stem is unthreaded from the actuator stem, remove actuator from the valve.
If air action needs to be reversed, refer to the video titled “Reversing Air action on a Valtek VL Actuator".
Actuator Installation-
IMPORTANT: Make sure the bellows, stem clamp and gland flange, with the bevel down, are in the proper position and orientation before installing the actuator. These components cannot be installed after the actuator has been reinstalled to the valve.
Apply an anti-seize compound to the top of the plug stem threads.
Place the actuator over the plug stem and lower it until the plug stem is centered in the actuator stem threads.
Carefully spin the actuator ccw until the leading thread of the plug stem drops into the leading thread of the actuator stem. Spin the actuator CW onto the plug threads until the gap between the yoke and surface the yoke sits on is between 1/16” -1/8”. The surface the yoke sits on will either be a step on the bonnet or the half rings depending on which style the valve is. The plug must not rotate on the seat or damage could occur to the seating surfaces.
Turn the actuator to the desired orientation while maintaining the 1/16” - 1/8” gap.
If the actuator is configured fail open, apply air to the top port and lock the air inside so that the actuator is stroked fully in the ‘closed’ position, as if it were fail closed. The fail closed actuator can be installed as is.
For fail open actuator, remove the air from the top of the actuator and the actuator will drop leaving no gap.
For fail closed actuators, apply air to the bottom side actuator port and the actuator will drop leaving no gap. Install yoke bolting and half clamps (with the bevel up) if applicable. Reinstall packing bolts. For instructions on tightening packing, refer to the basic packing video.
Next, ensure that the bottom of the stem clamp is flush with the bottom of the actuator stem. Then, tighten the stem clamp bolt.
If re-installing a positioner, it will need to be calibrated. Refer to product support videos on our YouTube channel “Flowserve Interactive, or contact your Flowserve sales representative.
Видео Remove and Reinstall a Valtek VL Actuator on a MK1 Control Valve канала Flowserveinteractive
Показать
Комментарии отсутствуют
Информация о видео
Другие видео канала
 Reversing the Actuator Fail Action and Air Action on the Flowserve VL Series
 Flowserve FAST Tester Connect and Calibrate HART Positioner
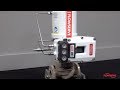 Troubleshooting a Flowserve Digital Positioner
 The Valtek Control Valve: Understanding the Components
 Mounting a Fisher FIELDVUE DVC6200 Digital Valve Controller on a 657 or a 667 Size 40i Actuator
 How Pneumatic Valves Work
 MASCOT CONTROL VALVE WITH REGENT VALVE POSITIONER
 Valtek Control Valves Basic Valve Packing Adjustments
 VR Actuator Orientation Change
 Control Valve Basic parts its function and Dismantling Assembling procedure
 Overhauling of butterfly valves on board
 Mounting Flowserve Logix 3000 Series Positioners to Rotary Actuators
 Mount a FIELDVUE DVC6200 to a Fisher sliding stem valve
 Durco Mark 3 ASME Chemical Process Pump Maintenance
 Valtek MK1 & MK2 Basic Body-sub Assembly
 Logix™ 3200 Positioner Calibration
 HVAC: BRAY Series 70 Electric Actuator Valve Installation/Replacement (Chilled Water Valve)
 How to Change a Rotary Actuator Fail Action
 How to Reverse the Pinion in a Bray Pneumatic actuator
 Flowserve Control Valve Maintenance Training