How To Check Motorcycle Wheel Bearings | MC Garage
It’s rare that a wheel bearing fails, but when they do, it can be ugly! For that reason it’s important to inspect your wheel bearings—with every oil change or tire replacement is a good rule of thumb, though more frequent inspections are recommended if you frequently ride in the rain or in dusty conditions. Thankfully, checking your wheel bearings only takes a few minutes. Here’s how to do it.
--
It’s rare that a wheel bearing fails, but when they do, it can be ugly! For that reason it’s important to inspect your wheel bearings—with every oil change or tire replacement is a good rule of thumb, though more frequent inspections are recommended if you frequently ride in the rain or in dusty conditions. Thankfully, checking your wheel bearings only takes a few minutes.
How To Check Your Motorcycle Wheel Bearings
If your motorcycle has a center stand, you’ve got everything you need to do a preliminary wheel-bearing inspection. If your bike doesn’t have a center stand, you’ll need paddock stands to elevate your bike’s wheels off the ground. The idea here is to have as little weight on the wheels as possible so that you can feel any play that may be present at the hub.
With the wheel off the ground (or gently resting on the ground, as would be the case with the front wheel on a center stand equipped bike), grab the tire on opposite sides and push with one hand while pulling with the other, alternating the movements in an effort to twist the wheel around the axle. You’re looking to see if there’s any play or movement of the wheel relative to the axle but bear in mind that the tire may flex, so don’t mistake this movement for bearing play. Turn the wheel 45 degrees and repeat the procedure.
If you notice any play or clicking, it’s possible that one or more of your wheel bearings may be munched.
If you suspect a bearing may be on its last legs, it’s time to remove the wheel and take a closer look. Stick your finger in the bearing and rotate it. If it feels gritty, rough, or binds up when you turn it, that’s a sure sign that bearing needs to be replaced.
How To Replace A Motorcycle Wheel Bearing
Deep within your wheels’ hubs—out of sight and out of mind—are wheel bearings. They’re the reason your bike rolls smoothly down the road. And while modern sealed bearings are incredibly reliable, they do occasionally fail.
More often than not, bearings fail due to water or dirt penetrating past the bearing seals, which contaminates the grease and causes the bearings to lose lubrication. When that happens, they corrode and fail.
When you suspect a bad wheel bearing, the first thing to do is inspect it. Luckily, that’s an easy procedure, and we’ve got that covered in this MC Garage.
If you do have to replace your bearings, don't panic. It's an easy job. You'll need are a few tools and supplies and the knowledge to do the job, which you can complete in about an hour. You’ll need tools to remove the wheels, as well as a hammer, a drift punch, a bearing driver kit, a socket, a torch for heating the wheel, a flat blade screwdriver, a pair of snap rings pliers, wood for wheel support, grease and contact cleaner, and new wheel bearings and seals.
Once you’ve gathered all of your tools—and have the wheels removed from your motorcycle— you need to start by supporting your wheel on the woodblocks to protect the rim and the rotor. Next pry off the wheels seals with your flat-blade screwdriver, being careful not to gouge the hub. If you have a stubborn wheel seal or bearing, heat the hub, and then the seal should pop right out.
Once the seals have been removed from both sides of the wheel, it’s time to drive the bearings out. First, move the inner spacer out of the way with your finger or the drift punch. Next, drive the bearing out with the punch or with the bearing driver set. It is always a good idea to apply some heat to the hub to make it expand. This will make driving out the old bearing—or driving in the new one—simple. When using the drift punch method, make sure to work along the exterior race to avoid breaking the bearing. Flip your wheel over and repeat.
If you’re using a bearing driver tool, then this task got a lot simpler. A bearing driver tool will provide equal pressure to the entire perimeter of the bearing, just heat the hub, set the tool, and start tapping with a hammer and the bearing should fall free.
Read here how to check and replace motorcycle wheel bearings: https://www.motorcyclistonline.com/mc-garage-video-how-to-replace-your-motorcycle-wheel-bearings/
Subscribe: http://www.youtube.com/c/MotorcyclistMag?sub_confirmation=1
Motorcyclist Shirts: https://teespring.com/stores/motorcyclist
Shop Products We Use: https://www.amazon.com/shop/motorcyclistmagazine
See more from us: http://www.motorcyclistonline.com/
Видео How To Check Motorcycle Wheel Bearings | MC Garage канала Motorcyclist Magazine
Показать
Комментарии отсутствуют
Информация о видео
Другие видео канала
 Did You Know the Kurt Caselli Foundation Raises Money for Off-Road Motorcycle Safety?
 AIMEXpo SPOTLIGHT: Three Brand-New Tires From Bridgestone
 The Motorcyclist/Edelweiss Reader Tour 2014
 How To Perform A Motorcycle Pre-Ride Safety Check | MC GARAGE
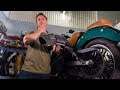 Bias-Ply Motorcycle Tires vs. Radial Motorcycle Tires | MC Garage
 GROMKHANA II: FAST TIMES AT GROMKHANA HIGH
 How to Decode Motorcycle Tire Sidewalls | MC Garage
 A Day With Josh Hayes On His Graves-Yamaha YZF-R1 | On Two Wheels
 Motorcycle Brake Pad Options Explained | MC GARAGE
 How to Lube Your Motorcycle Steering Head Bearings | MC Garage
 3 Tips For Becoming A Better Motorcycle Mechanic | MC GARAGE
 Vintage Triumph Hot Rod Motorcycle! | On Two Wheels
 4 Ways To Revitalize Your Ride | MC GARAGE
 How to Avoid Setting Your Motorcycle On Fire | MC Garage
 The Royal Enfield Scram 411 Is More Than a One Trick Pony
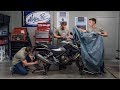 How to Winterize Your Motorcycle | MC Garage
 Alpinestars Racing Absolute V2 One-Piece Suit Review
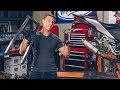 How To Service Your Swingarm and Suspension-Linkage Pivots | MC Garage
 The Truth About Clutchless Shifting | MC Garage
 How To Replace the Factory Exhaust With a Yoshimura R77 on a Honda CB300F | MC GARAGE