NSK SurgicPro - Attachment Calibration
The rotation resistance of a handpiece depends on the handpiece model, condition, and internal wear of the handpiece gears. This Control Unit incorporates an automatic function to recognize the level of the resistance of the attached handpiece and motor.
1.Attach Gear Ratio 20:1 handpiece to the motor and make sure the display is in the 20:1 Gear mode.
2.Attach the Calibration Bur to the handpiece.
3.Press the [CAL] key for about 2 seconds. There will be a beep and the display will switch to Calibration Mode.
4.Hold the motor in your hand and make sure that "L" is displayed on the torque display. Press the [CAL] key while allowing the bur to spin freely. This calibration step may take approximately 10 seconds and is complete when there is a beep and "donE" appears on the display.
5.Make sure "H" is displayed on the torque display, plug the calibration bur into the Torque Load at the top of the control unit. Push [CAL] key (This calibration step is done while applying torque load, so securely grasp the handpiece.) The calibration bur will begin to rotate. This Calibration step is complete when there is a beep and "doneE" appears on the display.
6.Remove the bur from the Torque Load at the top of the unit and then press the [CAL] key (Calibration bur should not touch anywhere). The bur will begin to rotate at a slow speed. After rotating slowly for 8 seconds, the bur will rotate at high speed for 8 seconds. There will a beep when calibration is complete. Calibration mode will finish automatically.
Please reference the SurgicPro Operation Manual prior to use.
Contact Brasseler USA for more details at 800-841-4522 or visit online at http://www.brasselerusa.com
Видео NSK SurgicPro - Attachment Calibration канала Brasseler USA
Показать
Комментарии отсутствуют
Информация о видео
Другие видео канала
 SLE1000 | 4. Powering up, Pneumatic Test and Calibration of the SLE1000
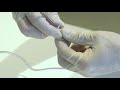 NSK Surgic Pro in-service
 NSK Surgic Pro - Installation and operation
 Step-by-Step - Montagem do Motor Neodent
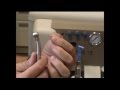 VetPro® 1000 Accessories Overview
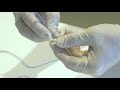 NSK SurgicProTutorial setup instructions
 Instructional video, NSK
 Kit Quirúrgico Grand Morse Neodent
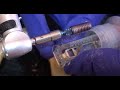 Flujo de colocación de un implante Bone Level
 KaVo Handpiece Manual Maintenance Video
 Dental Highspeed Handpiece - Brio440 from Brasseler USA
 Dentalaire Oil Change on Compressor
 Motor de implante NSK - Como configurar?
 ESR CM Endo System: A Safe, Simple and Complete Endo-Restorative Solution
 NSK Surgic Pro Implant Motor Set Up and Functions
 TUTORIAL: SURGIC AP DE NSK
 Prótesis atornillada unitaria o múltiple en implantes Bone Level Sistema Straumann SRA
 MyRay's X-pod Digital Imaging System
 How it's made - Dental Porcelain Veneers in Singapore
 7ème commandement : le forage et la pose d'implant