- Популярные видео
- Авто
- Видео-блоги
- ДТП, аварии
- Для маленьких
- Еда, напитки
- Животные
- Закон и право
- Знаменитости
- Игры
- Искусство
- Комедии
- Красота, мода
- Кулинария, рецепты
- Люди
- Мото
- Музыка
- Мультфильмы
- Наука, технологии
- Новости
- Образование
- Политика
- Праздники
- Приколы
- Природа
- Происшествия
- Путешествия
- Развлечения
- Ржач
- Семья
- Сериалы
- Спорт
- Стиль жизни
- ТВ передачи
- Танцы
- Технологии
- Товары
- Ужасы
- Фильмы
- Шоу-бизнес
- Юмор
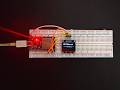
How to make flappy bird on ESP32 with OLED display and button
Want to build something cooler than a blinking LED? In this video, we are making a fully playable, retro Flappy Bird game using a standard ESP32 and a tiny OLED screen! We will code everything from scratch, building a mini arcade console you can carry in your pocket.
If you enjoy this project, make sure to hit that SUBSCRIBE button for more practical, intermediate ESP32 and hardware engineering tutorials!
PARTS LIST:
Microcontroller: Regular ESP32 (Classic NodeMCU / WROOM Board)
Display: 0.96" I2C SSD1306 OLED Screen
Input: 1x Tactile Push Button
Wires: Dupont Jumpers & Breadboard (or Breakout Shield)
WIRING (Classic ESP32 Layout):
OLED VCC -- ESP32 3V3
OLED GND -- ESP32 GND
OLED SDA -- ESP32 GPIO 21
OLED SCL -- ESP32 GPIO 22
Button Pin 1 -- ESP32 GPIO 23
Button Pin 2 -- ESP32 GND
SOURCE CODE & LIBRARIES:
The link to the source code is in the pinned comment.
Required Libraries in Arduino IDE:
Adafruit_SSD1306
Adafruit_GFX
#ESP32 #Arduino #FlappyBird #OLED #DIYGaming #TechTutorial #EmbeddedEngineering #RetroGaming
Видео How to make flappy bird on ESP32 with OLED display and button канала TheGPIOBench
esp32 oled flappy bird how to make flappy bird with esp how to make flappybird flappybird arduino electronics games diy DIY project fun button controll fun projects with microcontroller fun ESP32 projects #ESP32 #Arduino #FlappyBird #OLED #DIYGaming #TechTutorial #EmbeddedEngineering #RetroGaming Arduino FlappyBird OLED DIYGaming Embeddedengineering
Комментарии отсутствуют
Информация о видео
16 июня 2026 г. 21:40:35
00:00:58
Другие видео канала