Glitter Beach Tumbler Tutorial
#BeachGlitterTumbler #GlitterTumblerTutorial
*Disclosure: I only recommend products I would use myself and all opinions expressed here are our own. This description box may contain discount codes and affiliate links that at no additional cost to you, I may earn a small financial benefit. This helps support our channel so we can continue to provide you with inspired and focused content. Thank you.
This is the first of probably a few beach glitter tumblers we’ll be doing tutorials on! I love beach tumblers and this version is definitely one of my favorites!
STEP 1: Make sure your tumbler is sanded, cleaned and free of all debris. You’ll want to wash out the inside with warm dish soap and water. The tumbler shown in this video is a 20oz traditional from https://www.crafthaven.com/20oz-Traditional_p_26.html
**Use code FLYNNSISTERS 8% off!
STEP 2: Spray paint your base colors with the following spray paint colors.
Top blue color: https://amzn.to/2XcpnSS
Middle teal color: https://amzn.to/2TncSTd
White wave color: https://amzn.to/2Xfwn1t
Gold bottom sand color: https://amzn.to/3gamTgw
STEP 3: dry your spray paint in front of a small space heater (do not leave unattended) until paint is dry and cup will be warm. Apply less than 1-2ml of epoxy and apply glitter. Start with the chunky glitters first and use the smaller cuts to blend. All the glitter shown in this video can be found here https://www.peachyoliveglitters.com **Use code FlynnSisters10 for 10% off!
Colors used: Earmuffs, Lapis, Semper Fi, Head Over Teals, Weesley, Weekend at Bernies (or Mr. Lomax), Parabatai, Bliss, Athena, Goldmember
STEP 4: allow the glitter layer to dry for 2-3 hours and seal with a clear gloss spray paint. We prefer this one https://amzn.to/3d2nCOE
STEP 5: apply epoxy layer. For this 20oz tumbler we used about 40ml to coat the first layer. Allow that to dry on the turner for at least 4-6 hours. Then apply about 15-20ml of epoxy and mix 1 drop of epoxy dye into 5ml of epoxy and use the white dyed epoxy to create the waves. Find the epoxy dye here https://www.alumilite.com/dyes-colors/alumilite-dye/?aff=26
**Use code FLYNN10 for 10% off!
STEP 6: after at least 8 hours sand as needed and apply your decal. Apply final layers of epoxy.
Find the SVG I used for this design here: https://www.etsy.com/listing/616415907/life-is-better-at-the-beach-svg-png-dxf?ref=yr_purchases
Looking for a great cup turner? Get your own TheBoan Cup Turner here: https://www.etsy.com/shop/theboanllc/
**Use coupon code FLYNNSISTERS10 for 10% off all 2, 3, 4, 5, and 6 cup turners!!
MY CUP ARMS + TURNER SYSTEM -- Get your own TheBoan Cup Turner here:
👉 https://www.etsy.com/shop/theboanllc/
👉 Facebook group: https://www.facebook.com/groups/1994042817560049
👉**Use coupon code Flynn1 for $5.00 off total of $50.00 or more!!
Get Social with Craft Haven!!
Facebook group: https://www.facebook.com/groups/crafthaven/
Facebook page: https://www.facebook.com/crafthaventumblers
Instagram: https://www.instagram.com/crafthaventumblers/
YouTube: https://www.youtube.com/channel/UCdQKOh885mpX6NMltDuYF9g/
Shop: https://www.crafthaven.com
Get Social with Peachy Olive Glitters!
Facebook group: https://www.facebook.com/groups/172545040003476/
Facebook page: https://www.facebook.com/peachyoliveglitters/
Instagram: https://www.instagram.com/peachyoliveglitters/
YouTube: https://www.youtube.com/channel/UCc6FHj-iu_byUyg22qLblrQ/
Shop: https://www.peachyoliveglitters.com
Get Social with Flynn Sisters!
Facebook group: https://www.facebook.com/groups/flynnsisterscommunity
Facebook page: https://www.facebook.com/flynnsistersboutique
Instagram: https://www.instagram.com/flynnsistersboutique
YouTube: https://www.youtube.com/c/flynnsistersboutique
Flynn Sisters Boutique videos are sponsored by Peachy Olive Glitters and Craft Haven.
Are you loving our videos? Thank us with a small donation to our channel or buy us coffee: https://tinyurl.com/yx2fcwjt
Видео Glitter Beach Tumbler Tutorial канала Flynn Sisters Boutique
Показать
Комментарии отсутствуют
Информация о видео
Другие видео канала
 Beach Tumbler Tutorial | Glitter Beach Tumbler | Acrylic Paint Beach Tumbler Tutorial
 Leopard and Serape Water Slide Tumbler Tutorial
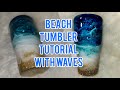 Beach Tumbler Tutorial with Waves | Bee Jay's Glitter | Tumblerpoxy
 Glitter Sunset Tumbler Tutorial
 Glitter Ombre Tumbler Tutorial
 Seascape Beach Epoxy Tumbler with REAL SAND!!
 Pastel Glitter Beach Tumbler Tutorial
 Pink Opal Milky Way Tumbler Tutorial
 Glittered Ombre Beach Tumbler with Alcohol Ink Tutorial | Mr. Nola's Glitter
 Easy Striped Tumbler Tutorial
 Centered Vinyl Wrap Tumbler Tutorial
 Sunset Beach Tumbler
 Patriotic Swirl Tumbler Tutorial
 Beach Tumbler Tutorial 2.0
 Sunset Beach Glitter Tumbler Tutorial
 Start to finish epoxy tumbler
 Alcohol Ink Swirl Tumbler Tutorial
 Glittered Opal Milky Way Tumbler
 Footsteps on the Beach Glitter Tumbler Tutorial part 1
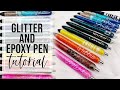 Glitter and Epoxy Pen Tutorial