- Популярные видео
- Авто
- Видео-блоги
- ДТП, аварии
- Для маленьких
- Еда, напитки
- Животные
- Закон и право
- Знаменитости
- Игры
- Искусство
- Комедии
- Красота, мода
- Кулинария, рецепты
- Люди
- Мото
- Музыка
- Мультфильмы
- Наука, технологии
- Новости
- Образование
- Политика
- Праздники
- Приколы
- Природа
- Происшествия
- Путешествия
- Развлечения
- Ржач
- Семья
- Сериалы
- Спорт
- Стиль жизни
- ТВ передачи
- Танцы
- Технологии
- Товары
- Ужасы
- Фильмы
- Шоу-бизнес
- Юмор
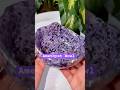
DIY Enchanted Starlight Bowl | Holographic Glitter & White Mica Resin Tutorial ✨
🪄 Step-by-Step Tutorial: Enchanted Starlight Bowl
Hey guys, in this video I’ll be showing you how I created this Enchanted Starlight Bowl using Craft Resin and some beautiful shimmer and glitter! 💫
Materials Used:
• Craft Resin (1:1 ratio)
• White shimmery mica from Eye Candy
• Various discontinued holographic glitters
• Holographic floral witch hat decal
• Mixing cups & stir sticks
• Silicone bowl mold
• 99% alcohol spray
• Toothpick
• Torch or heat gun
• Gloves and protective workspace
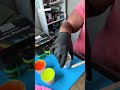
Step 1: Mix Your Resin
Start by mixing your Craft Resin using a 1:1 ratio of Part A and Part B. Stir it slowly for about 7 minutes, making sure it’s fully combined and clear.
⸻
Step 2: Separate and Add Color
Next, separate your mixed resin into two cups — one for the white shimmery mica from Eye Candy and one for your glitter mix.
Mix each cup thoroughly until your colors are well blended and smooth.
⸻
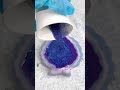
Step 3: Pour the Resin into the Mold
Begin pouring your resin into the bowl mold, alternating between the white mica mix and the glitter mix.
Rotate between both cups as you pour to create a stunning swirl and layered holographic effect. Continue until your mold is completely filled.
⸻
Step 4: Pop Bubbles & Cure
Once filled, lightly spray the top with 99% alcohol to remove any surface bubbles.
Let your piece cure for 24 hours in a dust-free space.
⸻
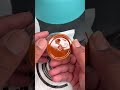
Step 5: Demold Your Bowl
After 24 hours, carefully remove your bowl from the mold. It should have a beautiful shimmer and sparkle effect! ✨
⸻
Step 6: Add the Clear Layer & Decal
Now, mix a small batch of clear epoxy resin and pour it into the center of your bowl to make sure the bottom is completely covered.
Then, gently place your holographic sticker decal in the center of the bowl. Use a toothpick to press it down and make sure it’s fully submerged in the resin with no air bubbles underneath.
⸻
Step 7: Seal and Cure Again
Pour a small layer of clear resin on top of the decal to fully encapsulate it.
Use a torch or heat gun to carefully pop any remaining bubbles.
Cover your piece and let it cure for another 24 hours until it’s fully hardened and clear.
⸻
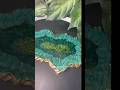
Step 8: Final Reveal!
And there you have it — your Enchanted Starlight Bowl! 🌙✨
The holographic glitter and shimmery mica together give this bowl a magical, galaxy-like sparkle that’s absolutely mesmerizing.
⸻
💜 Don’t forget to like, comment, and subscribe for more resin tutorials!
✨ Follow me on all my socials for behind-the-scenes and new drops!
🩵 Use code: UNEQKREATIONS to save with Eye Candy!
#ResinArt #ResinArtist #ResinBowl #DIYResin #CraftResin #EyeCandyPigments #ResinTutorial #ResinPour #ResinCreation #EpoxyArt #HandmadeWithLove # #UNeqKreations #TheLuxuryResinGoddess #HolographicResin #ResinCommunity #ResinDesigns #ResinAddict #ResinInspiration #ResinDecor #ResinMagic #ResinCrafts #UniqueCreations #SupportSmallBusiness
Видео DIY Enchanted Starlight Bowl | Holographic Glitter & White Mica Resin Tutorial ✨ канала U’Neq Kreations
Hey guys, in this video I’ll be showing you how I created this Enchanted Starlight Bowl using Craft Resin and some beautiful shimmer and glitter! 💫
Materials Used:
• Craft Resin (1:1 ratio)
• White shimmery mica from Eye Candy
• Various discontinued holographic glitters
• Holographic floral witch hat decal
• Mixing cups & stir sticks
• Silicone bowl mold
• 99% alcohol spray
• Toothpick
• Torch or heat gun
• Gloves and protective workspace
Step 1: Mix Your Resin
Start by mixing your Craft Resin using a 1:1 ratio of Part A and Part B. Stir it slowly for about 7 minutes, making sure it’s fully combined and clear.
⸻
Step 2: Separate and Add Color
Next, separate your mixed resin into two cups — one for the white shimmery mica from Eye Candy and one for your glitter mix.
Mix each cup thoroughly until your colors are well blended and smooth.
⸻
Step 3: Pour the Resin into the Mold
Begin pouring your resin into the bowl mold, alternating between the white mica mix and the glitter mix.
Rotate between both cups as you pour to create a stunning swirl and layered holographic effect. Continue until your mold is completely filled.
⸻
Step 4: Pop Bubbles & Cure
Once filled, lightly spray the top with 99% alcohol to remove any surface bubbles.
Let your piece cure for 24 hours in a dust-free space.
⸻
Step 5: Demold Your Bowl
After 24 hours, carefully remove your bowl from the mold. It should have a beautiful shimmer and sparkle effect! ✨
⸻
Step 6: Add the Clear Layer & Decal
Now, mix a small batch of clear epoxy resin and pour it into the center of your bowl to make sure the bottom is completely covered.
Then, gently place your holographic sticker decal in the center of the bowl. Use a toothpick to press it down and make sure it’s fully submerged in the resin with no air bubbles underneath.
⸻
Step 7: Seal and Cure Again
Pour a small layer of clear resin on top of the decal to fully encapsulate it.
Use a torch or heat gun to carefully pop any remaining bubbles.
Cover your piece and let it cure for another 24 hours until it’s fully hardened and clear.
⸻
Step 8: Final Reveal!
And there you have it — your Enchanted Starlight Bowl! 🌙✨
The holographic glitter and shimmery mica together give this bowl a magical, galaxy-like sparkle that’s absolutely mesmerizing.
⸻
💜 Don’t forget to like, comment, and subscribe for more resin tutorials!
✨ Follow me on all my socials for behind-the-scenes and new drops!
🩵 Use code: UNEQKREATIONS to save with Eye Candy!
#ResinArt #ResinArtist #ResinBowl #DIYResin #CraftResin #EyeCandyPigments #ResinTutorial #ResinPour #ResinCreation #EpoxyArt #HandmadeWithLove # #UNeqKreations #TheLuxuryResinGoddess #HolographicResin #ResinCommunity #ResinDesigns #ResinAddict #ResinInspiration #ResinDecor #ResinMagic #ResinCrafts #UniqueCreations #SupportSmallBusiness
Видео DIY Enchanted Starlight Bowl | Holographic Glitter & White Mica Resin Tutorial ✨ канала U’Neq Kreations
resin art tutorial diy resin bowl holographic resin bowl resin pouring tutorial craft resin tutorial epoxy resin art handmade resin creations how to make resin bowl resin artist tips resin diy for beginners resin mica powder eye candy pigments resin glitter bowl resin with decal resin holographic effect resin shimmer bowl resin mold art unique resin crafts luxury resin designs resin home decor
Комментарии отсутствуют
Информация о видео
11 октября 2025 г. 9:00:57
00:00:59
Другие видео канала