How to Install a TOTO Skirted toilet | TOTO WASHLET+
Daniel Johnson, you're bidet expert and Many Bidets owner, walks you through installing TOTO skirted toilet and WASHLET+. Stay tuned for for non-skirted and partially skirted toilets.
TOTO WASHLET+ Units: https://www.manybidets.com/product-category/bidet-style/washlet-toilets-with-bidet-seats/?utm_source=YouTube&utm_medium=install&utm_campaign=washlet-plus-skirted-toilet
TOTO Auto Flush Video: https://www.youtube.com/watch?v=_5FLJNUmNyg
Confused and need help picking a bidet? Get our ebook!
https://www.manybidets.com/how-to-pick-a-bidet-ebook/
Save this video, and follow for new articles on Flipboard: https://flip.it/U2pKog
Visit our site: https://www.manybidets.com/?utm_source=YouTube&utm_medium=install&utm_campaign=washlet-plus-skirted-toilet
Don't forget to Subscribe for the latest reviews, compares, install tips, troubleshooting, and giveaways: https://goo.gl/gpJu2d
Need help deciding? Check out our quiz: https://www.manybidets.com/blog/bidet-quiz/
Useful Links & Info:
Phone: (Call or Text): 248-974-4030
Email: support@manybidets.com
In-depth compares: https://www.manybidets.com/blog/?sort_by=post_modified&categories=comparisons
Testimonials: https://www.manybidets.com/reviews-and-testimonials/?utm_source=YouTube&utm_medium=install&utm_campaign=washlet-plus-skirted-toilet
Learn about us: https://www.manybidets.com/about/?utm_source=YouTube&utm_medium=install&utm_campaign=washlet-plus-skirted-toilet
Transcript:
If you've ever wondered how to install a Washlet+ setup, with a skirted design, today's your lucky day. Today, we are going to walk through, in detail, installing a Toto Nexus Washlet+ toilet, with a S550e Washlet+ Bidet Seat. Cord and hose are completely hidden and we have the skirted design. Subscribe to our channel if you're looking to see the videos on partially skirted and non-skirted Washlet+ videos, when we release them here, in the near future. My name is Daniel Johnson. I'm your Bidet expert and the owner of ManyBidets.com, where over the past 8 years, we've sold over 10,000 Bidets.
The first thing we need to do is, we need to use the template to decide where we need to drill holes in the floor. For the Nexus, you can have either 12, or 14 inch rough-in, both require different adapters. Some of the Washlet+ toilets, like the Aquia 4, have a 10 inch rough-in option, as well. Here, we see the 14 and the 12, but on some mounting templates you'd also see a 10, on the opposite side of the 12 line. We're dealing with a 12 inch rough in, so I tore the perforated edge for the 12 inch circle. Now, I'm going to take this template and place it over the flange. We're going to line it up here, so that it's as centered as we can have it here real quick. Now, we're going to grab a drill and drill holes here, here and here. If it makes it easier for you, you can tape this down while you're drilling the holes. Since we're not actually installing this in a real bathroom, i'm just going to hold it in place. Here's our 12 inch rough-in adapter. If we were dealing with a 14 inch, or a 10 inch rough in, the rough-in is from the center of these bolt holes, to the back wall, without the trim taking into account, but if we were dealing with a 12 or 10 inch rough-in, this piping would be longer, or shorter, accordingly. We are using a Better than wax seal here. A lot of people will use an actual wax ring on this portion. We're using better than wax simply, because it's less messy and we install a lot of toilets on this platform. These bolts, along with the additional hardware that I'm installing right now, are hardware that should have come with your flange, when you first installed it. These are items that Toto does not include, because they shouldn't be needed. That being said, if they did not come with your original flange, or it was misplaced, these can be quickly and easily picked up for a few dollars at your local hardware store. We're going to tighten this down, until it's snug. If you're using a wax ring, you'll definitely feel the wax kind of grip this flange adapter, as you tighten it down. Now, what we need to do is, we need to screw through the holes that we've created here in the back, to hold the back of the flange adapter down. These are short screws, they're the only short ones in the box and they're actually taped to the back of the flange adapter. You might also put anchors into the floor, which are in the same bag. We didn't in this scenario, because we're drilling into wood. That flange adapter is now tight. Again, remember this is our 12 inch flange adapter, and so we're working with a 12 inch rough and this should work just fine. We now have to install the brackets that the toilet screws into, and you'll see that...
00:00 Introduction
00:47 Install Flange Adapter
04:36 Place the Toilet
07:03 Install Bidet Seat
10:43 Connecting the Water
12:31 Common Remote Question - Auto Flush
14:05 Checking for Leaks
17:10 Closing Statement
Видео How to Install a TOTO Skirted toilet | TOTO WASHLET+ канала Many Bidets
Показать
Комментарии отсутствуют
Информация о видео
Другие видео канала
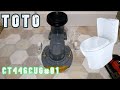 TOTO TOILET - CT446CUG#01- INSTALLATION
 How to Choose a WASHLET+ Bidet Toilet | Comparison - how are they different?
 How to install a skirted toilet with a sealed trapway
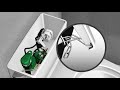 Installing the TOTO Auto Flush Kit - THU767
 TOTO S550e / S500e Washlet Review - bidetsPLUS.com
 Installing a Toto One-Piece Toilet
 Best Toto Toilet 2022
 How To Install a Toilet. One Piece Swiss Madison Concorde Toilet. Замена унитаза
 Are Toto Washlets Worth It? A Plumber Shows What a Toto Washlet Is and Why He Loves Them
 TUSHY Bidet Installation on Skirted Toilet
 Toto Toilet Comparison
 TOTO WASHLET C2 & C5 Bidet Toilet Seat Review Video | BidetKing.com
 How To Replace A Toilet Wax Seal OR Rubber Toilet Seal On A Toilet Flange To STOP Toilet Leaks!
 How to Install a Bidet Toilet Seat on a Skirted Toilet | BidetKing.com
 Installing a Bidet Toilet Seat + 2 Week Update
 Skylle-/tørretoilet: Aquatec Pure Bidet Instruktionsvideo
 Dalmo Toilet Bidet Adapter Install.
 How to install the TOTO S550e Washlet Bidet Seat
 TOTO- Neorest usage -保養篇
 How to Remove and Install a Toilet Seat