Suzuki DR-Z400 Project Bike – Episode 3 (Engine Assembly Part 1)
T2W Amazon Store: https://www.amazon.com/shop/tim2wheels
Part 1 = Bearings / Crankshaft / Transmission
In this first part of the motor reassembly I will cover replacing the bearings in the bottom-end, installing a new crankshaft, and installing the transmission.
Tools used for this video:
Tusk Bearing Remover Set ($69.99) - https://www.rockymountainatvmc.com/parts/tusk-bearing-remover-p
Parts used in this video:
Hot Rods Complete Crankshaft Assembly ($368.96) - https://www.rockymountainatvmc.com/parts/hot-rods-complete-crankshaft-assembly-heavy-duty-p?v=2607
Hot Rods Main Bearing Set ($62.96) - https://www.rockymountainatvmc.com/parts/hot-rods-crankshaft-main-bearing-and-seal-kit-p?v=2607
Hot Rods Counter Balancer Bearing Kit ($35.96) - https://www.rockymountainatvmc.com/parts/hot-rods-counter-balancer-bearing-kit-p?v=2607
Hot Rods Transmission Bearing Kit ($89.96) - https://amzn.to/2KZFPkp
Tusk Engine Oil Seal Kit ($14.99) - https://www.rockymountainatvmc.com/parts/tusk-engine-oil-seal-kit-p?v=2607
For a list of other Tools, Equipment, and Supplies I use in my shop, visit: http://tim2wheels.com/stuff-i-use/
Want to donate?
https://www.patreon.com/tim2wheels
or
https://www.paypal.me/tim2wheels
___________________________________________________________________
Video Sponsors:
Rocky Mountain ATV/MC - https://www.rockymountainatvmc.com/
ToolVector.com: https://toolvector.com/
ToolVector 10% Discount Code for my viewers. Just enter “T2W” at checkout.
___________________________________________________________________
Video Gear:
Canon EOS M50 – https://amzn.to/2PZMr2G
Rode Video Micro - https://amzn.to/2PW8ZBD
GoPro Hero 5 Black - https://amzn.to/2PAAL5M
Music Credits:
Closing Song from Ampletunes.com – Nice work guys!
DISCLAIMER: The Information provided in this video IS NOT professional advice. It is simply a demonstration of how I performed this task and is for informational purposes only. If you are not comfortable performing this type of work, seek professional assistance. Always follow the manufacturer’s instructions when performing maintenance or installing parts and equipment.
Видео Suzuki DR-Z400 Project Bike – Episode 3 (Engine Assembly Part 1) канала Tim2Wheels
Показать
Комментарии отсутствуют
Информация о видео
Другие видео канала
 Suzuki DR-Z400 Project Bike – Episode 4 (Engine Assembly Part 2)
 Suzuki DR-Z400E Project Bike – Episode 1 (Engine Tear-down)
 DRZ 400 SUPERMOTO: SUPERMOTO BUILD SERIES PT. 3
 2001 Suzuki LTZ400 engine assembly short block
 ONLY MODS you need DRZ400SM | Beginners Guide
 DRZ400SM Lectron Carb Install and Review
 DRZ400E ULTIMATE LIGHTWEIGHT ADVENTURE BIKE SETUP AND MODS. (FULL RUNDOWN)
 How To: Replacing Countershaft Oil Seal DRZ400SM
 My Favorite DUAL SPORT & ENDURO Mods, Farkles, & EDC (DRZ 400) o#o
 Suzuki DR-Z400 Project Bike – Episode 5 (Bike Assembly)
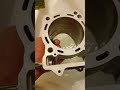 DRZ 470sm Stroker Project
 PART 3 KFX 400 LTZ DRZ ENGINE DISASSEMBLY!
 NEW - How to install Integrated Tail light & Fender Eliminator on a Suzuki DRZ 400 by TST Industries
 Must have mods for the DRZ400 | On Two Wheels
 Install Lowering Links on a 2008 Suzuki DRZ400S - Part 1
 DRZ400 engine fail! | On Two Wheels
 Engine Tear Down On A 75,000Km DRZ400E
 Suzuki DRZ400 Modifications for Adventure Riding
![Turning the DR650 into a Monster! - [ PROCYCLE FUEL AND AIR ]](https://i.ytimg.com/vi/BgH7LYI1iIU/default.jpg) Turning the DR650 into a Monster! - [ PROCYCLE FUEL AND AIR ]
Turning the DR650 into a Monster! - [ PROCYCLE FUEL AND AIR ] Suzuki DR-Z 70 Valve Check & Oil Change