Chenille Scarf Tutorial and Free Pattern
We will be making a Chenille scarf from Flannel. It's fun and easy for beginners to advanced sewers. You will be walked through the step by step process of creating this one of a kind Chenille Scarf.
Chenille scarf
Fabric amounts
Base Fabric - .35M
Chenille Fabric – 1.5M (40”+ wide)
Cutting
Base Fabric – 6” x approx. 80” (2 widths of fabric) can be cut on the straight grain. Sew pieces together to get full length.
Chenille fabric – 6” wide on the bias. (start 6” from one corner cutting on a 45* angle.) Remove salvages and simply overlap fabrics.
Sewing
Position 2 layers on top side and 2 layers on bottom side. Pin to hold while sewing
Draw stitching line down center of scarf. Stitch that line then 3/8” on either side.
Continue stitching 3/8” to outside edges of scarf. Trim edges to ¼” – 1/8” from last row of stitching if needed.
Using Chenille cutter cut through top 2 layers between stitching on both sides.
Sew across ends 6” up from edges. Watch that all layers lay flat. Cut base layer of fabric up to the 6” stitching (Forms the fringe)
Wash 2 or more times to fluff.
Видео Chenille Scarf Tutorial and Free Pattern канала Sew It Yourself
Показать
Комментарии отсутствуют
Информация о видео
Другие видео канала
 SCARF IS SEW EASY!
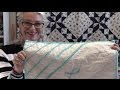 How to Sew with "Chenille-it" to make Faux Chenille!
 How to Make a Chenille Rug Out of a Fabric Panel | A Shabby Fabrics Sewing Tutorial
 Darvanalee Designs Studio | How to Make a Chenille Cushion
 Let's Make a Chenille Scarf with SewBatik
 DIY!!! How to cut and sew stylish front pleated hijab| instant hijab tutorial
 HQ Live - September 2019 - Chenille-It! with Nannette Holmberg
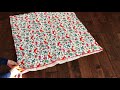 faux chenille baby blanket tutorial
 Start to Finish ALL Steps Placemat Tutorial - Cross Corner Free Pattern!
 All About Aprons!!! Easy at Home Sewing Project from Jordan Fabrics
 Sew Your Own Chenille Fabric!
 Chenille-It tm Strip-Pieced Baby Quilt
 How to make your own faux Chenille with the Olfa Chenille Cutter
 How to Turn Quilt Panels into a Chenille Quilt
 3 DIY SIMPLE POUCH IDEAS JUST FROM SQUARE FABRIC // Sew it Without Skills
 ⭐️❤️ How To Make A 2/Two Seam Tote Bag ~ Original Magic Tote Bag ~EASY
 SEW EASY! Free Pattern Panel Project :)
 Quilt As You Go Venice Placemats | A Shabby Fabrics Tutorial
 Twisted Infinity Scarf
 My Sewing Supply Thrift Haul ~ Amazing Goodwill Sewing Treasures