Stone Veneer Installation | Natural Stone | By SHEMSS
Natural Stone Veneers Installation. Tools you will need for the project; A trowel, slicker, Hammer, Soft brush, and a Wire brush, a Dimond blade grinder, a mixing paddle, a torch, a propane heater and a whole lot of talent.
For the Mortar were using Spec Mix, its a specially formulated mortar for the use in the installation of masonry veneers. a Great choice for our rock. Follow the instructions on the bag on how to mix the mortar. You will need a bucket, some water and this where that mixing paddle with a drill comes in handy.
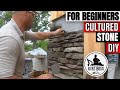
For the surface preparation, Our mason first applied the water-resistant barrier and a galvanized expanding metal lath. Then you want to start the rock installation from your corners, Stonehenge provides precut stone corners which makes it easier and faster to do your corners. Once your corners are installed, start filling in the wall with stone.
Apply the mortar to the stone and onto the wire lath, press the stone in firmly to embed into the mortar until the excess mortar extrudes around the sides.
We are working with a natural stone in this project. This is not what’s called a faux stone, faux stone is fake, made to look like it's real, but as soon as it chips or is cut, it will not look like stone. We are using real peaces of stone, chip them or cut them however you want the inner material is still stone and will not lose its stone looking properties because it's a natural stone, no peace is the same, they are all unique in color variation, shape and size. This is where creativity and an eye for great design is important. Randomizing your stones is the goal, keep flipping the stone until you see that desired fit. Our mason begins filling in the wall with available stones without cutting or chipping, then he comes back around and fills in the empty spots with best-fitting stones, or He chips away to proper shape or size as needed.
Before the Mortar dries, use the slicker tool to scrape off bulging mortar and then use the wire brush to clean the seems even further and finish with a soft brush.
As far as the torch and heaters, depending on the weather you may not need one. We’re working in the snow, it’s cold and we need to help our mortar dry. So we warm up the stones.
Now the Interior will be different when it comes to surface backing, for the interior stone around the fireplace we used a Densshield backer board, it's is also used for laying tile, we like this backing because it has a built-in moisture barrier. then we add the metal lath and install it as usual. Very important, Do not install directly onto sheetrock.
To build your very own custom home, go to shemss.com
Built & Designed by SHEMSS Inc. https://www.shemss.com/
FOLLOW US ON:
https://www.instagram.com/shemss.inc/
https://www.facebook.com/SHEMSSinc
We Don’t Build Houses, We Build Homes.
Camera - Panasonic Lumix GH5
Lens - Olympus M.Zuiko Digital ED 7-14mm f/2.8 PRO
Video Editors & Camera
https://www.instagram.com/imagelush/
Music - https://www.premiumbeat.com/
Видео Stone Veneer Installation | Natural Stone | By SHEMSS канала SHEMSS
For the Mortar were using Spec Mix, its a specially formulated mortar for the use in the installation of masonry veneers. a Great choice for our rock. Follow the instructions on the bag on how to mix the mortar. You will need a bucket, some water and this where that mixing paddle with a drill comes in handy.
For the surface preparation, Our mason first applied the water-resistant barrier and a galvanized expanding metal lath. Then you want to start the rock installation from your corners, Stonehenge provides precut stone corners which makes it easier and faster to do your corners. Once your corners are installed, start filling in the wall with stone.
Apply the mortar to the stone and onto the wire lath, press the stone in firmly to embed into the mortar until the excess mortar extrudes around the sides.
We are working with a natural stone in this project. This is not what’s called a faux stone, faux stone is fake, made to look like it's real, but as soon as it chips or is cut, it will not look like stone. We are using real peaces of stone, chip them or cut them however you want the inner material is still stone and will not lose its stone looking properties because it's a natural stone, no peace is the same, they are all unique in color variation, shape and size. This is where creativity and an eye for great design is important. Randomizing your stones is the goal, keep flipping the stone until you see that desired fit. Our mason begins filling in the wall with available stones without cutting or chipping, then he comes back around and fills in the empty spots with best-fitting stones, or He chips away to proper shape or size as needed.
Before the Mortar dries, use the slicker tool to scrape off bulging mortar and then use the wire brush to clean the seems even further and finish with a soft brush.
As far as the torch and heaters, depending on the weather you may not need one. We’re working in the snow, it’s cold and we need to help our mortar dry. So we warm up the stones.
Now the Interior will be different when it comes to surface backing, for the interior stone around the fireplace we used a Densshield backer board, it's is also used for laying tile, we like this backing because it has a built-in moisture barrier. then we add the metal lath and install it as usual. Very important, Do not install directly onto sheetrock.
To build your very own custom home, go to shemss.com
Built & Designed by SHEMSS Inc. https://www.shemss.com/
FOLLOW US ON:
https://www.instagram.com/shemss.inc/
https://www.facebook.com/SHEMSSinc
We Don’t Build Houses, We Build Homes.
Camera - Panasonic Lumix GH5
Lens - Olympus M.Zuiko Digital ED 7-14mm f/2.8 PRO
Video Editors & Camera
https://www.instagram.com/imagelush/
Music - https://www.premiumbeat.com/
Видео Stone Veneer Installation | Natural Stone | By SHEMSS канала SHEMSS
Показать
Комментарии отсутствуют
Информация о видео
Другие видео канала
 How to install cultured stone veneer for beginners Part 1 on a Homestead
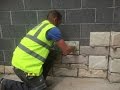 ThinStone ...fitting demo video
 Installing the BEST Looking (FAKE) Faux Stone: Versetta Stone by BORAL
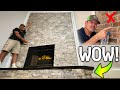 DIY FIREPLACE TRANSFORMATION with a CUSTOM HEARTH!
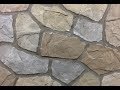 How to do a Hand Carved Flagstone Concrete Overlay Wall, Outdoor Kitchen, Fireplace, or Seat Wall
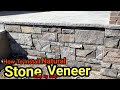 How To install Natural Stone Veneer - Step By Step ,
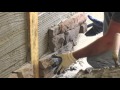 Drystack vs. Preset Drystack Installation
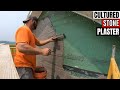 Installing wire lath & plaster for cultured stone veneer fieldstone
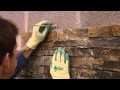 Z Clad Natural Stone Cladding
 How to Install Veneer Stone
 How to Build a Stone Wall
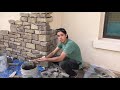 How to install stone veneer como instalar piedra de fábrica
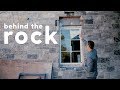 Details for Stone or Brick
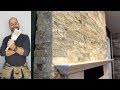 DIY How To Install Stone on Your Fireplace Easily
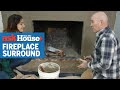 How to Stone Veneer a Fireplace | Ask This Old House
 Stone Veneer Installation, Surface Prep Heritage Stone
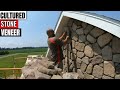 Installing Cultured Stone Veneer Fieldstone Homesteading
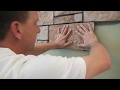 Masonry Veneer Installation System (MVIS) by LATICRETE
 Natural Thin Veneer Stone Installation Outdoors Ledgestone
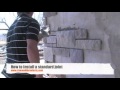 How to Install Stone Veneer - Stone Mill Inc