#35 Making a Model Loco Test Board (with Rolling Road, DCC Decoder Tester, LokProgrammer & SPROG)
Update: Due to popular demand, a PDF wiring diagram for the test board is now available here: https://tinyurl.com/loco-tester-rollingroad-wiring
I've been doing an increasing number of DCC decoder installations and model locomotive repair jobs - both for myself and others - and setting up my tester and rolling road each and every time I needed them was becoming a bit tiresome (not to mention the rat's nest of cables).
So, I decided to put together a wee loco and decoder test board, with LokProgrammer, SPROG and off-board control integration (DCC and DC/Analogue). It also features a rolling road, using DCC Concepts rolling road modules and my own take on a means to permanently integrate them into a test set up.
This is only one way of approaching this and there other examples out there. I do recommend that you do something like this if you're intending to do a lot of decoder installation and maintenance - it saves a lot of time and hassle!
CORRECTION: In the video, I mention the acrylic/perspex sheet as being 6mm when it is actually 4mm. A thickness of 6mm is likely to be too thick and may interfere with the wheel flanges.
---
You can buy some components for this how-to project via the links below. Buying via Amazon or eBay affiliate links means I get a (very) small donation and helps to support the channel:
- DCC Concepts rolling road: https://ebay.to/3bfT63l
- Red and black wire pack: https://amzn.to/2C1Infx
- Green 2-pin terminal plugs/sockets: https://amzn.to/2PiVfiW
- Peco straight track: https://amzn.to/2LGgPM7
- A4 clear acrylic sheet (4mm thick): https://amzn.to/2Cae1Yk
- M5x8mm black nylon spacer: https://amzn.to/2Pq7tX4
- A4 plywood 12mm: https://ebay.to/31uVpLr
- A4 plywood 3mm: https://amzn.to/2C03bE2
- ESU decoder tester: https://ebay.to/2S13mVI
- SPROG dcc module: http://www.sprog-dcc.co.uk
- Green power panel-mount socket/plug (20pk): https://ebay.to/37WP0ey
- Green power panel-mount socket/plug (2P / 3.81 Pitch): https://ebay.to/2v7Qe86
- DC power socket: https://ebay.to/2v30jU6
- DC power plug: https://ebay.to/2tvNu46
- 3 position, 2-pole switch: https://ebay.to/2SxKNaX
If you've got a 3D printer, you can download STL file for the 3D-designed parts for free and print yourself a copy:
Switch box/enclosure: https://skfb.ly/6B6Cy
SPROG3 cradle: https://skfb.ly/6B6DY
---
Thank you very much for watching.
Please comment, like, share and subscribe!
Visit us at: http://www.strathpefferjunction.com
---
Please note: If you choose to follow any of the steps or suggestions outlined in the video, you do so at your own risk and any damage or injury to yourself, your models, your equipment or others is your own responsibility.
Видео #35 Making a Model Loco Test Board (with Rolling Road, DCC Decoder Tester, LokProgrammer & SPROG) канала Strathpeffer Junction
Показать
Комментарии отсутствуют
Информация о видео
Другие видео канала
 FAULTY DCC DECODER – how do you know?
 Setting up the perfect Rolling Road - SkillsCast
 #33 Part B: Installing a Flashing Tail Lamp/EOT Light (Making Pickups, Switch & Voltage Regulator)
 DIY Rolling Road v1 0
 41. Chadwick Model Railway, track change again!
 #10 Adding a motor to Oxford Rail road/rail Landrover Defender
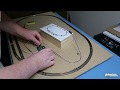 Model Railway optical block detector hook up and demo
 Overview - ESU LokProgrammer & Decoder Tester
 DCC Concepts Rolling Road (DCM-RRA4)
 52. DCC 101, Easy decoder testing
 #29 Ringfield Motor Upgrade Using a 3D Printed Adaptor
 87. Bonus Video--More On DCC Power Measurements
 Connecting DCC System to JMRI PC/MAC Verson 2
 Hornby Ringfield Motor Upgrade Kits - Plug & Play!
 Tri-ang Hornby Track Plan along with a few other bits and pieces on the layout
 #39 Part 1: How to make a Stay Alive Capacitor Unit (Hornby TTS Sound Decoder and Others)
 How To Use The ESU Decoder Tester On Your Model Railroad
 Model Railway Shuttle System - BLOCKsignalling - SS2A DC Shuttle System with Speed Controller
 #25 Lima Class 47 Ringfield Motor Upgrade - Part A
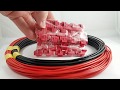 How to Wire DCC for under £20 with No Soldering!