How to Wet Sand and Polish Paint [Beginner's Guide]
How to wet sand and polish paint. I originally released a wet sanding tutorial video back in 2013, so this is my updated version covering commonly asked questions and showing a more detailing process along with what to expect during each stage. First I will be starting out with single stage paint and in the second part of the video will be two stage paint. Wet sanding will remove orange peal, improving the clarity and imagine in the paint. It will also help remove foreign contaminants which maybe on the surface in the paint along with runs, overspray, and even paint oxidization. It can be used on both single and two stage paints. Single stage paints is a form of paint applied which is both the color and finish coat and will dry with a shiny finish. Two stage paints require a base coat which is a color and finally a clear coat which provides the final shine and protection to the base color. Wet sanding is a great way to improve a good paint job and can even be used to help improve the quality of a poorly laid paid layer. #paint #autobody #detailing
Amazon links for some of the products used in the video:
USA:
Backing pad: https://amzn.to/3qUc5rl
1000 grit sandpaper: https://amzn.to/2YkJzmq
1500 grit sandpaper: https://amzn.to/3qTem61
2000 grit sandpaper: https://amzn.to/3iWGzWX
Polishing Compound: https://amzn.to/3omIghF
Wax and applicator kit: https://amzn.to/36xqYs7
Canada:
Backing pad: https://amzn.to/2M71Hhg
1000 grit sandpaper: https://amzn.to/36e2fZs
1500 grit sandpaper: https://amzn.to/3cfSJZx
2000 grit sandpaper: https://amzn.to/3pot4BF
Polishing Compound: https://amzn.to/36g3PKq
Wax and applicator kit: https://amzn.to/3sZXoF6
Website: http://4diyers.com
Patreon: https://www.patreon.com/4diyers
Facebook: https://www.facebook.com/4diyers
Google Plus: https://plus.google.com/+4DIYers
Twitter: https://twitter.com/4DIYers
Instagram: https://www.instagram.com/4diyers/
Tumblr: http://4diyers.tumblr.com
Pintrest: https://www.pinterest.com/4diyers/
Tools/Supplies Needed:
-1000 grit wet/dry sandpaper
-1500 grit wet/dry sandpaper
-2000 grit wet/dry sandpaper
-bucket of water with carwash soap
-access to a hose
-polishing compound
-soft clothes
-microfiber clothes
-backing pads (foam block, rubber pad)
Procedure:
Wait at least a week so the paint is cured, this can depend on the paint thickness and your climate. Using a bucket of water with soap added.
With the sandpaper, backing pads should be used across larger flat surfaces to provide even pressure so you don’t create waves with your fingers. I like to start out with 1000 grit. Ensure the surface is clean and wet, always pre-soak the sandpaper and then continue to sand the surface. Evenly go over the surface removing any orange peal. Always keep the surface well lubricated and rinse away any sanding material when needed.
Once done with the 1000 grit sandpaper, almost all the the orange peal should have been removed. Rinse the area, move up to 1500 grit sandpaper, again using the same process. With a single stage paint, you’ll notice the color of the paint in the sanding residue which is normal. If this was a two stage paint, you would only be sanding the clear coat and the water will only turn milky. If you are getting a color in a two stage paint, that means you sanding through the clear coat and have damaged the finish.
Moving onto 2000 grit, using the same process, at this point all the orange peal should have been removed and now you’re only left with preparing the paint for polishing, removing those course sanding marks. Darker colored paints has a higher risk of showing imperfections so it does take more time to create a flawless surface. But with that being said, those imperfection will still exist on lighter colors, they’re just harder to see.
With a polishing compound, this can be done by hand or with a machine polisher. Apply the polish to the cloth, it can be dabbed around the surface, then work it into the surface.
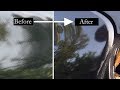
As you can see the paint’s shine is coming back and with the wet sanded surface, you’re left with a crisp and clear image. When polishing a touched up area, it’s best to go further back on the existing old paint so the paint will match and you won’t be left with one shiny area. This will be the final shine of the paint and when done correctly, this should maintain a shiny finish. As for a wax or other type of paint sealant, this should only be done when the paint is fully cured. Cure times for paint can be anywhere from a month or longer, this does vary between paints, weather, thickness and quality of products used.
Thank you to all those who watch my videos and support my content. Don't forget to subscribe to my channel for future tutorial videos and like my video if you found it helpful. New videos are always being uploaded every week!
© 4DIYers 2013
All Rights Reserved
No part of this video or any of its contents may be reproduced, copied, modified or adapted, without the prior written consent of the author.
Видео How to Wet Sand and Polish Paint [Beginner's Guide] канала 4DIYers
Amazon links for some of the products used in the video:
USA:
Backing pad: https://amzn.to/3qUc5rl
1000 grit sandpaper: https://amzn.to/2YkJzmq
1500 grit sandpaper: https://amzn.to/3qTem61
2000 grit sandpaper: https://amzn.to/3iWGzWX
Polishing Compound: https://amzn.to/3omIghF
Wax and applicator kit: https://amzn.to/36xqYs7
Canada:
Backing pad: https://amzn.to/2M71Hhg
1000 grit sandpaper: https://amzn.to/36e2fZs
1500 grit sandpaper: https://amzn.to/3cfSJZx
2000 grit sandpaper: https://amzn.to/3pot4BF
Polishing Compound: https://amzn.to/36g3PKq
Wax and applicator kit: https://amzn.to/3sZXoF6
Website: http://4diyers.com
Patreon: https://www.patreon.com/4diyers
Facebook: https://www.facebook.com/4diyers
Google Plus: https://plus.google.com/+4DIYers
Twitter: https://twitter.com/4DIYers
Instagram: https://www.instagram.com/4diyers/
Tumblr: http://4diyers.tumblr.com
Pintrest: https://www.pinterest.com/4diyers/
Tools/Supplies Needed:
-1000 grit wet/dry sandpaper
-1500 grit wet/dry sandpaper
-2000 grit wet/dry sandpaper
-bucket of water with carwash soap
-access to a hose
-polishing compound
-soft clothes
-microfiber clothes
-backing pads (foam block, rubber pad)
Procedure:
Wait at least a week so the paint is cured, this can depend on the paint thickness and your climate. Using a bucket of water with soap added.
With the sandpaper, backing pads should be used across larger flat surfaces to provide even pressure so you don’t create waves with your fingers. I like to start out with 1000 grit. Ensure the surface is clean and wet, always pre-soak the sandpaper and then continue to sand the surface. Evenly go over the surface removing any orange peal. Always keep the surface well lubricated and rinse away any sanding material when needed.
Once done with the 1000 grit sandpaper, almost all the the orange peal should have been removed. Rinse the area, move up to 1500 grit sandpaper, again using the same process. With a single stage paint, you’ll notice the color of the paint in the sanding residue which is normal. If this was a two stage paint, you would only be sanding the clear coat and the water will only turn milky. If you are getting a color in a two stage paint, that means you sanding through the clear coat and have damaged the finish.
Moving onto 2000 grit, using the same process, at this point all the orange peal should have been removed and now you’re only left with preparing the paint for polishing, removing those course sanding marks. Darker colored paints has a higher risk of showing imperfections so it does take more time to create a flawless surface. But with that being said, those imperfection will still exist on lighter colors, they’re just harder to see.
With a polishing compound, this can be done by hand or with a machine polisher. Apply the polish to the cloth, it can be dabbed around the surface, then work it into the surface.
As you can see the paint’s shine is coming back and with the wet sanded surface, you’re left with a crisp and clear image. When polishing a touched up area, it’s best to go further back on the existing old paint so the paint will match and you won’t be left with one shiny area. This will be the final shine of the paint and when done correctly, this should maintain a shiny finish. As for a wax or other type of paint sealant, this should only be done when the paint is fully cured. Cure times for paint can be anywhere from a month or longer, this does vary between paints, weather, thickness and quality of products used.
Thank you to all those who watch my videos and support my content. Don't forget to subscribe to my channel for future tutorial videos and like my video if you found it helpful. New videos are always being uploaded every week!
© 4DIYers 2013
All Rights Reserved
No part of this video or any of its contents may be reproduced, copied, modified or adapted, without the prior written consent of the author.
Видео How to Wet Sand and Polish Paint [Beginner's Guide] канала 4DIYers
Показать
Комментарии отсутствуют
Информация о видео
Другие видео канала
 How to Sand and Buff Clear Coat - 3M Sand & Polish System
 How to Wet Sand and Buff New Paint - Single Stage or BC/CC
 When to Polish vs Compound vs Wetsand
 A GUIDE TO RESTORING CAR PAINT- (paint decontamination, paint correction & paint protection)
 The Best Rattle Can Car Paintjob!
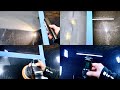 A Guide To Wet Sanding, Compounding & Polishing Car Paint!
 Learn how to wet sand: Episode #1 (scratches, scuffs, swirls)
 Must Watch BEFORE Wetsanding Paint!
 PART 1: WET SANDING CLEAR COAT PLUS TIPS & TRICKS TO WET SANDING
 How to Wet Sand Orange Peel in Car Paint: Porsche 911
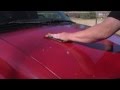 How To wet sand and buff your car
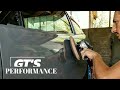 How I Wet Sand & Polish RUSTOLEUM Paintjob
 How to achieve a super high gloss clear coat
 Short-Cut Color Sanding and Buffing Techniques for MIRROR Finishes..
 wet sanding and polishing the fender
 Can You Repair Badly Damaged and Peeling Clear Coat?
 How to repair damaged clear coat AT HOME! with SPRAY CANS!
 How to sand and buff your clear
 How to Wet Sand - wet flatting before polishing