How to replace LCD Screen on Lenovo ThinkPad P52
https://www.laptopscreen.com/English/
https://www.laptopscreen.com/English/brand/Lenovo/
This is a guide on replacing a screen on Lenovo ThinkPad P52
For the replacement process we will need the following tools: plastic pick and a tweezers.
To begin turn off the laptop and disconnect the power cord.
Start removing the bezel. Use a plastic pick to pry off the inner edge from the screen.
Go around the perimeter unsnapping the tabs underneath. Put the bezel aside.
The screen is held in place with adhesive strips with loose tabs above the top corners of the screen.
Using tweezers pick the tab on the right side and pull out adhesive strip.
Pull out adhesive strip on the left side. Place the screen on the keyboard.
Peel off the clear tape securing the video connector. Using plastic pick open the connector’s
bracket. Disconnect the video cable. Discard the old screen.
Place the new screen onto the keyboard. Reconnect the video cable. Close the connector’s bracket,
secure it with clear tape.
Lift the screen up. Now we can test the new screen. Turn the laptop on. The screen is working
and we can continue the installation process.
Place the screen back onto the keyboard. As you can see the old adhesive strips were on the inner surface
of the laptop back cover. But in our case for convenience we are going to apply new adhesive strips
on the sides of the screen.
By the way: We offer standard double-sided tape
for such repairs on our site: laptopscreen.com
Apply new adhesive strips making sure that their tabs will stay loose at the top of the screen.
Lift the screen up and apply some pressure on the sides .
Make sure that the video cable stays in proper position underneath the screen.
Replace the bezel. Press firmly in the bottom corners and then go around the perimeter
snapping tabs back in place.
Turn the laptop on, and we are done!
Видео How to replace LCD Screen on Lenovo ThinkPad P52 канала LaptopScreen.com
Показать
Комментарии отсутствуют
Информация о видео
Другие видео канала
![Laptop screen replacement / LCD repair [HP Stream 13]](https://i.ytimg.com/vi/T4BRKtcbktU/default.jpg) Laptop screen replacement / LCD repair [HP Stream 13]
Laptop screen replacement / LCD repair [HP Stream 13] How to replace LCD Screen on Acer TravelMate P658 series laptop
 iPhone 3G screen replacement / digitizer glass and LCD reinstallation instructions
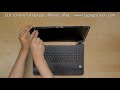 How to replace LCD Screen on HP 250 G5 laptop. Step-by-step instructions
![Laptop screen replacement / LCD repair [Samsung QX411]](https://i.ytimg.com/vi/STdBF1nyt4s/default.jpg) Laptop screen replacement / LCD repair [Samsung QX411]
Laptop screen replacement / LCD repair [Samsung QX411] How to replace LCD Screen on Clevo N960KR. Step-by-step instructions
 How to replace LCD Screen on HP Stream 14
 How to replace LCD Screen on Asus ROG GA401Q. Step-by-step instructions
 How to replace LCD Screen on HP Zbook 14U G5
 How to replace LCD screen on Lenovo ThinkPad T490s
![Laptop screen replacement / LCD repair [Lenovo IdeaPad Y50]](https://i.ytimg.com/vi/N4bgQJvUy7A/default.jpg) Laptop screen replacement / LCD repair [Lenovo IdeaPad Y50]
Laptop screen replacement / LCD repair [Lenovo IdeaPad Y50] How to replace LCD screen on Dell Inspiron 7501
 How to replace Display assembly on MacBook Air M1 A2337
 How to replace LCD Screen on Acer Chromebook CB315 3H. Step-by-step instructions
 How to replace LCD Screen on Asus F515J. Step-by-step instructions
 How to replace LCD Screen and Digitizer on Samsung 740U. Step-by-step instructions
![Laptop screen replacement / LCD repair [HP 15 Notebook PC]](https://i.ytimg.com/vi/KN10J4jjxac/default.jpg) Laptop screen replacement / LCD repair [HP 15 Notebook PC]
Laptop screen replacement / LCD repair [HP 15 Notebook PC]![MacBook Pro 17 screen replacement / Installation guide [Apple MacBook Pro 17 LCD repair]](https://i.ytimg.com/vi/HLwO1YV5M8M/default.jpg) MacBook Pro 17 screen replacement / Installation guide [Apple MacBook Pro 17 LCD repair]
MacBook Pro 17 screen replacement / Installation guide [Apple MacBook Pro 17 LCD repair] ACER Aspire 5 A515-54-52BQ screen replacement done RIGHT.
 Apple MacBook Pro 15 Model A2141 speakers replacement guide