R2500 DIY KITCHEN MAKEOVER | BUDGET DIY KITCHEN UPDATES | SOUTH AFRICAN YOUTUBER
PLEASE READ INSTRUCTIONS BELOW:
Helo everyone,
A couple of weeks ago, I mentioned that I would like to share a video showing how I DIYed my kitchen. I hope you will enjoy this and hopefully be inspired to tackle any of your DIY's too.
If you would like to follow the instructions, I've written them down below, but feel free to ask any questions in the comments if you would like:
DIY KITCHEN MAKEOVER STEPS:
Prep the cabinets:
1. Clean cabinets and doors thoroughly! Use a
degrease solution! Check out Builders Warehouse for a decreaser (or any hardware store)
2. Remove the cabinet doors
.
.
Get organised:
1. Number the doors to
keep track of where you
removed them from
2. If you are renting or will be
reusing the handles, label them
so you remember which doors
they belong to!
.
.
Prep planks for shaker doors:
1. Measure the size of planks
needed for the different doors
and cut them to size
Time saving tip: go to Builders
with your measurements
and ask for help cutting
IT'S TOTALLY FREE
2. Once your cuts are ready,
glue them on with liquid nails
and leave to dry
Close out the gaps:
1. Once the shaker door planks are
dry, apply wood filler to ensure
that there are no cracks and you
are left with a smooth finish
2. Let wood filler dry completely
before painting
Personalise your hardware
1. While waiting for the filler to dry,
I sanded my new handles from Builders
and spray painted the handles gold
2. I let the first coat dry completely
before applying the second coat
Some finishing touches;
1. Once the wood filler was dry,
I was able to paint the cabinets and door
and reconnected
2. I waited overnight for the first coat
to dry completely before applying the
second coat
TIME SAVING TIP : GET A MULTI
PURPOSE PAINT (I.E PRIME AND TOP
COAT)
New backsplash:
1. After several weeks I was able to get
backsplash. I removed the old
backsplash using a hammer and chisel
Prep the wall for tiling
1. TIP clean the mess as you go!!!
2. Once the mess has been cleared,
use mortar to close out the holes
in the wall
and make sure they are level
before installing the tile
You can buy ready-made mortar mix
from Builders Warehouse
LET MORTAR DRY COMPLETELY
BEFORE TILING
Installing the tiles:
1. I opted for a subway tile installation and that
meant, cutting the first rows tiles in half to achieve the subway pattern
2. Once the small piece is in, it becomes easier
alternate
3. If it's your first time tiling, apply grout to small
spaces at a time to avoid the grout drying too
quickly
TIP 1: SPACERS ARE YOUR FRIEND, USE THEM!
TIP 2: MEAUSURE TWICE AND CUT ONCE
TIP 3: CUT BEFORE STARTING INSTALL TO SAVE TIME
Grout time:
1. Once the tiles where completely dry, I then applied
the grout
2. My initial choice was black but I felt it was too harsh
for my space
I opted to remove
the black grout for
white!
Lastly, applied sealant once
everything was dry
Refresh old accessories:
1. I sanded down the dish rack and
paper towel holder
2. I then spray painted them matte black
TIP : INCORPORATE CHEAP DIY to
renew items you already
I had so much fun shooting this video and I hope you enjoy it!
I look forward to engaging with all of you, and I hope this added a bit of joy and sunshine to your day.
More ways to connect with me:
• Instagram: https://www.instagram.com/melidah_sehlapelo/
Music: Moon
Musician: Carl Storm
Music: Gravelike
Musician: Philip E Morris
Видео R2500 DIY KITCHEN MAKEOVER | BUDGET DIY KITCHEN UPDATES | SOUTH AFRICAN YOUTUBER канала Melidah Sehlapelo
Показать
Комментарии отсутствуют
Информация о видео
Другие видео канала
 Let's catch up + Kitchen Makeover Updates and Haul from Mr Price, H&M Home and Poetry
 Making Home | Concrete inspired floors transformation
 Extreme DIY Kitchen Makeover on a budget || Marble Contact Paper under R300 | South African YouTuber
 RENTER FRIENDLY BEDROOM UPDATE + TOUR | South African YouTuber
 How to paint on wall tiles and melamine cupboards with Tjhoko Paint
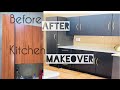 DIY KITCHEN MAKEOVER | HOME IMPROVEMENT | SOUTH AFRICAN DIY YOUTUBER
 DIY SMALL KITCHEN MAKEOVER! Cabinet Painting, Floor Painting, On A Budget
 We Bought Our First Property - Empty House Tour Before Renovations | South African Youtuber
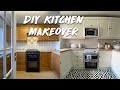 DIY KITCHEN MAKEOVER
 DIY LIVING ROOM MAKEOVER ON A BUDGET | living room decorating ideas 2021 + living room makeover
 Mini Kitchen Makeover | South African Youtuber
 Living Room Styling and Decor | South African Apartment | Our First Apartment
 EXTREME DIY KITCHEN MAKEOVER ON A BUDGET | AFFORDABLE + UNDER $500 | DIY SHAKER CABINETS
 How to paint laminate mdf kitchen cupboards, work space makeover!
 KITCHEN MAKEOVER UK £48.58 | DIY | BEFORE AND AFTER | ON A BUDGET
 $300 BUDGET KITCHEN MAKEOVER
 AFFORDABLE DIY GRID MIRROR I SOUTH AFRICAN YOUTUBER
 DIY Kitchen Makeover
 DIY KITCHEN MAKEOVER ON A BUDGET! PAINTING KITCHEN CABINETS! DIY MODERN FARMHOUSE KITCHEN UPDATES!
 bathroom renovation part 3/3 | pep home, mr price home, @home shopping haul & REVEAL| SA Youtuber