- Популярные видео
- Авто
- Видео-блоги
- ДТП, аварии
- Для маленьких
- Еда, напитки
- Животные
- Закон и право
- Знаменитости
- Игры
- Искусство
- Комедии
- Красота, мода
- Кулинария, рецепты
- Люди
- Мото
- Музыка
- Мультфильмы
- Наука, технологии
- Новости
- Образование
- Политика
- Праздники
- Приколы
- Природа
- Происшествия
- Путешествия
- Развлечения
- Ржач
- Семья
- Сериалы
- Спорт
- Стиль жизни
- ТВ передачи
- Танцы
- Технологии
- Товары
- Ужасы
- Фильмы
- Шоу-бизнес
- Юмор
Hover effect in PowerPoint 🤯#powerpoint #presentation #study
Hover effect in PowerPoint 🤯#powerpoint #presentation #study
Create an Eye-Catching Zoom-on-Hover Effect in PowerPoint!
Elevate your PowerPoint presentations with this amazing zoom-on-hover effect! Follow this easy tutorial to add dynamic zoom animations to objects or images, making your slides more engaging and professional. Perfect for educators, professionals, and designers! 🔥 Subscribe for more PowerPoint tips and tricks! 📊
#PowerPoint #PresentationDesign #AnimationTutorial #SlideDesign #EdTech #TechTips #PowerPointHacks #DesignTrends #CreativeSlides #Trending2025
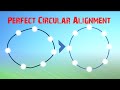
This video from DzynerByDesign demonstrates how to create a "zoom-on-hover" effect in PowerPoint, making objects or images animate and enlarge when the mouse hovers over them (0:10-0:17). The creator explains this trick is useful for engaging audiences in presentations (0:17-0:27).
The tutorial outlines the following steps:
1. Draw and Format Rectangles: Start by drawing a rounded rectangle and formatting it with desired colors and gradients (0:31-1:07). Duplicate this rectangle and format the new one with a different color (1:10-1:26).
2. Insert Pictures: Add pictures of your choice and align them on the slide (1:28-1:46).
3. Insert New Slides: Create two new blank slides (1:58-2:00).
4. Add Action to Objects: For each object on the first slide, go to the "Insert" menu, click "Action," select the "Mouse Over" tab, and choose "Hyperlink to" a specific new slide (slide two for the first object, slide three for the second object) (2:11-2:46).
5. Copy and Paste Content: Copy all content from the first slide and paste it onto the two new slides (2:51-3:00).
6. Adjust Object Sizes on New Slides: On slide two, enlarge the first object's picture and box while shrinking the other objects. Do the same for the second object on slide three (3:04-4:05).
7. Apply Morph Transition: Select all three slides, go to the "Transitions" menu, and choose "Morph" (4:10-4:17).
8. Add Details (Optional): Add player names or fun facts to slides two and three (4:20-4:24).
Finally, the video demonstrates the effect in slideshow mode (4:33-4:40), showing how hovering over an object triggers the zoom animation.
Видео Hover effect in PowerPoint 🤯#powerpoint #presentation #study канала DzynerByDesign
Create an Eye-Catching Zoom-on-Hover Effect in PowerPoint!
Elevate your PowerPoint presentations with this amazing zoom-on-hover effect! Follow this easy tutorial to add dynamic zoom animations to objects or images, making your slides more engaging and professional. Perfect for educators, professionals, and designers! 🔥 Subscribe for more PowerPoint tips and tricks! 📊
#PowerPoint #PresentationDesign #AnimationTutorial #SlideDesign #EdTech #TechTips #PowerPointHacks #DesignTrends #CreativeSlides #Trending2025
This video from DzynerByDesign demonstrates how to create a "zoom-on-hover" effect in PowerPoint, making objects or images animate and enlarge when the mouse hovers over them (0:10-0:17). The creator explains this trick is useful for engaging audiences in presentations (0:17-0:27).
The tutorial outlines the following steps:
1. Draw and Format Rectangles: Start by drawing a rounded rectangle and formatting it with desired colors and gradients (0:31-1:07). Duplicate this rectangle and format the new one with a different color (1:10-1:26).
2. Insert Pictures: Add pictures of your choice and align them on the slide (1:28-1:46).
3. Insert New Slides: Create two new blank slides (1:58-2:00).
4. Add Action to Objects: For each object on the first slide, go to the "Insert" menu, click "Action," select the "Mouse Over" tab, and choose "Hyperlink to" a specific new slide (slide two for the first object, slide three for the second object) (2:11-2:46).
5. Copy and Paste Content: Copy all content from the first slide and paste it onto the two new slides (2:51-3:00).
6. Adjust Object Sizes on New Slides: On slide two, enlarge the first object's picture and box while shrinking the other objects. Do the same for the second object on slide three (3:04-4:05).
7. Apply Morph Transition: Select all three slides, go to the "Transitions" menu, and choose "Morph" (4:10-4:17).
8. Add Details (Optional): Add player names or fun facts to slides two and three (4:20-4:24).
Finally, the video demonstrates the effect in slideshow mode (4:33-4:40), showing how hovering over an object triggers the zoom animation.
Видео Hover effect in PowerPoint 🤯#powerpoint #presentation #study канала DzynerByDesign
Комментарии отсутствуют
Информация о видео
13 июня 2025 г. 20:05:18
00:05:12
Другие видео канала