Shop Drill Cabinet // Workshop Organization
Check out links to items I used to build the cabinet below!
First and foremost I'd like to introduce my wife, Kerynn, to Youtube! She has always been my biggest supporter in the background and I thought it would be fun to let her crack some jokes in the video. Let her know how she did!
A problem that plagues my shop (and I'm sure yours as well) is that I'm always hunting down drill bits & drivers. I wanted to create a central location where all of these tools could be located and easy to access. The drill cabinet design that I came up with is a hybrid between several designs I've seen online. Part of that design is leveraged from a small cabinet the Wood Whisperer did. I'll admit his looks better but I got some great ideas from watching his video (you should check out his channel).
The cabinet construction is simple and was put together with random cut-offs and scraps of plywood I had handy. The back, sides, and enclosed cabinet section is all 1/2" plywood. No fancy joinery here - simple butt joints, glue, and brad nails. The shelves of the open half are 3/4" plywood. It is hung on the wall with a simple french cleat making mounting/removing very simple.
I elected to mount a handy-dandy drill & tap chart on the front of the cabinet featuring both imperial and metric threads. You never know when you're going to need that information! You can put whatever information you want here, heck even a small dry-erase board would be cool! I finished off the outside with black hammered metallic spray paint. I have been digging how this looks in my shop and plan on using some hammered metal looking cabinets in the future.
The inside of the drill cabinet has several shelves for bit storage with a useful twist. Each shelf has a row of rare-earth magnets which are used to mount the bit holders. I chose to make my own bit holder/organizers and ditch the plastic boxes they all came in. I love how you can see everything and know right away if you've got what you're looking for. You can easily remove the block you need and take it to wherever you are working. This system also makes it very easy to upgrade/adapt as time goes on.
As always thank you for watching! My channel is steadily growing and it's great knowing I'm at least inspiring some folks out there to make their shop great! Join Shop Nation as we PURSUE SHOP GREATNESS!
Check out the Shop Nation Website:
https://www.shop-nation.com/
Follow along on Instagram (@dreamshopnation):
https://www.instagram.com/dreamshopnation/
Products I make and SWAG:
https://www.etsy.com/shop/ShopNationStore
Interested in getting some Shop Nation T-shirts?
https://teespring.com/stores/shop-nation-gear
Link to the Drill & Tap Chart I used:
http://www.biolettersample.info/wp-content/uploads/2017/05/tap-and-die-chart-drill-tap.jpg
Links to some of the products I used in the video (if you're interested):
Bar Magnets - https://amzn.to/2IpaYu3
Round Magnets - https://amzn.to/2KqzmvJ
Center Punch - https://amzn.to/2GkToph
5-Min Epoxy - https://amzn.to/2GlezqU
Видео Shop Drill Cabinet // Workshop Organization канала Shop Nation
Показать
Комментарии отсутствуют
Информация о видео
Другие видео канала
 Ultimate Workbench Build - Drawers & Part Organizers // Part 3
 How to Upgrade Your Shop Air Compressor
 DIY Shop Towel Cabinet Build // Shop Organization
 08 - How to Build a Cordless Drill Shelf and Charging Station to hang on french cleats
 2 Year Shop Build Progress // Shop Tour 2019
 New Workshop MDF Work Surfaces with T-Track // Sealing MDF with Shellac
 How I Made my Basement a Gym // Home Fitness
 Simple Low-Profile Miter Saw Stop Block!
 Bit Storage Cabinet
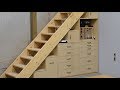 Tool Tansu, carpentry woodworking tool organization cabinets
 Shop Storage and Organization Ideas and Solutions
 How to Make a Patio Deck Box // Pool Storage
 Custom Built-in Desk // Home Office Work Space
 Upgrade Your Home Office Desk Setup // Floating Shelves
 Ask Me Anything // Gift Ideas // Shop Talk Ep. 4 🎁
 How to build a diy drill charging station
 Swinging Tool Wall // Clever Plywood Storage Solution
 Setting Up The New Shop! // 2020 Shop Tour
 9 Cheap And Easy Shop Organizers - Super Simple HOW TO
 The Shop Sanding Cabinet // Shop Organization