DIY Sign Making: How to Create Professional-Looking Signs Using a Router
Router font set: https://amzn.to/3tdeuR9
Router bit: https://amzn.to/3Tl2oju
How to Create a Professional-Looking Sign Using a Router
If you're looking to create a professional-looking sign, whether it's for your business or a unique piece of home decor, a router is an essential tool to have in your arsenal. In this article, we'll guide you through the step-by-step process of designing, cutting, and finishing your sign using a router, as well as tips and tricks to ensure your project is a success.
Step 1: Designing Your Sign
The first step in creating a sign using a router is to design your sign. This can be done using software such as Adobe Illustrator or Inkscape, or by hand on paper. When designing your sign, keep in mind the size and shape you want, as well as the message you want to convey.
Step 2: Cutting Your Sign
Once you have your design, it's time to start cutting your sign. To do this, you'll need a router and a router bit. There are many different router bits available, each with a unique shape and purpose. Some bits are designed for cutting straight lines, while others are used for creating curves or decorative edges. It's essential to choose the right bit for your project to achieve the desired outcome.
One way to ensure precision cuts is by using templates. Templates are pre-made designs that you can trace onto your wood to create a precise outline for your router bit to follow. You can make your templates or purchase them online or at your local woodworking store.
Step 3: Finishing Your Sign
Once you've finished cutting your sign, it's time to add the finishing touches. You can choose to paint or stain your sign to match your decor or branding. Ensure you use appropriate protective equipment such as gloves and masks when painting or staining to avoid inhaling fumes or coming into contact with harmful chemicals.
Step 4: Mounting Your Sign for Display
The final step in creating a professional-looking sign using a router is mounting it for display. There are many ways to mount your sign, depending on its size and location. Some common mounting options include using screws, picture hangers, or adhesive hooks.
Whether you're a beginner or an experienced woodworker, creating a sign using a router is an enjoyable and rewarding project. With the right tools and a bit of creativity, you can create a beautiful and professional-looking sign that will be sure to impress. So, why not try your hand at making a sign using a router today?
Equipment I use for my videos:
Canon SL2 with 18-55mm lens: https://amzn.to/36fWh9r
Comica BoomX-D1 2.4G Wireless Lapel Microphone System: https://amzn.to/3f4Z2jo
GEEKOTO 77'' Tripod, Camera Tripod for DSLR, Compact Aluminum Tripod with 360 Degree Ball Head and 8kgs Load for Travel and Work: https://amzn.to/3f4nJfH
Samsung Galaxy S21 Factory Unlocked Phone with 128GB - https://amzn.to/3f44vH0
Rode VideoMic Me Directional Microphone for Smart Phones: https://amzn.to/3bMcCDL
We are a participant in the Amazon Services LLC Associates Program, an affiliate advertising program designed to provide a means for us to earn fees by linking to Amazon.com and affiliated sites.
#woodworking #woodworktherapy #router #sign #signmaking #routing #wood #woodcarving #woodwork
@WoodWorkTherapy @WoodWorkTherapy
Видео DIY Sign Making: How to Create Professional-Looking Signs Using a Router канала Wood Work Therapy
Показать
Комментарии отсутствуют
Информация о видео
Другие видео канала
 DIY Floating Storage Shelf/Bookcase: How to Build a Stable and Professional-Looking Shelf
 Fun Epoxy summer projects part 1
 DIY Beer Tote Plans: How to Make Your Own Beer Tote (Free Templates Included)
 Unbelievable Vevor Mechanics Stool Review: You Won't Believe What I Found!
 Crafting a Stabilized Wood Box Top: A Step-by-Step Guide to Artisan Woodworking
 DIY Floating Desk: Easy Step-by-Step Guide to Building Your Own
 Stepped tea light candle holders diy
 Breaking Down the Tech: VEVOR Cordless Buffer Polisher Review
 VEVOR Auto Heat Press | Review and Demonstration
 Triangle Cabinet Build: Part 2 of 2 - Finishing the Cabinet and Adding a Herringbone Top
 Unveiling the AlgoLaser DIY 5.5-watt Laser Review: Shocking Discoveries Inside!
 DIY Silverware Drawer Organizer: How to Build a Simple and Beautiful Organizer using a Table Saw
 How fast? Ansbell Magnetic USB C to USB C Adapter Review
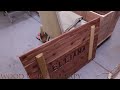 Uncover the Hidden Truth: Shellac vs Bare Wood Differences
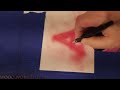 Discovering the Pros and Cons of Vevor TC 802 Airbrush and Compressor
 DIY Mini Planters: How to Make Adorable Miniature Planters for Your Home or as Gifts
 Unlocking the Secrets How to Create Cost Effective Router Dovetails
 Say Goodbye to Knee Pain with the Kneevo Knee Compression Sleeve - Review and Test
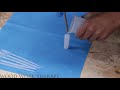 Fun Epoxy summer projects part 2
 DIY Lumber Rack Installation: Step-by-Step Guide