Quick and easy way to fit shutters - no drilling needed!
In this video, I am going to run through in detail, the quickest, easiest and neatest way to fit shutters in a standard recessed window, this is the easy fit shutter kit.
Assemble the D1 fixings by screwing them into the inserts. Put one of the fixings in one of the holes and hammer it down flush using the wooden dowel, there is a hole one end that fits over the fixing, continue this for all the fixing holes.
Layout the frame out in order, its marked left/right top and bottom, ensure the top is labelled in pencil behind the line.
If you have Tposts, align and centralise the sliding plate, and insert them into the frame screw in the screws.
Use the white interlocking keys to connect the mites together in each corner.
Turn the frame over and insert the keys from behind or lift the frame up and hammer the keys flat from behind.
Screw the corners together using the screws provided, take care to ensure the mitres are even and neatly together.
Unwrap the shadow tape, cut the end off at a 45 degree angle and stick it around the edge of the frame inline with the small groove. Pucker up the tape at the corners slightly to allow it to expand.
Work your way around the whole frame, then cut the end of the tape at another 45 degree angle to match the first cut.
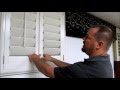
Lift the shutter frame into your window ensuring the top of the frame is at the top, angle and tilt the frame to make it easier to lift into the recess.
If the recess is smaller at the front and the frame is tight to get in, you might need to try different angles.
For a standard window with protruding handles, use the wooden spacing blocks to space the frame away from the window by 40mm.
Clip them onto the hinge so they miss the fixing hole and push the frame back so the blocks touch the window frame.
Move the frame left/right so there is an equal shadow gap either side. Using your 2mm Allen key or driver, wind out the fixings on the left and right side until there is an even gap at the top and bottom of the frame.
Move the wooden spacing blocks to the top hinges and push the frame back so the blocks touch the frame again.
Wind out the left or right fixing until it just hits the wall and the point of the fixing just digs in.
Keep slight pressure on the frame pushing it towards the window and the fixing so it doesn’t move.
Wind out the other fixing at the top so the point digs in again, this will secure the frame in place.
Stand back and check there is an equal shadow gap all round, adjust the fixings until your happy with the spacing.
Lift the left panel into the frame, bottom hinge first then the top hinge, insert the hinge pins to connect the hinges together. Do the same with the right panel.
Check there is an equal gap between the bottom of the panels and frame below the shutters.
If you need to make any adjustments, loosen the hinge screws and move the panels up and down and re-tighten the screws.
Do the same with any Tposts, by loosening the screws and moving the post left or right to ensure and equal gap both sides.
It's important to get the clearance right between the shutters and frame before you start adjusting the shadow gap between the recess.
To adjust the shadow gap and shutter alignment, simply wind the fixings in and out.
So to move the frame left, loosen the left fixing and tighten the right fixing, remember to support the weight of the shutter while doing this.
Tightening the right fixing will lower the right hand shutter, and move the left up.
Tightening the left fixing will lower the left hand shutter, and move the right shutter up.
Once the shutters are aligned within the frame and there is an equal shadow gap all round you can gradually tighten the rest of the fixings.
Wind them out until they start to touch the wall, tighten the opposite fixing and try and keep equal pressure on them as you go.
If you have Tposts, wind out the bottom fixings slightly then the top.
Alternate from top to bottom to get equal pressure and ensure the shutters don’t move out of alignment.
Gradually secure the rest of the fixings, checking as you go that the shadow gap and shutter clearance does not move.
On tall windows you may need put an extra mechanical fixing in the side using a raw plug, so in this case you will need to get your hoover out and drill some holes.
The D1 fixings will act as an adjustable packer allowing you get the perfect clearance.
You don’t need to over tighten the fixings, they should be hand tight.
Once you're happy you can screw the final hinge screws into place.
Place the white cover caps over the fixing holes.
Stick the ‘Fitted with D1 fixings’ sticker over the bottom right corner hole, so you know ‘how’ the shutters have been installed to help with future removal of the shutters if you need to decorate.
And thats how easy it is to install shutters.
Видео Quick and easy way to fit shutters - no drilling needed! канала opennshut
Assemble the D1 fixings by screwing them into the inserts. Put one of the fixings in one of the holes and hammer it down flush using the wooden dowel, there is a hole one end that fits over the fixing, continue this for all the fixing holes.
Layout the frame out in order, its marked left/right top and bottom, ensure the top is labelled in pencil behind the line.
If you have Tposts, align and centralise the sliding plate, and insert them into the frame screw in the screws.
Use the white interlocking keys to connect the mites together in each corner.
Turn the frame over and insert the keys from behind or lift the frame up and hammer the keys flat from behind.
Screw the corners together using the screws provided, take care to ensure the mitres are even and neatly together.
Unwrap the shadow tape, cut the end off at a 45 degree angle and stick it around the edge of the frame inline with the small groove. Pucker up the tape at the corners slightly to allow it to expand.
Work your way around the whole frame, then cut the end of the tape at another 45 degree angle to match the first cut.
Lift the shutter frame into your window ensuring the top of the frame is at the top, angle and tilt the frame to make it easier to lift into the recess.
If the recess is smaller at the front and the frame is tight to get in, you might need to try different angles.
For a standard window with protruding handles, use the wooden spacing blocks to space the frame away from the window by 40mm.
Clip them onto the hinge so they miss the fixing hole and push the frame back so the blocks touch the window frame.
Move the frame left/right so there is an equal shadow gap either side. Using your 2mm Allen key or driver, wind out the fixings on the left and right side until there is an even gap at the top and bottom of the frame.
Move the wooden spacing blocks to the top hinges and push the frame back so the blocks touch the frame again.
Wind out the left or right fixing until it just hits the wall and the point of the fixing just digs in.
Keep slight pressure on the frame pushing it towards the window and the fixing so it doesn’t move.
Wind out the other fixing at the top so the point digs in again, this will secure the frame in place.
Stand back and check there is an equal shadow gap all round, adjust the fixings until your happy with the spacing.
Lift the left panel into the frame, bottom hinge first then the top hinge, insert the hinge pins to connect the hinges together. Do the same with the right panel.
Check there is an equal gap between the bottom of the panels and frame below the shutters.
If you need to make any adjustments, loosen the hinge screws and move the panels up and down and re-tighten the screws.
Do the same with any Tposts, by loosening the screws and moving the post left or right to ensure and equal gap both sides.
It's important to get the clearance right between the shutters and frame before you start adjusting the shadow gap between the recess.
To adjust the shadow gap and shutter alignment, simply wind the fixings in and out.
So to move the frame left, loosen the left fixing and tighten the right fixing, remember to support the weight of the shutter while doing this.
Tightening the right fixing will lower the right hand shutter, and move the left up.
Tightening the left fixing will lower the left hand shutter, and move the right shutter up.
Once the shutters are aligned within the frame and there is an equal shadow gap all round you can gradually tighten the rest of the fixings.
Wind them out until they start to touch the wall, tighten the opposite fixing and try and keep equal pressure on them as you go.
If you have Tposts, wind out the bottom fixings slightly then the top.
Alternate from top to bottom to get equal pressure and ensure the shutters don’t move out of alignment.
Gradually secure the rest of the fixings, checking as you go that the shadow gap and shutter clearance does not move.
On tall windows you may need put an extra mechanical fixing in the side using a raw plug, so in this case you will need to get your hoover out and drill some holes.
The D1 fixings will act as an adjustable packer allowing you get the perfect clearance.
You don’t need to over tighten the fixings, they should be hand tight.
Once you're happy you can screw the final hinge screws into place.
Place the white cover caps over the fixing holes.
Stick the ‘Fitted with D1 fixings’ sticker over the bottom right corner hole, so you know ‘how’ the shutters have been installed to help with future removal of the shutters if you need to decorate.
And thats how easy it is to install shutters.
Видео Quick and easy way to fit shutters - no drilling needed! канала opennshut
Показать
Комментарии отсутствуют
Информация о видео
Другие видео канала
 Options for Plantation Wood Shutters
 Five Hidden Benefits of Having Plantation Shutters
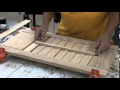 Sommerfeld's Tools for Wood - Window Shutter Set Made Easy with Marc Sommerfeld - Part 2
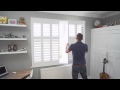 How to choose your shutter frame
 Window Treatment Trends for 2021 by 3 Blind Mice Window Coverings
 How to measure for window shutters - What to deduct to ensure they fit
 Plantation Shutters | Options Considerations for Custom Interior Shutters
 How to replace a broken shutter louvre blade or pin - control rod and staple
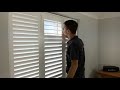 The best louvre size - shutter layout - popular colour - how shutters open - where they fit
 Window shutters explained - Everything you need to know about shutters.
 FIX PLANTATION SHUTTERS (Broken Louver Pin / $4 Plantation Shutter Slat Repair!)
 100% Blackout Bedroom Plantation Shutters
 How To Install Blinds | Custom Faux Wood Plantation Shutters | DIYPowerCouple
 DIY wooden window shutters/drewniane żaluzje okienne
 How to Install Outside Mount Shutters
 MDF Shutters or Wood - best louvre size - easy shutter installation and fitting
 Plantation Shutters - Lets talk Louvres and Tilt Rods
 DIY | HOW TO MAKE PLANTATION SHUTTERS FROM SCRATCH! | UNDER £50
 How to Install Exterior Shutters | Functional Shutter Installation | Timberlane Shutters
 Shutter Types Explained