How to Install Timing Chain | 1Nz Engine | Toyota Corolla
How to install timing chain 1nz engine toyota corolla
Align the gold or yellow links with each timing mark located on the camshaft timing gear and sprocket, then install the chain.
...
Notice:
Remove any oil from the contact surface.
Install the chain cover within 3 minutes of applying seal packing.
Do not add engine oil for at least 2 hours after installing the chain c
To adjust your timing, all you need to do is turn the distributor housing one direction or the other, depending on whether or not you want to advance or move back the timing. If the rotor turns clockwise, you'll advance the timing by rotating the distributor counterclockwise, and vice versa.
Step 1
Mark the spark plug wires for the cylinder number using a short piece of masking tape on each wire. Remove all the spark plugs using the spark plug wrench. The engine will be easier to turn by hand with the spark plugs removed and it's a good time to replace them if required. Remove the valve cover from over the number one cylinder. On a V-block engine this is normally the valve cover on the driver's side. On in-line engines the number one cylinder is the one closest to the front of the car. Check your vehicle's specifications to be sure which cylinder is number one.
Step 2
Rotate the engine clockwise and observe the valves on the number one cylinder. When both valves are in the up position, insert a screwdriver into the number one cylinder through the spark plug hole. Rotate the engine very slowly back and forth until the screwdriver is at the maximum height. This indicates the number one cylinder is at Top Dead Center or "TDC" on the compression stroke.
Step 3
Locate the number one spark plug wire on distributor cap and make a tic-mark of this position with a marker pen on the distributor housing. Remove the distributor cap and observe the position of the rotor.
Step 4
Loosen the distributor hold down bolt and turn distributor until the rotor is lined up with the mark you made in Step 3. Your timing is now set to zero degrees of mechanical timing.
Step 5
Replace the valve cover using a new gasket. Replace the spark plugs and spark plug wires using the marks from Step 1. You may want to mark the harmonic balancer with a zero point referenced to a fixed point on the engine. A fixed point could be a bolt head or accessory bracket that does not move when the engine is running. Later on this mark can be used as an indicator for stroboscopic timing.
Step 6
Connect a vacuum gauge to a manifold vacuum source. Most engines will have a port at the base of the carburetor or throttle body where a gauge can be connected. Start the engine and observe the vacuum gauge reading.
Step 7
Turn the distributor until the maximum vacuum gauge reading is noted. Back off one inch of vacuum from the maximum reading. Tighten the distributor hold down bolt. Normal readings average from 14 to 21 inches of vacuum depending on the condition of the engine.
Test drive the vehicle and listen for pinging noises. Repeat Steps 5 and 6 if excessive pinging is heard, or if there is a significant loss of power. The timing is correct when the vehicle operates at maximum power without the engine hard starting, backfiring, or pinging on acceleration.
https://www.facebook.com/caroldtips
https://www.facebook.com/nisar.khan.98478
https://www.instagram.com/nisargkhan143/
https://plus.google.com/115204662541740094232
https://twitter.com/NisarKh55753218
#1nzengine #2nzengine #timingchain #toyotacorolla
Видео How to Install Timing Chain | 1Nz Engine | Toyota Corolla канала Car Tips Tv
Показать
Комментарии отсутствуют
Информация о видео
Другие видео канала
 timing chain installation toyota
 How to assemble engine VVT-i Toyota Part 30: Timing chain setup and installation
 Toyota Prius NHW10. Замена цепи ГРМ 1NZ.
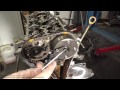 What are Yellow markings in Toyota timing chain
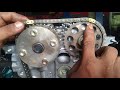 2AZ TIMING MARKS.
 Кап. ремонт двигателя 1NZ-FE ( четвертая часть )
 2007-2013 Toyota Corolla How to Clean and Check Camshaft Timing Oil Control Valve Βαλβίδα Ελέγχου
 How to replace timing chain Toyota Corolla VVT-i engine. Years 2000 to 2015
 1nz engine gasket check timing
 Diagnosis,How do you know if your timing chain tensioner is bad | And Replacement Of Corolla 2ZR-FE
 Honda mobilio Honda City Honda amaze engine timing
 1ZZ-FE 1.8L Timing Chain Replacement How To - For Toyota Matrix, Toyota Corolla, and Pontiac Vibe
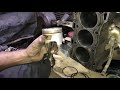 How To Replace Suzuki Mehran || Engine Rings Piston Restoration a engine
 How To Set The Timing On A Toyota 1AZ FE/2AZ FE Engine
 Toyota Corolla Model 2012 VVT-i Engine Complete Tuning | How To Improve The Engine Performance
 Toyota 1NZ engine timing #africa#mechanic#toyota#automobile#car#engine#timingchain#1nz #algeria
 How to timing settings f8B engine, Suzuki mehran car, suzuki bolan Urdu in Hindi
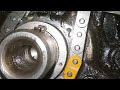 Timing Chain Mark | Toyota 1ZZ-FE 3ZZ-FE@DIY Spanner
 Toyota GLI Missing Problem || Toyota Corolla Engine Misfire
 HOW TO SET 660CC ENIGINE TIMING | URDU HINDI TUTORIAL