How To Install A KITCHEN SINK In A CAMPER VAN 🚐 DIY Camper Van Build #VANLIFE
We're back with another camper van conversion build video! This time, I'll show you how to install a kitchen sink in a camper van. That's right, The Singletrack Sampler finally has running water in his van life!
🎥 Subscribe to Crafted Workshop : https://goo.gl/V5gcNJ // Subscribe to Alex, The Singletrack Sampler : http://bit.ly/SingletrackSampler
📦 Parts Used On The Camper Van Kitchen Sink Build (affiliate):
Mobile Workbench : https://amzn.to/32BuEW4
Sink : https://amzn.to/2LxK5bG
Faucet : https://amzn.to/2FJN2SP
Foot Pump : https://amzn.to/30ebkfD
RV Drain : https://amzn.to/2xrfVyH
Nylon Tubing : https://amzn.to/2Xpd8oM
Greywater Tank : https://amzn.to/2XHpLuN
Freshwater Tank : https://amzn.to/2Jkpl4l
1/2" Hose Barb x 3/8" NPT Male Adapter (for connecting nylon tubing to faucet, better than what we used) : https://amzn.to/32BpfOu
1/2" Hose Barb x 3/4" Male NPT (for connecting tubing to the freshwater tank lid, need 2) https://amzn.to/2XPxec5
Hose Clamps : https://amzn.to/2Ye5KfH
Silicone : https://amzn.to/2YeMkHu
Cutting Board : https://amzn.to/2K16uMj
📦 Parts Used On The Camper Van Kitchen Cabinet & Backsplash Build (affiliate):
Powerhead Screws : https://amzn.to/32rhPNQ
Hinges (for upper cabinet) : https://amzn.to/308uZxe
Piano Hinge (for lower cabinet) : https://amzn.to/2JKLkBM
Latches : https://amzn.to/2XMVHyR
FastCap Door Stops : https://amzn.to/2Xh4SlX
Wood Glue : https://amzn.to/30uaBqu
Water Based Polyurethane : https://amzn.to/30u49Qs
Construction Adhesive : https://amzn.to/2SrudsD
🛠 Tools Used On The Camper Van Kitchen Sink (affiliate):
🔹Rockler Clamp-It Corner Clamping Jig : https://amzn.to/2XNkPo8
🔹Rockler Clamp-It Assembly Square : https://amzn.to/2J6pbyx
Jigsaw : https://amzn.to/2JMeOiQ
Table Saw : https://amzn.to/2WrrNMm
Push Stick : https://amzn.to/2XIvgFq
Miter Saw : https://amzn.to/2TeGdgO
Speed Square : https://amzn.to/2XMF5CE
Magnetic Screw Holder (for my impact driver) : https://amzn.to/2xGYPwD
Cordless Drill : https://amzn.to/2wOFM2S
Sander : https://amzn.to/2oHOmg7
Brad Nailer : https://amzn.to/30s8Fij
Japanese Pull Saw : https://amzn.to/2S9Zdgu
Block Plane : https://amzn.to/2V2D7h1
👕 Get your Build It Yourself merch! http://bit.ly/BuildItYourselfMerch
📹 SUBSCRIBE : https://goo.gl/V5gcNJ
💰 SUPPORT ME : https://www.youtube.com/channel/UC-hTi9atsD6wAl2s46LpAVw/join
📲 FOLLOW CRAFTED WORKSHOP!
INSTAGRAM: http://instagram.com/craftedworkshop
FACEBOOK: http://facebook.com/craftedworkshop
TWITTER: http://twitter.com/craftedworkshop
PINTEREST: http://pinterest.com/craftedworkshop
Camper Van Kitchen Sink Build Process:
The first step in this camper van kitchen project was collecting all of the parts we needed to complete the plumbing system, which included a sink and faucet, freshwater and greywater tanks, foot pump, tubing, and fittings.
We started with cutting the hole for the sink. To start the cut, I first drilled a hole through the top and cut the hole with my jigsaw after drilling the starter hole.
Eventually, after a little more cutting with the jigsaw, we got the foot pump fit and then I attached it to the floor of the van with screws.
With the pump installed, we could move on to the van plumbing. I made sure to use teflon tape on all of the threaded fittings to prevent any leaks.
To permanently mount the sink in the van, we ran a bead of silicone around the perimeter of the flange and dropped the sink into place.
Next, I could get to work on closing the cabinet back up. I used some basic plywood and cut the pieces to size at the table saw and miter saw.
I needed to add some more security to keep the doors shut while Alex is on the road with the van. We found these window sash latches, which have the benefit of pulling the door tight when they’re closed.
Next, we could get to work on the upper cabinet, which is what makes up for the storage in the van that Alex lost in the tool chest. I kept the cabinet construction simple and just used screws and glue.
With the cabinet assembled, we could get the cabinet dry fit in the van. I notched out the areas around the ribs using a combination of my jigsaw, Japanese pull saw, and a chisel.
Next, we could get the cabinet attached to the van. I used Powerhead sheet metal screws, making sure to pre-drill the holes, and we drove the screws into the areas of the roof and walls where we knew there were ribs.
Once the cabinet was permanently installed, I could take some measurements for the faux subway tile backsplash.
To install the tiles, I scribed the first tile to fit the desk and sanded it to fit using my spindle sander. After getting the first row installed, I offset the second row by half a tile and continued getting the tiles installed. Finally, I could add some corner trim to cap off the ends of the tile backsplash.
And with that, this portion of the van project was a wrap. These little comforts are what makes van life more enjoyable and, most importantly, more fun.
Видео How To Install A KITCHEN SINK In A CAMPER VAN 🚐 DIY Camper Van Build #VANLIFE канала Crafted Workshop
Показать
Комментарии отсутствуют
Информация о видео
Другие видео канала
 It's HUGE! Building out my camper van workspace with 5K screen, new lights, and charge station
 How to build a Camper Van / Studio - DIY conversion (Step by step)
 How to Build a Basic Water System For Your Van - #Vanlife Basics - Episode 1
 Bike Shop Owner Lives in Self-Built Sprinter Van
 VANLIFE GOALS: Hannah's Dialed MTB Van Tour
 Easy Van Sink Plumbing with foot pump
 HOW TO INSTALL DOMETIC SINK
 Building a Kitchen Sink in a Camper Van (Simple Setup)
 DIY Car camping kitchen box for SUV or Minivan - easy setup, organization ideas and hacks
 My First Month Living in a Van
 Master Craftsman Renovates My Camper Van To DRASTICALLY Improve My Van Life!
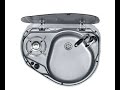 Fitting a Hob Sink in a campervan Smev Dometic 8821, 9722 , 9222, VW Camper
 5 Things I HATE About My Custom Camper Van Build
 Building a fun and practical garage office
 SIMPLE & CHEAP Van Build PLUMBING | DIY Water System
 15 Smart and Stupid Details On My Van | RAM Promaster camper conversion
 Cheap & Easy DIY Camper Van Plumbing System - Van Life
 Inspecting, cleaning, & reviewing the pieces of my custom camper van after 2 years of adventures
 Building a Kitchen and Sink for My Van - Van Build Pt. 3
 10 Great KITCHEN DESIGNS for your VAN CAMPER Conversion 🍳