DIY Smart Home Control: 12V RF 4 Channel 433Mhz wireless Remote Control Switch Module
433Mhz Universal Wireless Remote Control Switch 12V Relay Receiver Home Automation Modules and 2pcs RF Remote 433Mhz Transmitter
From:
https://www.aliexpress.com/store/product/433Mhz-Universal-Wireless-Remote-Control-Switch-12V-Relay-Receiver-Home-Automation-Modules-and-2pcs-RF-Remote/2921105_32799870186.html
About Working mode:
1. Momentary/Jog: Press and hold to on; Release to Off
Keep pressing one button , the corresponding channel is working /on;
Loosen your finger is stop/OFF .
(4 channel switch(receiver) need 4 button remote control (transmitter ))
2. Toggle/Self-Lock: Press to on; Press again to Off
Press one button for one time , the corresponding channel is working/on;
Press the same button again is stop/OFF .
(4 channel switch(receiver) need 4 button remote control (transmitter)).
3. Latched/Inter-Lock: Press to on; Press other button to Off
Press one button for one time, the corresponding channel is working/on;
Press another button is stop/OFF(At the same time, another corresponding channel works) .
( 4 channel switch( receiver) need 4 buttons remote control (transmitter).
The setting of working mode:
1. Momentary Mode: pressing one time the learning key button on the receiver board ( Led indicator on receiver board will signaling simultaneously ),then press any of the remote button , signaling three times by remote’s LED indicator informs about setting momentary mode successfully .
2. Toggle Mode: pressing two times the learning key button on the receiver board( Led indicator on receiver board will signaling simultaneously ),then press any of the remote button , signaling three times by remote’s LED indicator informs about setting toggle mode successfully .
3. Latched Mode: pressing three times the learning key button on the receiver board ( Led indicator on receiver board will signaling simultaneously ),then press first remote button ,follow on second remote button , signaling three times by remote’s LED indicator informs about setting latching mode successfully ( first button stands for on , second button stands for off ).
4. 2CH momentary + 2CH Toggle : pressing four times the learning key button on the receiver board(Led indicator on receiver board will signaling simultaneously ),then press any of the remote button , signaling three times by remote’s LED indicator informs about setting successfully .
5. 2CH Momentary + 2CH Latched : pressing five times the learning key button on the receiver board ( Led indicator on receiver board will signaling simultaneously ),then press any of the remote button , signaling three times by remote’s LED indicator informs about setting successfully .
6. 2CH Toggle + 2CH Latched : pressing six times the learning key button on the receiver board [Led indicator on receiver board will signaling simultaneously] ,then press any of the remote button , signaling three times by remote’s LED indicator informs about setting successfully .
7. 2CH Latching + 2CH Latched : pressing seven times the learning key button on the receiver board [Led indicator on receiver board will signaling simultaneously ],then press any of the remote button , signaling three times by remote’s LED indicator informs about setting successfully .
8. Deleting existing remote controls data: pressing eight times the learning key button on the receiver board , the LED indicator on receiver board will flash for eight times , the existing remote controls are deleted successfully.
NOTES:
1. Please do not charged operation, you should shut off the power, and operation after testing and correct electricity.
2. Please promptly change battery when remote control voltage is insufficient, (when the battery voltage is insufficient, generally get close transmitting )
3. Please pay attention to avoid metal mask,large equipment ,strong interference electromagnetic filed when using wireless RF products,and avoid too short distance between the remote control and receiver board .
4. Please avoid abnormal using of the product.Abnormal using will reduce product performance and life, when seriously it may damage the products and even make danger for your safe .
What's More: The system can store for 25 pcs of remotes , if the remote get more than 25 pcs , the initial remote control will be lost .
Видео DIY Smart Home Control: 12V RF 4 Channel 433Mhz wireless Remote Control Switch Module канала FunDeal
Показать
Комментарии отсутствуют
Информация о видео
Другие видео канала
 433Mhz Wireless RF Remote Control Switch Lamp Light LED Bulb Corridor Room Home Wall Panel Switch
 Wireless Remote Control Switch AC 110V 220V 1CH Relay Receiver Transmitter for Light Switch
 433Mhz Wireless Remote Control Switch AC 110V 220V 1CH Relay Receiver Led Light Switch
 433Mhz Wireless RF Remote Control Switch AC 110V 220V Lamp Light LED Bulb Diy Control
 433MHz AC 220V 2 Way Channel Wireless Remote Control Switch + Wall Panel Transmitter
 433Mhz 3.6V 12V 24V 1CH Wireless Remote Control Switch RF Mini Receiver Controller
 Basic Smart Wifi Switch for Alexa Google Home Timer 10A/2200W Wireless RF Remote Control Switch
 86 wall panel 1CH 2CH Light Switch And 110V 220V 1CH Receiver
 How to use: AC 110V 220V Remote Control Switch 1CH Relay Receiver Module with remote control
 Copy CAME TOP432NA Universal Remote Control Garage Door Gate 433mhz Transmitter Duplicator
 433Mhz Wireless Remote Control Switch DC 12V 10A 1CH Relay Receiver Module and RF Remote Transmitter
 RX480 433mhz Wireless Receiver Learning Code Decoder Module 4 Ch output Diy kit With Learning Button
 How to Duplicator remote control Electric Garage Door Opener
 How to use: 4 Channel DC 12V 433MHz Remote Control Switch with 4 button RF Wireless remote control
 How to use: 1 Channel DC 12V 433MHz Remote Control Switch with 4 button RF Wireless remote control
 DIY Duplicator: Universal Cloning Electric Gate Garage Door 433mhz Remote Control Key Fob Opener
 DIY Duplicator/Replacement Copy 433.92Mhz RF Wireless Remote Control
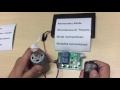 DIY Control:433Mhz Wireless RF Switch DC12V Relay Receiver DC Motor Forward and Reverse Controller
 How to use: Blue light 433.92Mhz RF Wireless remote control Replacement/Duplicator
 Smart Home control :3 working modes for Wireless Remote Control Switch AC 110V 220V 2CH Receiver