Rainfall Projects Booth Front
A big thanks to Squarespace for sponsoring this video. Click here to get 10% off your first website or domain: https://www.squarespace.com/rainfallprojects
I'm really excited to be going to Maker Faire this year. I wanted to build a booth front for the convention. The challenge about this was designing it so it would break down and fit on a standard size pallet so I can ship it down there. I start off by cutting out the YouTube logo that I can hang on the booth. Next I grab a pallet from the farm and break it down so I can use the wood for the back of the sign. I form a rough shape of an arch with the wood pieces and screw them together using a 1x2 backing strip. Once I had it clamped down to the welding table, I routed in an abstract design and then profiled around the outside of the arch, cutting it out. Next I made a metal frame for the arch on the ring roller, and attached the boards to it one at a time. After the sign was done, I moved onto building the stand for it. I cut some panels that Kelly drew for me and centered them in a 1.25" steel tubing frame. I attached some feet and lastly laid them flat on the welding table so I could attach the sign to the stand.
Come say hi at Maker Faire!
Видео Rainfall Projects Booth Front канала Rainfall Projects
Показать
Комментарии отсутствуют
Информация о видео
Другие видео канала
 Building the Eiffel Tower
 The Ups and Downs of Owning a CNC Plasma Cutter // Lift Arc Studios
 Irrigation Repairs - Welding and Digging in the Field
 Remodeling Kitchen Cabinets with a CNC Router
 55 Gallon Drum Meat Smoker Build
 Wood and Metal Coffee Table with Epoxy Inlay
 Truck Tailgate Fabrication and Rollover Tarp
 Meat Smoker Build - Vertical w/ Electronic Controls
 The Barn Rebuild Story and a Shop Tour
 Dumbbell Set from Scrap Metal | 10-100 lbs, Flat Bench, and Rack
 Band Saw Restoration and Stand Build
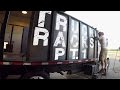 #15 - Truck Racks pt. 1
 Big Bowl with a CNC Router
 Garden Trellis • Ipad → CNC
 Toolbox Organizer for the Farm Pickup
 Studio Remod pt. 1 - Tear out, Framing, Electrical, Plumbing, Insulation
 Refinishing Fir Floors - Studio Remod pt. 3
 Building Fertilizer Buggy ver. 2.0
 Plasma Cutting Welding Project Lawn Edger
 Is a Plasma Cutter for you? Our experience with the Langmuir Crossfire Pro and Hypertherm 45 XP.