Checkerboard pattern for magnetic levitation
This video is part of my series on how to handle neodymium magnets safely.
This is a more advanced lesson on how to make a matrix of magnets with the poles in a checkerboard pattern. This is what you need to make a piece of diamagnetic pyrolytic graphite levitate. I will also give you some hints on how to take the matrix apart again.
Here are the captions in case the combination of my lousy microphone and danish accent is hard to understand (also available: danish and english closed captions - just press the CC button under the video):
Hello there,
this video is part of my series on how to handle neodymium magnets safely.
In this video I am showing you how to safely put together magnets with the poles in a checkerboard pattern that is suitable for levitation.
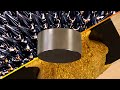
What you see is pyrolytic graphite being repelled by four neodymium magnets.
So let's start with some tiny ones. These can be arranged by hand alone but don't for a second think they are weak. Just one of these will hold over a kilogram of iron.
The only tool I recommend for these tiny magnets is this simple locking-board.
The iron plates underneath locks the loose magnets in place - or at least dampens the acceleration when putting the magnets together.
These thin magnets are very fragile and will easily break if just thrown together.
Alright. Here's the checkerboard pattern of north and south poles I am going to make.
Let's go ahead and take the first magnet of the stack and place it on the locking board. The next magnet you need to turn 180 degrees before putting it on.
The poles of the magnets can't face in the same direction since only opposites attracts.
Continue doing this and remember to turn every second magnet upside down.
There you go...
And now just some hints for restacking the magnets without breaking them.
OK - what you've seen so far may be basic to most of you so let me raise the ante.
These are tricky little bastards. They are just the size where they don't look impressive like a huge one in some of my other videos but these will draw blood if you get pinched by them.
Who said nerds don't work out? :)
I have marked the north poles on these cube magnets with dots around the edges so I always
know which two surfaces are the poles.
Let's build a checkerboard: take the first magnet of the stack using a splitter tool.
Put the magnet on the locking board with one of the pole surfaces pointing upwards.
For the next magnet you need a large wedge to slide the two magnets safely together.
Remember to turn the next magnet upside down so you've got opposite poles attracting
each other.
I will make a 3x3 pattern so let me just put another one on - mind the poles.
Repeat until you have three of these 3x1 bars. Remember to keep them far apart so they don't smash together.
Take one of the bars and mind the poles.
Take the next bar and put it upside down on the locking board following the rule of attraction
between opposite poles.
Bring the bars together with the wedge in between and make sure the bars are aligned.
Finish the project with the last bar.
There you have it: nine powerful magnets put together with no loss of blood.
And here's what they can do.
Now for some hints on how I restack them. As always: Mind the poles... Bye bye for now.
Видео Checkerboard pattern for magnetic levitation канала Brainiac75
This is a more advanced lesson on how to make a matrix of magnets with the poles in a checkerboard pattern. This is what you need to make a piece of diamagnetic pyrolytic graphite levitate. I will also give you some hints on how to take the matrix apart again.
Here are the captions in case the combination of my lousy microphone and danish accent is hard to understand (also available: danish and english closed captions - just press the CC button under the video):
Hello there,
this video is part of my series on how to handle neodymium magnets safely.
In this video I am showing you how to safely put together magnets with the poles in a checkerboard pattern that is suitable for levitation.
What you see is pyrolytic graphite being repelled by four neodymium magnets.
So let's start with some tiny ones. These can be arranged by hand alone but don't for a second think they are weak. Just one of these will hold over a kilogram of iron.
The only tool I recommend for these tiny magnets is this simple locking-board.
The iron plates underneath locks the loose magnets in place - or at least dampens the acceleration when putting the magnets together.
These thin magnets are very fragile and will easily break if just thrown together.
Alright. Here's the checkerboard pattern of north and south poles I am going to make.
Let's go ahead and take the first magnet of the stack and place it on the locking board. The next magnet you need to turn 180 degrees before putting it on.
The poles of the magnets can't face in the same direction since only opposites attracts.
Continue doing this and remember to turn every second magnet upside down.
There you go...
And now just some hints for restacking the magnets without breaking them.
OK - what you've seen so far may be basic to most of you so let me raise the ante.
These are tricky little bastards. They are just the size where they don't look impressive like a huge one in some of my other videos but these will draw blood if you get pinched by them.
Who said nerds don't work out? :)
I have marked the north poles on these cube magnets with dots around the edges so I always
know which two surfaces are the poles.
Let's build a checkerboard: take the first magnet of the stack using a splitter tool.
Put the magnet on the locking board with one of the pole surfaces pointing upwards.
For the next magnet you need a large wedge to slide the two magnets safely together.
Remember to turn the next magnet upside down so you've got opposite poles attracting
each other.
I will make a 3x3 pattern so let me just put another one on - mind the poles.
Repeat until you have three of these 3x1 bars. Remember to keep them far apart so they don't smash together.
Take one of the bars and mind the poles.
Take the next bar and put it upside down on the locking board following the rule of attraction
between opposite poles.
Bring the bars together with the wedge in between and make sure the bars are aligned.
Finish the project with the last bar.
There you have it: nine powerful magnets put together with no loss of blood.
And here's what they can do.
Now for some hints on how I restack them. As always: Mind the poles... Bye bye for now.
Видео Checkerboard pattern for magnetic levitation канала Brainiac75
Показать
Комментарии отсутствуют
Информация о видео
Другие видео канала
 Magnetic dough and fluid...
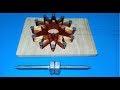 20000+ RPM magnetic levitation motor
 TOP 10 MIND-BLOWING LEVITATING GADGETS
 Macho Set of Magnets
 DIY- HOW TO MAKE EIFFEL TOWER WITH MAGNET STICKS AND BALLS(Satisfying)ASMR
 8 Amazing Science EXPERIMENTS to do at Home * Interesting Electromagnetic Tricks
 Magnetic Silver Play Button?
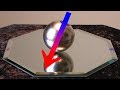 Vertical? The Earth's Magnetic Field?!?!
 SuperMagnetMan - Fundamentals of Halbach Arrays
 unit woodworking - levitating chair with magnet / impossible floating chair using repulsive force
 Buyer's Guide: Your first neodymium magnet
 MAGNETIC HOURGLASS | Time changed by magnet?
 Beauty of The Sphere // 75k Subs Special
 HOW TO MAKE MAGNETIC LEVITATOR | ANTIGRAVITY LEVITATION | DIY
 Unboxing a MONSTER | Extreme neodymium magnets
 Exotic Elements vs. Magnet | Platinum Group! | Part 5/6
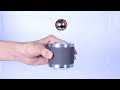 9 Amazing Magnet Gadgets!
 Amazing Science Toys/Gadgets 5
![Super Magnets meets Lighters [ TRY NOT TO GET SATISFIED ! 😍 ]](https://i.ytimg.com/vi/1v5uiRxaxIM/default.jpg) Super Magnets meets Lighters [ TRY NOT TO GET SATISFIED ! 😍 ]
Super Magnets meets Lighters [ TRY NOT TO GET SATISFIED ! 😍 ]