Tool Restoration with How To DIY Nickel Plating at Home
DIY your own Nickel Plating at home with this How To video and instructions! Here are some of the things you'll need:
Battery Charger: https://amzn.to/38F8owa
Nickel Strips: https://amzn.to/2vIOCCN
White Vinegar: https://amzn.to/2TK4cFS
Household Salt: https://amzn.to/2IBEfmI
Glass Container: https://amzn.to/2PWSRRS
Metal Polish: https://amzn.to/2wGjfbV
Directions:
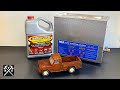
-You'll first start by adding your white vinegar and your salt to a glass or plastic container. Measurements don't need to be exact, about 1/8 cup of salt to one gallon of vinegar will do.
-Next you will add you pure nickel strips. It's best to bend them slightly so they will hang on to the edge of your container. If not, secure them in some way that they will not fall or touch each other. Once the strips are in place connect the positive and negative leads from the battery charger. At this point it does not matter which lead goes where, as long as you have a lead on each strip and they are not touching. just make sure that the clamps of your charger are not submerged in the solution, or they will dissolve.
-Your nickel acetate is beginning to form, this will take about 12 hours in a safe, well ventilated area.
-You will know your nickel acetate is ready when it is a rich emerald green color and a lot of the nickel strip on your positive lead (the red one) will be dissolved.
-Attach the part to be plated onto a wire that will suspend it in the solution. A copper wire will work well, but an uncoated wire clothes hanger will do the trick too.
-Attach your positive lead (the red one) to the nickel strip you have left that did not dissolve, and place it in the solution. Make sure the clamp is not in the solution or it will dissolve.
-Attach the negative lead (the black one) to the wire that your part is suspended from. Just make sure it is suspended in a way that it will not fall.
-Once your battery charger is connected to a power source, bubbles should begin to form on your part that you are plating.
-The plating process will take approximately 30 minutes.
-Once your part is plated, remove it and dry it off. It will appear just slightly tarnished, but a quick polish will shine it right up!!
-The best part is; the solution you just made can be reused, in fact it will get better the more you use it. Just put the lid on the container and store it in a safe place away from pets and children.
Disclosure: The products listed above are listed using affiliate links. As an associate I earn from qualifying purchases. Affiliate link purchases help fund projects on this channel. Thank you
hand tools restoration
#handtools #diy #restoration #howto
Видео Tool Restoration with How To DIY Nickel Plating at Home канала TRG RESTORATION
Battery Charger: https://amzn.to/38F8owa
Nickel Strips: https://amzn.to/2vIOCCN
White Vinegar: https://amzn.to/2TK4cFS
Household Salt: https://amzn.to/2IBEfmI
Glass Container: https://amzn.to/2PWSRRS
Metal Polish: https://amzn.to/2wGjfbV
Directions:
-You'll first start by adding your white vinegar and your salt to a glass or plastic container. Measurements don't need to be exact, about 1/8 cup of salt to one gallon of vinegar will do.
-Next you will add you pure nickel strips. It's best to bend them slightly so they will hang on to the edge of your container. If not, secure them in some way that they will not fall or touch each other. Once the strips are in place connect the positive and negative leads from the battery charger. At this point it does not matter which lead goes where, as long as you have a lead on each strip and they are not touching. just make sure that the clamps of your charger are not submerged in the solution, or they will dissolve.
-Your nickel acetate is beginning to form, this will take about 12 hours in a safe, well ventilated area.
-You will know your nickel acetate is ready when it is a rich emerald green color and a lot of the nickel strip on your positive lead (the red one) will be dissolved.
-Attach the part to be plated onto a wire that will suspend it in the solution. A copper wire will work well, but an uncoated wire clothes hanger will do the trick too.
-Attach your positive lead (the red one) to the nickel strip you have left that did not dissolve, and place it in the solution. Make sure the clamp is not in the solution or it will dissolve.
-Attach the negative lead (the black one) to the wire that your part is suspended from. Just make sure it is suspended in a way that it will not fall.
-Once your battery charger is connected to a power source, bubbles should begin to form on your part that you are plating.
-The plating process will take approximately 30 minutes.
-Once your part is plated, remove it and dry it off. It will appear just slightly tarnished, but a quick polish will shine it right up!!
-The best part is; the solution you just made can be reused, in fact it will get better the more you use it. Just put the lid on the container and store it in a safe place away from pets and children.
Disclosure: The products listed above are listed using affiliate links. As an associate I earn from qualifying purchases. Affiliate link purchases help fund projects on this channel. Thank you
hand tools restoration
#handtools #diy #restoration #howto
Видео Tool Restoration with How To DIY Nickel Plating at Home канала TRG RESTORATION
Показать
Комментарии отсутствуют
Информация о видео
Другие видео канала
 Easy DIY Nickel Electroplating - Electro Plating Made Easy
 The Ultimate Rust Remover - Evaporust and an Ultra-Sonic Cleaning Tank!
 Metal plate your 3D prints at home.
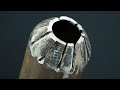 Diy Tool For Your Workshop
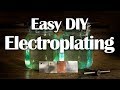 Electroplating - Easy DIY Nickel, Copper, Zinc Plating
 1960's Tonka Hi-Way Patrol Car Restoration - Awesome Toy Restoration!
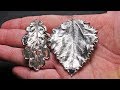 Making Nickel Plated DIY Decorations!
 1955 Tonka Log Truck Finished - Rare Tonka Restoration
 1977's Children Pedal Car Restoration
 DIY tool | Homemade Powerful Metal Bender for Construction Steels
 Restoring a Tonka Horse Hauler - Vintage Toy Restoration
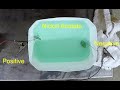 Making Nickel Acetate easily and cheaply for Nickel plating
 1955 Tonka Green Giant Semi Restoration
 Vintage Tonka Camper Restoration
 1962 Tonka Airport Set Restoration - Part 1
 Old Kitchen Scale - Restoration (with sandblasting)
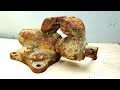 Restoration Antique VISE | Restore Vise rusty tool
 1962 Tonka Airport Set Restoration Part 2 - Tonka Serv-I-Car Restoration
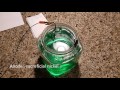 More Electroplating - Nickel onto brass