etrailer Trailer Idler Hub Assembly Installation
Click for more info and reviews of this etrailer Trailer Hubs and Drums:
https://www.etrailer.com/Trailer-Hubs-and-Drums/etrailer/AKIHUB-545-35-EZ-K.html
Check out some similar Trailer Hubs and Drums options:
https://www.etrailer.com/dept-pg-Trailer_Hubs_and_Drums-sz-5_on_4~1|2_Inch.aspx
Click for more info and reviews of this etrailer Trailer Hubs and Drums:
https://www.etrailer.com/Trailer-Hubs-and-Drums/etrailer/AKIHUB-545-35-G-EZ-K.html
Check out some similar Trailer Hubs and Drums options:
https://www.etrailer.com/dept-pg-Trailer_Hubs_and_Drums-sz-5_on_4~1|2_Inch.aspx
Click for more info and reviews of this etrailer Trailer Hubs and Drums:
https://www.etrailer.com/Trailer-Hubs-and-Drums/etrailer/AKIHUB-545-35-G-K.html
Check out some similar Trailer Hubs and Drums options:
https://www.etrailer.com/dept-pg-Trailer_Hubs_and_Drums-sz-5_on_4~1|2_Inch.aspx
Click for more info and reviews of this etrailer Trailer Hubs and Drums:
https://www.etrailer.com/Trailer-Hubs-and-Drums/etrailer/AKIHUB-545-35-K.html
Check out some similar Trailer Hubs and Drums options:
https://www.etrailer.com/dept-pg-Trailer_Hubs_and_Drums-sz-5_on_4~1|2_Inch.aspx
https://www.etrailer.com
Don’t forget to subscribe!
https://www.youtube.com/user/etrailertv
Full transcript: https://www.etrailer.com/tv-install-trailer-hub-and-drum-assembly-akihub-545-35-k.aspx
Speaker 1: Today we're gonna be taking a look at and showing you how to install trailer idler hub assembly for 3,500 pound axle, part number AKIHUB-545-35-K. This is also available in galvanized for marina applications, part number AKIHUB-545-35-G-K. This is also available in E-Z lube, part number AKIHUB-545-35-EZ-K. Also available in E-Z lube, galvanized for marina applications part number AKIHUB-545-35-G-EZ-K.This is what our hub assembly looks like installed on our trailer, it's gonna offer you an inexpensive, convenient way of having a complete new hub assembly where if you are looking to just replace your bearings you may have the added cost of hiring a shop to remove your old races from your old hubs in turn costing you more time and money by the time it's completed. Our hub kit is going to have the races already installed, it's gonna come with new bearings, new seals, caps, and new lug nuts, you're only gonna need grease and a few tools to get these installed.First thing we need to do to start our installation, I've gone ahead and removed the tire, we need to remove our hub. We're gonna remove this cap first, you're gonna take a small screwdriver and a mallet and we're gonna pop this cap off.
Just gonna work your way around, loosen it up. Then I'm gonna wipe off some of this grease, you can see there's a retaining ring right here that we've gotta remove. Take our screwdriver, we're just gonna pop that off and we're gonna hang onto this because we're gonna be putting this back on.We're gonna take a one and a half inch socket and they shouldn't be on there very tight and you're gonna want to hold onto this because we're gonna be reinstalling that also. Then you're gonna have your ring that goes up against your bearings and you're gonna want to hold onto that because we're gonna be reinstalling that also, we'll just slide our old hub off. After you get this cleaned off you want to make sure you check it for any gouges, nicks, anything like that to make sure it's not damaged.Now if you look on this inside of your hub you're gonna see that it kind of has an inset, what you want to do is pack grease in there so this is level.
You want some good bearing grease, and get this nice and coated inside the hub. Now we're gonna pack our large bearing, what you want to do is take some grease and put it on your hand like this and you'll notice on the bearings they have an open edge on the front and the back. What you want to do is we're gonna roll the bearing to get that grease packed inside of there like this. When you're pushing that grease in there you want to see it push out and inside the bearings, make sure you get a good coat on it. Once you get that done you're gonna drop it in the large side which is gonna be facing the trailer.
You can see how it kind of tapers smaller at one side than it is on the other, the small side's gonna go in toward the hub.In your kit you're gonna get a large seal, we're gonna put that over the bearing. It's a good idea to use a seal drivers to drive that on, to make sure that it's going on straight. I'll just tap it on and you want the seal just about flush with this edge of your hub, don't have to go all the way down in there. Now we're gonna take some lube and you want to grease up your axle.Next we'll take our hub and slide it onto our axle like that then we'll take our small bearing and we're gonna pack the grease in our small bearing the same way we did our large one. When you put your small bearing in again you want to make sure that the smaller side of the bearing is going in towards the hub.
Now we
Видео etrailer Trailer Idler Hub Assembly Installation канала etrailer.com
Показать
Комментарии отсутствуют
Информация о видео
Другие видео канала
 How to Replace a Trailer Hub Quick and Easy
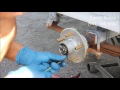 How To Replace Wheel Hub on Boat Trailer
 **DETAILED** Trailer Hub & Bearing installation // Timbren 3500
 How To Replace RV Trailer Brakes, Hubs, Rotors & Repack Bearing Grease
 How to Assemble and Install a Wheel Hub Kit for Your Boat Trailer
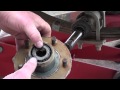 Pt.1 Boat Trailer Bearing Service At D-Ray's Shop
 How To Replace Wheel Hubs/Bearings On A Boat Trailer Easy Step By Step Instructions
 PRESS-IN WHEEL BEARINGS LIKE A PRO WITHOUT A PRESS! | Version 2.0
![How to Repack Trailer Wheel Bearings [Start to Finish]](https://i.ytimg.com/vi/H3J4NSFTnY4/default.jpg) How to Repack Trailer Wheel Bearings [Start to Finish]
How to Repack Trailer Wheel Bearings [Start to Finish] Timken Tricks of the Trade: Trailer Wheel Bearing Maintenance
 How To Determine Your Trailer Hub Size
 How to replace U joints with no special tools
 Making a new trailer axle #2021
 Utility Trailer - Installing new axle and Hubs
 Trailer Wheel Bearing Grease Repack - RV Travel Trailer & Fifth Wheel
 HOW TO ASSEMBLE AND INSTALL A 5 LUG HUB FOR YOUR BOAT TRAILER
 Pt.2 Boat Trailer Bearing Service At D-Ray's Shop
 How to - Replace Trailer Wheel Bearings // Supercheap Auto
 Trailer Bearings | Boat Trailer Bearing Installation | How to pack Trailer Bearings | Utility Marine