DIY Box Beams | Easy Faux Beams
These faux beams look amazing and I think we found the easiest and quickest way make and install DIY Box Beams! These ceiling beams do not require mitered edges, and we used standard sized boards, so there is no need to rip down any wood. We used 10' long boards and only had to take a 1/2 inch off each board for them to fit perfectly in our tray ceiling. Because our room is very long, we opted for chunky ceiling beams to better fill the scale of the room. We used 1x8x10 boards for the top and bottom, and 1x6x10 boards for the sides (our beams are wider than they are tall, but your don't have to be!).
If you decide to try this project for yourself, I want to see! Tag me on IG @AmandaFallonHomes in your project pictures =)
Let's connect!
Insta: @AmandaFallonHomes
FB: http://Facebook.com/AmandaFallonHomes
Website: http://www.AmandaFallonHomes.com
E-mail: AmandaFallonHomes@Gmail.com
Cell: 714-328-0233
PRODUCTS USED:
- Common Boards : (8) 1x8x10 and (8) 1x6x10 to make (4) total beams.
- Drywall Screws to attach top mounting board to ceiling.
- Trimhead Screws to assemble the U-Beam & to attach U-Beam to top mounting board.
- Drill.
- Wood Filler for small drywall repair (I use Drydex) & touchup paint for walls.
- Stainable Wood Filler (optional) to fill and stain behind trimhead screws.
- Sander to prep the boards that will be exposed.
- Wood Conditioner: Varathane.
- Wood Stain & Staining Pad.
- Circular Saw, or some other method to cut your common board to the needed length (to fit the width of your room). We cut ours at home, but you can have Home Depot or Lowes cut your wood for you at the store -- you just need to know EXACTLY the length you need your wood cut to beforehand.
KEEP IN MIND that the "common" dimensions for wood are not the same as the actual dimensions... for example, a 1"x6" is actually a 3/4"x 5.5". This is especially important to know when you are measuring and marking your room in order to have correct spacing between beams.
My STAIN RECIPE:
I love this mix because it matches my floors so well! First, I soak the wood with wood conditioner. About a half hour later I add the first thin coat of Varathane Classic Gray stain with a staining pad, wiping it off as soon as I put it on. A couple hours after that I add the second thin coat of Classic Gray stain, and immediately follow that up with a thin coat of Varathane Briarsmoke stain, wiping it off as soon as I put it on. The Briarsmoke stain deepens the color and covers the grain slightly.
I also used this stain mix on our DIY Sofa Table & DIY Large Rustic Coffee Table!
Sofa Table Tutorial: @Iy-M
Coffee Table Tutorial: https://youtu.be/FIMykO12rKU
Accent Wall Tutorial: https://youtu.be/EA0SECU--Pc
Please leave me your comments and questions =)
MUSIC
Track: Lemon Fight - Stronger (feat. Jessica Reynoso) [NCS Release]
Music provided by NoCopyrightSounds.
Watch: https://youtu.be/gDwVGS75sUA
Free Download / Stream: http://ncs.io/LFstrongerYO
Track: Unknown Brain - Roots (feat. Attxla) [NCS Release]
Music provided by NoCopyrightSounds
Watch: https://youtu.be/cexPpgmaXhI
Free Download / Stream: http://ncs.io/RootsYO
Видео DIY Box Beams | Easy Faux Beams канала Amanda Fallon, Realtor®
Показать
Комментарии отсутствуют
Информация о видео
Другие видео канала
 DIY Faux Beams Ceiling Makeover | Plank Over Popcorn Ceilings Faux Shiplap
 DIY Rustic Barn Wood Beams - distress wood fast - Mantel Build
 Fake Beams - Smarter Every Day 186
 Maple Box Beams - Building, Scribing, & Installing Production Style Beams
 Would you do this to your ceiling? Accent Trim Install
 Super cheap diy faux wood beams
 Tilton Faux Wood Ceiling Beams | QUICK & EASY TO INSTALL!
 Pro Tips for Installing Faux Beams
 Tape Miter Folding 12' Beams - Perfect Beam Assembly with Just Tape
 DIY Faux Wood Beams (Rental Friendly) | Home Made Happy - Ep. 6
 Building And Installing Rustic DIY FAUX BEAMS
 EASY... Installing Box Beams
 I Made Fake Beams in Our Bedroom
 DIY Rustic Wood Beams
 How to Build a Flat Coffered Ceiling
 How to Make Distressed Barn Beams
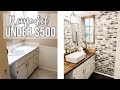 BATHROOM REMODEL UNDER $500 🔨
 Plywood Faux Plank Ceiling
 How To: Build a Coffered Ceiling
 Our New (faux!) Wood Beams & Install