Bob Williams - Bassoon Reeds from Beginning to End
Additional Comments for Reed Making Video
00:42 This is tube cane from Argentina.
00:58 I am spinning the tube against a straight edge to look for the straightest part of the tube to use for the reed.
01:15 First step, find the straightest section and cut to length.This cane saw cuts the tube to the playing length of 120 mm.
01:45 Custom bassoon gouger that thins the cane to a uniform thickness.
02:19 Comparison of gouged and un-gouged cane.
02:30 This stamping pre-shaper cuts cane 2 mm wider then the finished shape.
03:02 The finish shaper machines four pieces of cane at a time.
04:14 Sides of cane are sanded before profiling to remove fibers from the shaping process.
04:30 Cane is profiled one side at a time for a very consistent profile.
05:10 This is a very important step. I use a 1 in plastic dowel, to sand the finished gouged surface. Sanding the inside of the cane smooths out wood fibers that swell when the cane is first put in the water. I use 40, 20, and 9 micron 3M Microfinishing sand paper.
07:26 Beveling the cane helps the tip of the reed stay open and adds strength to the reed to help support weaker notes like the C# and E in the staff. It also helps to seal the reed tube.
08:30 Scoring the cane at the back of the tube helps to round the tube and keep cracks from forming above the first wire when forming the tube.
09:05 It is critical to make sure the collars line up so the reed will be balanced in strength on both sides.
09:20 The first wire is placed 26 mm above the back of the reed measuring from the bottom of the wire. The second wire is placed 8 mm below the first wire.
11:00 Heat the forming mandrel with the alcohol lamp!
11:32 Brass wire cuts are very painful!
12:50 If the cane has been beveled the sides will not come together when the forming mandrel is fully inserted in the reed. Pull the reed back from the shoulder about 2mm, and tighten the wires to get the tube sides to close properly. Un-beveled cane will close when fully inserted.
13:40 Let blank dry completely and then re-tighten all three wires. Stretch the wire and then tighten.
14:35 Reheating the hot glue with the alcohol lamp makes it easier to spread the glue in front of the “ball”.
15:15 Dipping the hot glued reed in ice water will prevent the glue from sagging.
18:30 Mindy Acosta, a flutist, is photographing this video!
20:42 9 micron 3M Microfinishing Sand Paper
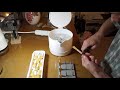
This photograph shows the various steps required to make a reed. In the center is a cane tube from the plantation, and one cut to the proper length. At 10:30 o’clock shows the tube split in 4 pieces. At 12 o’clock is gouged cane. Moving clockwise is rough shaped, then finished shaped, profiled, folded and wired, reed blanks, and finished reeds.
More information is available at www.womblewilliams.net
Видео Bob Williams - Bassoon Reeds from Beginning to End канала Mindi Acosta
00:42 This is tube cane from Argentina.
00:58 I am spinning the tube against a straight edge to look for the straightest part of the tube to use for the reed.
01:15 First step, find the straightest section and cut to length.This cane saw cuts the tube to the playing length of 120 mm.
01:45 Custom bassoon gouger that thins the cane to a uniform thickness.
02:19 Comparison of gouged and un-gouged cane.
02:30 This stamping pre-shaper cuts cane 2 mm wider then the finished shape.
03:02 The finish shaper machines four pieces of cane at a time.
04:14 Sides of cane are sanded before profiling to remove fibers from the shaping process.
04:30 Cane is profiled one side at a time for a very consistent profile.
05:10 This is a very important step. I use a 1 in plastic dowel, to sand the finished gouged surface. Sanding the inside of the cane smooths out wood fibers that swell when the cane is first put in the water. I use 40, 20, and 9 micron 3M Microfinishing sand paper.
07:26 Beveling the cane helps the tip of the reed stay open and adds strength to the reed to help support weaker notes like the C# and E in the staff. It also helps to seal the reed tube.
08:30 Scoring the cane at the back of the tube helps to round the tube and keep cracks from forming above the first wire when forming the tube.
09:05 It is critical to make sure the collars line up so the reed will be balanced in strength on both sides.
09:20 The first wire is placed 26 mm above the back of the reed measuring from the bottom of the wire. The second wire is placed 8 mm below the first wire.
11:00 Heat the forming mandrel with the alcohol lamp!
11:32 Brass wire cuts are very painful!
12:50 If the cane has been beveled the sides will not come together when the forming mandrel is fully inserted in the reed. Pull the reed back from the shoulder about 2mm, and tighten the wires to get the tube sides to close properly. Un-beveled cane will close when fully inserted.
13:40 Let blank dry completely and then re-tighten all three wires. Stretch the wire and then tighten.
14:35 Reheating the hot glue with the alcohol lamp makes it easier to spread the glue in front of the “ball”.
15:15 Dipping the hot glued reed in ice water will prevent the glue from sagging.
18:30 Mindy Acosta, a flutist, is photographing this video!
20:42 9 micron 3M Microfinishing Sand Paper
This photograph shows the various steps required to make a reed. In the center is a cane tube from the plantation, and one cut to the proper length. At 10:30 o’clock shows the tube split in 4 pieces. At 12 o’clock is gouged cane. Moving clockwise is rough shaped, then finished shaped, profiled, folded and wired, reed blanks, and finished reeds.
More information is available at www.womblewilliams.net
Видео Bob Williams - Bassoon Reeds from Beginning to End канала Mindi Acosta
Показать
Комментарии отсутствуют
Информация о видео
Другие видео канала
 Making a Bassoon Reed - from raw cane to finished reed
 Royal Concertgebouw Bassoon Master Class with Simon van Holen: Ravel's Bolero
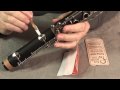 clarivid 60 something to crow about
 Uilleann pipe reed making (english version)
 How to make a clarinet.
 A First Day Scrape with Benjamin Kamins
 Air de Neris - Extrait de Medee - Luigi Cherubini (1760-1842)
 Vivaldi – Concerto in E minor for Bassoon, RV 484, Uniwersytet Muzyczny Fryderyka Chopina
 How to Profile Bassoon Cane Part 2 - advice and warnings
 Making an Oboe Reed
 The bassoon reed - my system - by Mordechai Rechtman
 Making Reeds with Dr. Andrew Parker and the UT Austin Oboe Studio.
 Scraping on Day 1: A Practical Example with Rian Craypo
 Bassoon Reed Making: First Scrape
 Stradivarius of bassoons resurrected
 Just how bad IS a $90 clarinet? And can you hear the difference?
 HOW I MAKE MY REEDS | a step by step video to build your bassoon reeds without special tools
 Professional vs Beginner Bassoon
 How to make reedvalves for pulsejet engines
 Fundamentals of Bassoon Playing