How to Sew an Easy to Clean Diaper Changing Pad! CraftyGarden N. 74
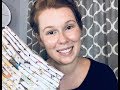
Hello and welcome to CraftyGarden!
Sorry about the sound while I was recording with my phone! I didn't realize it sounded like that until after this uploaded. Hopefully you're all still able to understand me and make a beautiful changing pad!
SIZE OF THE PADS I MADE:
You can make any size you need but here's what I did...
OWL FABRIC PAD with elastic closure- Fabric by Robert Kaufman bought at fabric.com
Cut fabric was 18.75 inches x 28 inches
Finished pad is: 18 inches x 27.25 inches
Noah's Ark Fabric Pad - Fabric found on Etsy
Cut Fabric was 18.25 inches by 21.5 inches
Finished Size - 17.5 inches by 21 inches
Please use Google to convert measurements to your desired unit measurement if needed.
LIST of MATERIALS:
Laminated Cotton Fabric - Amount depends on the size you make but a yard will make you one or two pads depending on the fabric width. (45inch vs 60inch)
Cotton Batting - Sometimes called Wadding. Can be bought in packs or by the yard.
Thread
Sewing needle capable of sewing through laminated cotton. A universal needle in good condition should be fine.
OPTIONAL:
Basting spray to stick the batting to the fabric
elastic (I used a black 1/4 inch wide 7 inch long piece) OR snaps to make it more portable and easy to put in a travel bag. I will not be showing how to do snaps. Sorry.
INSTRUCTIONS: ( I used 1/4 inch seem allowances you can use 3/8 if desired)
*Cut two rectangular pieces of laminated cotton to desired size
*cut one piece of cotton batting or similar material to the same size
*Use basting spray to attach the batting to the WRONG side of one of the pieces of laminated cotton
OR baste the batting to the wrong side of the fabric within the seam allowance 1/8 inch
Optional: Sew on a piece of elastic or fabric tab to one of the laminated cotton pieces. (It should not stick out) See the video for details.
*Place the 2 pieces of fabric right sides together (nice sides together) and sew around at a 1/4 of an inch. Pivot at the corners. Make sure to leave a gap about 3.5-4 inches NOT SEWN so you can turn it right sides out. Back stitch at the start and end of the opening.
*Trim corners or grade the seems. Do NOT cut through the stitches!
*Turn the fabric right sides out.
Optional:
Test your iron on low on a scrap of laminated cotton. Iron the corners of the pad and the use your fingers to turn the opening closed, gently press. Don't rub the iron back and forth!
*Sew around the edge using either a straight stitch or a zigzag stitch. Make sure that you sew close enough to the edge of the pad that your stitches catch and hold the opening closed.
Tada! You have an easy to clean diaper changing pad!
Share your changing pad with everyone!
Use #craftygardenchangingpad to share your finished pad on Instagram!
Видео How to Sew an Easy to Clean Diaper Changing Pad! CraftyGarden N. 74 канала CraftyGarden
Показать
Комментарии отсутствуют
Информация о видео
Другие видео канала
 HOW TO SEW AN EASY BURP CLOTH // EASY BURP CLOTH TUTORIAL // DIY TUTORIAL
 How to Bind a Round Quilt Inside and Outside Sides
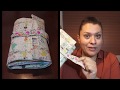 Changing Pad Sewing Tutorial for Beginners // DIY Baby Shower Gift // Grab and Go Changing Pad
 How to Sew a Ribbon Tag Baby Blanket
 How to sew a changing pad and diaper clutch set
 Baby On The GO! The Perfect Baby Gift! Let's Sew This Changing Mat and Wet Bag Pattern!
 baby changing mat pattern
 How To Make Washable Sanitary Pad At Home | Easy Tutorial
 How To Make The Ultimate Baby Bib ~ Waterproof & Reversible Baby Bib
 Baby Changing Pad | The Sewing Room Channel
 10 BEST SEWING PROJECTS FOR BABIES | Best Items to Make for your Baby | Baby Essentials
 Amazing tips for sewing lovers | how to sew a collar | Sewing tips and tricks for beginners
 How to Quilt As You Go- Time Saving Scrap Buster Technique
 Portable Baby Changing Pad (WITH DETACHABLE SHOULDER STRAPS) AMILLIARDI
 Quilting with Rulers on a Domestic Home Sewing Machine: Everything a Beginner Needs to Know
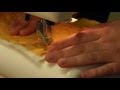 Beginner Free Motion Machine Quilting with Jenny Doan of Missouri Star (Instructional Video)
 Portable Baby Changing Pad (WITH DETACHABLE SHOULDER STRAPS) AMILLIARDI
 5 Ways to Start Crumb Blocks
 Official Jelly Roll Rug Tutorial
 Waterproof baby mat Baby Loovi diaper changing travel pad