Tricia's Creations: Halloween Witchy Hat Wreath with Bonus Craft!
2 FOR 1....
Yet another Dollar Tree Halloween craft with a bonus craft!
Join me as I gather up everything I can possibly grab to create this whimsical witch's hat wreath. Together we figure out just how much we need to fill it up and make it look pretty with leftovers to create a whole other craft. This is super cost effective and so much fun to make!
materials for my halloween witchy hat wreath
boo witch hat wall decor
hanging stockings with shoes door knob decor
hanging witchy sign of your choice
plastic pumpkins and spider rings
jingle bells
deco mesh to match 4 rolls 6 inch by 5 yrds. (2 rolls each of 2 different colors)
decorative halloween ribbon your choice 2 rolls of 3 inch by 3 yrds and any other thinner ribbon.
chenille stems
cotton balls
mod podge
glitter
tulle to match
brush for glue, scissors or rotary cutter with mat, measuring tool, glue gun and glue sticks
First cut off the stockings from the door hanger loop so you have open end on them.
stuff with cotton balls and seal the opening. cut 16 or more chenille stems in half.
prepare your sign by removing from ribbon etc. cut off ring part of spider rings. cut 16
pieces of tulle if you decide to add that. i cut them 6x6 inches. cut mesh in same size as tulle.
i cut 32 pieces of each color of deco mesh. I chose 2 .. one in black and other with orange black
stripes. You may choose to cut more if needed. take one of each color mesh and roll up into curls
using chenille piece tie 2 together to create a bundle. you can add tulle as well to each bundle.
Prepare the witch hat by removing boo cardboard letters. i left the fluffy garland on the top part of
the hat but i removed it off the bottom to add mesh bundles. save whatever garland is removed
for another project. the hat bottom or rim has sections, i placed 5 bundles of mesh bundles to the edge ones
and 3 bundles of mesh to the middles ones. then repeat since it has space for 2 rows. each row will
have 16 so in total that is 32 mesh bundles. you may decide you need more to make it fuller. cut ribbon
into pieces 6 inches long each. crinkle in middle and add to mesh bundles. add as much ribbon in
colors and sizes you choose alternating the ribbons into your mesh bundles. make your mesh bundles as
full as you like and you won't need to make more than 32. Use remainder mesh on roll to wrap around the
top part of your hat like a mummy would be wrapped. use additional chenille stem to tie on end then
tie to tip of hat and start wrapping it kinda folded and overlapping till it's all covered up. end it
using another piece of chennille stem as you did at start to tie it up to hat. use a bit of hot glue
to make sure it's stable. Start adding your mesh bundles to bottom part of hat. plan out how you want them
first if they are different. mine looked really full with just 16 mesh bundles so i only did that and
saved the other 16 for another project. but if you prefer add all 32. using brush.. brush on some
mod podge to top part of hat. brush it on all over or just in spots then sprinkle glitter on it.
shake off excess and let it dry. Attach the legs to the hat from behind with chennille stem and hot glue.
Attach the sign, pumpkins, bells, and spiders to your hat or any other decor you like. add a small ribbon
or chenille stem at top edge to hang your witchy hat wreath.
twitter/instagram: @triciatxlady
thetriciatxlady@gmail.com
https://fodtricia.wixsite.com/triciatxlady
#triciatxlady #craftsnrecipes
Видео Tricia's Creations: Halloween Witchy Hat Wreath with Bonus Craft! канала TriciaTxLady Flores
Показать
Комментарии отсутствуют
Информация о видео
Другие видео канала
 Dollar Tree Witch's Hat Wreath
 Witches Hat Wreath
 SCARECROW! 🍁🌾🍂 | SCARECROW WREATH USING DOLLAR TREE WITCH HAT!!
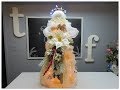 Tricia's Christmas: Deco Mesh Angel with Tomato Cage
 How to make a Halloween wreath poof, ruffles & rolls
 Dollar Tree Christmas Hat, Santa Hat, Ruffle Method
 Tricia's Creations: Birdhouse Wreath
 Tricia's Creations: Valentine's Day Swag /Wreath
 HARRY POTTER INSPIRED TUMBLER CUP | Samantha Culliton
 Halloween Skull With Hat On Candlestick
 Dollar Tree Spooky Splatter Screen Pumpkin
![[DOLLAR TREE WITCH HAT] DIY Dollar Tree Witch Hat Using Scarf Replay Wreath Tutorial](https://i.ytimg.com/vi/iUWEi3f5kGk/default.jpg) [DOLLAR TREE WITCH HAT] DIY Dollar Tree Witch Hat Using Scarf Replay Wreath Tutorial
[DOLLAR TREE WITCH HAT] DIY Dollar Tree Witch Hat Using Scarf Replay Wreath Tutorial Halloween How-To - The Witch's Broom
 2021 Floral Design: Happy Mother's Day Arrangement: Say It With Flowers Collab
 Deco Mesh Ruffle Wreath Tutorial/Mesh Wreath with Ribbon/Beginner Wreath
 Tricia's Creations Special Christmas For My Mom Deco Mesh Wreath Project 1 of 2 videos
 Grammy’s Loop wreath tutorial featuring dollar tree items!
 Halloween Decor DIY Dollar Tree 2020 #halloweendiy
 Dollar tree Santa hat wreath