BUILDING RED SANDSTONE WALL | DETAIL TUTORIAL | PROFESSIONAL MASONRY DIY TIPS, NATURAL STONE HOW TO
video is not sponsored! please check out tools links:
COLLOMIXER: https://amzn.to/2QwUlUD
sledge hammer: https://amzn.to/2I9mRaL
club hammer: https://amzn.to/2VyrZIS
safety glasses: https://amzn.to/2D5ip93
work shoes: https://amzn.to/2UnUo7Z
work pants: https://amzn.to/2D2Rkn1
work gloves: https://amzn.to/2FXKFuR
If you buy something through these links, I'll get a commission, of course without you having to pay more. I hope you liked the video, thanks for your support!
IF MY VIDEO HELPED YOU, FEEL FREE TO DONATE TO SUPPORT MY WORK! THANK YOU! PAYPALme: http://bit.ly/supportCarl
Hello and welcome this is Carl the Landscape Guy. Today is about the creation of a mortared sandstone wall and the natural stone expert Vangjeli has agreed to give a few tips. We will look at what he’s doing and I thank you for following along. This wall is going to be 2.5 meters high functioning as an enclosure on the side of the patio and of course this height can only be managed by using lime mortar. The weird shaped stones make building the walls a challenge. Therefore, I am happy that Vangjeli will show us how it works. Last time he prepared the stones for this wall and cut them, I will link the video up here and at the end again. Below in the video description there is more information about this project. Vangjeli, would you be so kind as to tell us what is important. Here we build a natural sandstone wall, it is a pretty soft red regional sandstone and there are a few things to look out for. We work with continuous joint lines. But they don’t run all the way through. After 3-4 stones we jump with the line up or down by setting a bigger or smaller stone. We are using strings to help get a nice, straight wall. On the wall, we set a vertical string on each side of the wall. Then you can move your horizontal strings up and down as you need. So the next stone is to be set here and we want to jump up with the level. We will use a thicker stone. Using different stones in sizes throughout the wall gives it that special, natural, ancient look. You can also use one string, that's what we do on the back side which won't be visible really later. But up front it's better with two strings. And then you support the big stones with little ones in the middle. And don't forget the mortar, that's very important. By the way many people say these type of walls don't have to be so wide. A wall must be 50 cm wide. Because the stones have to overlap in the middle. You need at least 3 to 4 big ones per square meter off wall that overlap well. And if you make it only 30 cm thick, we don't have enough room for overlapping the stones. For example, like here this one, it goes over here and that helps to last very long. If a wall is only 1.2 m, that's a different story but here the customer wants a 2.5m high wall and i highly recommend 50 cm of width. People want to save stones and mortar but that's nonsense. Of course we have scrap stones from shaping the rocks. But whatever lies around down here we will use in the middle to fill up the gaps. All the little ones we do not need come in the middle. Nicely mixed with enough mortar to make it sturdy and support the big stones. Now let's continue here. I chose this one because it has the right thickness and fits pretty good up in here. We watch out not to change levels with each stone meaning to jump up and down. Because then we will have problems with the next layer. So we keep this part of the row relatively level. So first i bring it to the right length. Only a little comes off. I do that by eye. Now take the humps off so that it lays nice and flat. Smoothening the edges a bit and then put it in place. And see how nicely it fits. Yes, that fits exactly where we want it. We need a little more mortar because that is not enough. And here we go, it’s nice and solid and this row is finished on that side. Here we have a very good one. I chose it because its very thin and it fits perfectly, I think. I check the face of the stone, which is gonna be the front, by sighting along it. I carefully break the corners. But I have to be careful because otherwise it will break somewhere else since it's so thin. So now we can put that in our wall. Of course some mortar underneath. By the way the mortar has to go more in the back because if we push the stone in place it should not come out the front. This customer wants a wall with open joints, meaning not filled. This one here is only 1 cm to big. Sometimes I'm not sure and before I take off too much I’d rather hold it in place to check. I am taking the thinner side off a little bit. I have to be careful with this one. Oh too late. But it's not too bad. We will still put it in there anyway? Thats the great thing about natural stones, we can just shape them different and it will still look very good. Here I also take off a bit here so that the back sits a little lower. I am taking the corners out a little and we can set it like this.
#masonry #naturalstone #wall
Видео BUILDING RED SANDSTONE WALL | DETAIL TUTORIAL | PROFESSIONAL MASONRY DIY TIPS, NATURAL STONE HOW TO канала CarlTheLandscapeGuy
Показать
Комментарии отсутствуют
Информация о видео
Другие видео канала
 Building Stone Retaining Wall
 How to Cut Stone with Hand Tools | Ask This Old House
 Repointing a Stone Wall with Lime Mortar
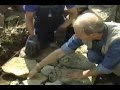 Walls of Stone: How to Build Drystone Walls and Rock Fences
 How to Install Veneer Stone
 Реконструкция старого каменного дома на глину. Часть 8. Начало строительства стен
 How to Cut and Shape Stones | Ask This Old House
 How To Make Wall Cladding Natural Stone Texture | Homemade Wall Natural Stone
 DRY STONE WALL BUILD, NATURAL STONE GARDEN WALL, PROFESSIONAL INSTRUCTION TIP, SET PORPHYRY YOURSELF
 Basement Stone Walls
 Stone Masonry Fundamentals
 PREPARING NATURAL STONE FOR WALL BUILD | SHAPING SANDSTONE SQUARE ROCK CARVING PROCESSING BY HAND
 STREAM DETAIL BUILD,START TO FINISH,COMPLETE WATER FEATURE GARDEN TUTORIAL,HOW TO DIY PONDLESS FALLS
 Go with Dry Stone Walling
 Небольшая ниша-арка из камня. Мастер-класс
 Primitive Life:Build a new house from stone! full video!
 How to Build Arches With Natural Stone
 How to mix lime mortar for pointing stone walls
 BUILDING STONE PILLARS or COLUMNS (Part 2) Mike Haduck
 Подпорная стена. Технология строительства