Samsung Galaxy Tab S2 8.0 Display Assembly Repair - Fixez.com
https://www.fixez.com presents the official Samsung Galaxy Tab S2 8.0 Screen Replacement Guide. Life is full of annoyances, but dealing with a cracked 8-inch Tab S2 display assembly does not have to be one of them! Following the step-by-step Galaxy Tab S2 screen repair instructions we have provided will help you safely replace a damaged or faulty display assembly. Visit Fixez.com for all of the DIY Samsung Galaxy Tab S2 8.0 replacement screens, parts and tools you need to fix your cell phone quickly, and affordably. https://www.fixez.com/store/samsung/samsung-galaxy-tab-s2/samsung-galaxy-tab-s2-8-0-2015
If you need your Samsung Galaxy Tab S2 8.0 repaired ASAP instead- we have you covered there too. Contact one of our skilled technicians at 866-233-6460 or support@fixez.com and they will fix your device for you. They are available Monday – Friday, 9am to 5pm PST.
Subscribe to our YouTube Channel for additional DIY smartphone and tablet teardown and repair videos! https://www.youtube.com/channel/UCDJrZCUtdJQaJq0akRCt3Ng
Like us on Facebook: https://www.facebook.com/fixez.com
Follow us on Twitter: https://twitter.com/fixezdotcom
Samsung Galaxy Tab S2 8.0 Display Assembly Repair Video Transcription:
Warning:
You are performing this repair at your own risk
We claim no responsibility for any damages that might occur
The DIY Galaxy Tab S2 repair tools used in this video can be found here: https://www.fixez.com/categories/repair-tools
Step 1
Power down your Samsung Galaxy Tab S2 tablet.
Step 2 (Samsung Galaxy Tab S2 8.0 microSD Card Tray)
Eject the microSD card tray.
Step 3 (Samsung Galaxy Tab S2 8.0 Display Assembly)
Begin to free the 8-inch Tab S2 display assembly by using the heat gun to warm up the adhesive.
With a suction cup and precision knife carefully create separation and insert a playing card to start slicing through the adhesive.
Take your time and apply additional heat as needed. Patiently work around the Tab S2 display assembly with playing cards to free it from the tablet.
The Galaxy Tab S2 screen is still connected to the motherboard. Do not try to remove it completely, or you will damage the data cable connecting the display to the tablet.
Remove the display cable bracket.
Use the spudger to disconnect the display cable and remove the Samsung Galaxy Tab S2 8-inch display assembly.
* To reassemble your device, follow the steps in reverse order.
Видео Samsung Galaxy Tab S2 8.0 Display Assembly Repair - Fixez.com канала Fixez.com
Показать
Комментарии отсутствуют
Информация о видео
Другие видео канала
 🔧Galaxy TAB S Glass Only Replacement - FULL GUIDE
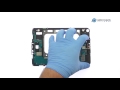 Samsung Galaxy Tab S2 8.0 Take Apart Repair Guide - RepairsUniverse
 Samsung Galaxy Note8 Display Assembly (LCD & Digitizer) Repair - Fixez.com
 How to fix Black Screen on Samsung Galaxy Tab (SM-T585, A6/A10.1 2016, many more)
 Samsung Galaxy Tab S2 9.7” SM-T810 SM-T813 SM-T815 Disassembly Screen LCD Battery Replacement Guide
 Samsung Galaxy Tablets black screen Fixed!
 How to Replace Your Samsung Galaxy Tab S2 8.0 Battery
 Samsung Galaxy Note8 Battery Repair - Fixez.com
 Destroyed Phone Restoration | Restore Samsung Galaxy S7 edge | Rebuild Broken Phone
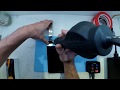 samsung galaxy Tab S2 8.0" SM-T710 SM-T713 Display replacement
 Galaxy Tab 2 10.1 charging problems
 Samsung TAB S / SM- 705 LCD Repair | cara ganti lcd samsung tab S
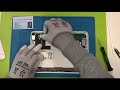 Samsung Galaxy Tab S2 T810 T813 T815 Akku Battery Tausch wechseln
 SM-T813 Galaxy S2 tablet no power + Bonus iPhone 6S+ no touch repair
 How to replace Glass - Digitizer on a Samsung Galaxy TAB S2 8.0 Model SM T710
 ALL Galaxy Tab A FIXED: Black Screen of Death, Frozen, Unresponsive, Boot Loop (4 Solutions)
 Samsunng Tab S2 Replace Battery (三星Tab S2 更換電池)
 How to Replace Your Samsung GALAXY Tab S2 8.0 SM-T715Y Battery
 Samsung Tab s2 8" sostituzione cambio batteria